MacOS
Quickstart
1. Install Docker or Podman
Install Docker from here: https://docs.docker.com/get-docker/ Alternatively, Neurodesk also works with Podman, follow the Podman installation instructions provided at https://podman.io/docs/installation.
Docker for MacOS by default runs with 2GB Memory. For actual workloads, 4GB Memory minimum for docker is highly recommended. You need to adjust this:
- Open the Docker Desktop and Navigate to the Settings. Then navigate to the “Resources” section.
- Increase the Memory slider from 2.00 GB to 4.00 GB (or greater)
- Increase Swap slider from 1GB to 2GB (or greater)
2. Run Neurodesktop
Use one of the following options to run Neurodesktop:
Option 1 (Recommended): Neurodesk-App
Instructions on installing and using the app: https://www.neurodesk.org/docs/getting-started/neurodesktop/neurodeskapp/
Option 2 (Advanced): Using Terminal
Create a local folder where the downloaded applications will be stored, e.g. ~/neurodesktop-storage
- Open a terminal, and type the following command to automatically download the neurodesktop container and run it
docker volume create neurodesk-home &&
docker run \
--shm-size=1gb -it --privileged --user=root --name neurodesktop \
-v ~/neurodesktop-storage:/neurodesktop-storage \
--mount source=neurodesk-home,target=/home/jovyan \
-e NB_UID="$(id -u)" -e NB_GID="$(id -g)" \
-p 8888:8888 -e NEURODESKTOP_VERSION=2025-06-10 vnmd/neurodesktop:2025-06-10
If you get errors in neurodesktop then check if the ~/neurodesktop-storage directory is writable for all users. If it is not, run chmod a+rwx ~/neurodesktop-storage
- Once neurodesktop is downloaded, leave the terminal open and check which server neurodesktop running on (Avoid pressing CTRL+C).
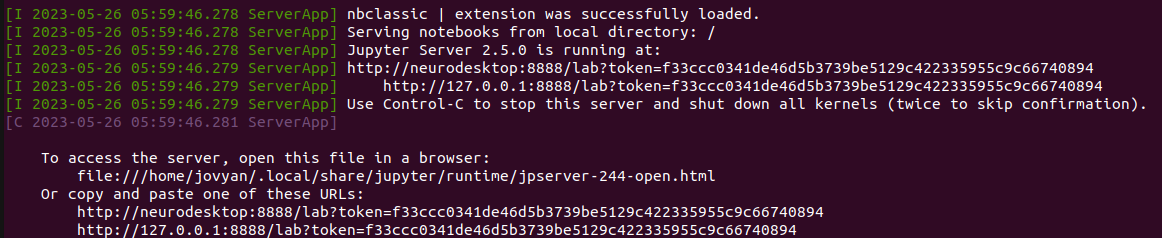
- To access neurodesktop, open your web browser and navigate to one of the URLs shown in your terminal (e.g.
http://127.0.0.1:8888/lab?token=your_unique_token).
If prompted, press on “Desktop RDP - changes resolution by resizing window and waiting for refresh” or “Desktop VNC - changes resolution by running lxrandr on a terminal” under “ALL CONNECTIONS”
If it is the first time you use Neurodesktop, wait until the desktop appears (it may take a few seconds). Otherwise, it should appear instantaneously.
Neurodesk is ready to use! See the tutorials page for advice on how to use Neurodesk.
Deleting neurodesktop:
When done processing your data it is important to stop and remove the container - otherwise the next start or container update will give an error ("… The container name “/neurodesktop” is already in use…")
Note
Note that any data that were saved outside of /neurodesktop-storage would be lost. Please make sure to move all your data to that folder before deleting neurodesktop.Click on the terminal from which you ran neurodesktop
Press control-C
Type:
docker stop neurodesktop
- Type:
docker rm neurodesktop