Ensure you note the release date of the Neurodesktop container image during installation, as it is indicated in the docker run command, e.g.
We regularly update Neurodesktop for optimal performance and updated software. Check the Release History for past releases. To upgrade your container, replace the release number with your desired version. For replicable analysis pipelines, share the stable release number you used, enabling others to recreate your work environment anywhere.
Video tutorial
See below for a 14 minute tutorial on getting started.
1 - Local
For simple interface and local installation
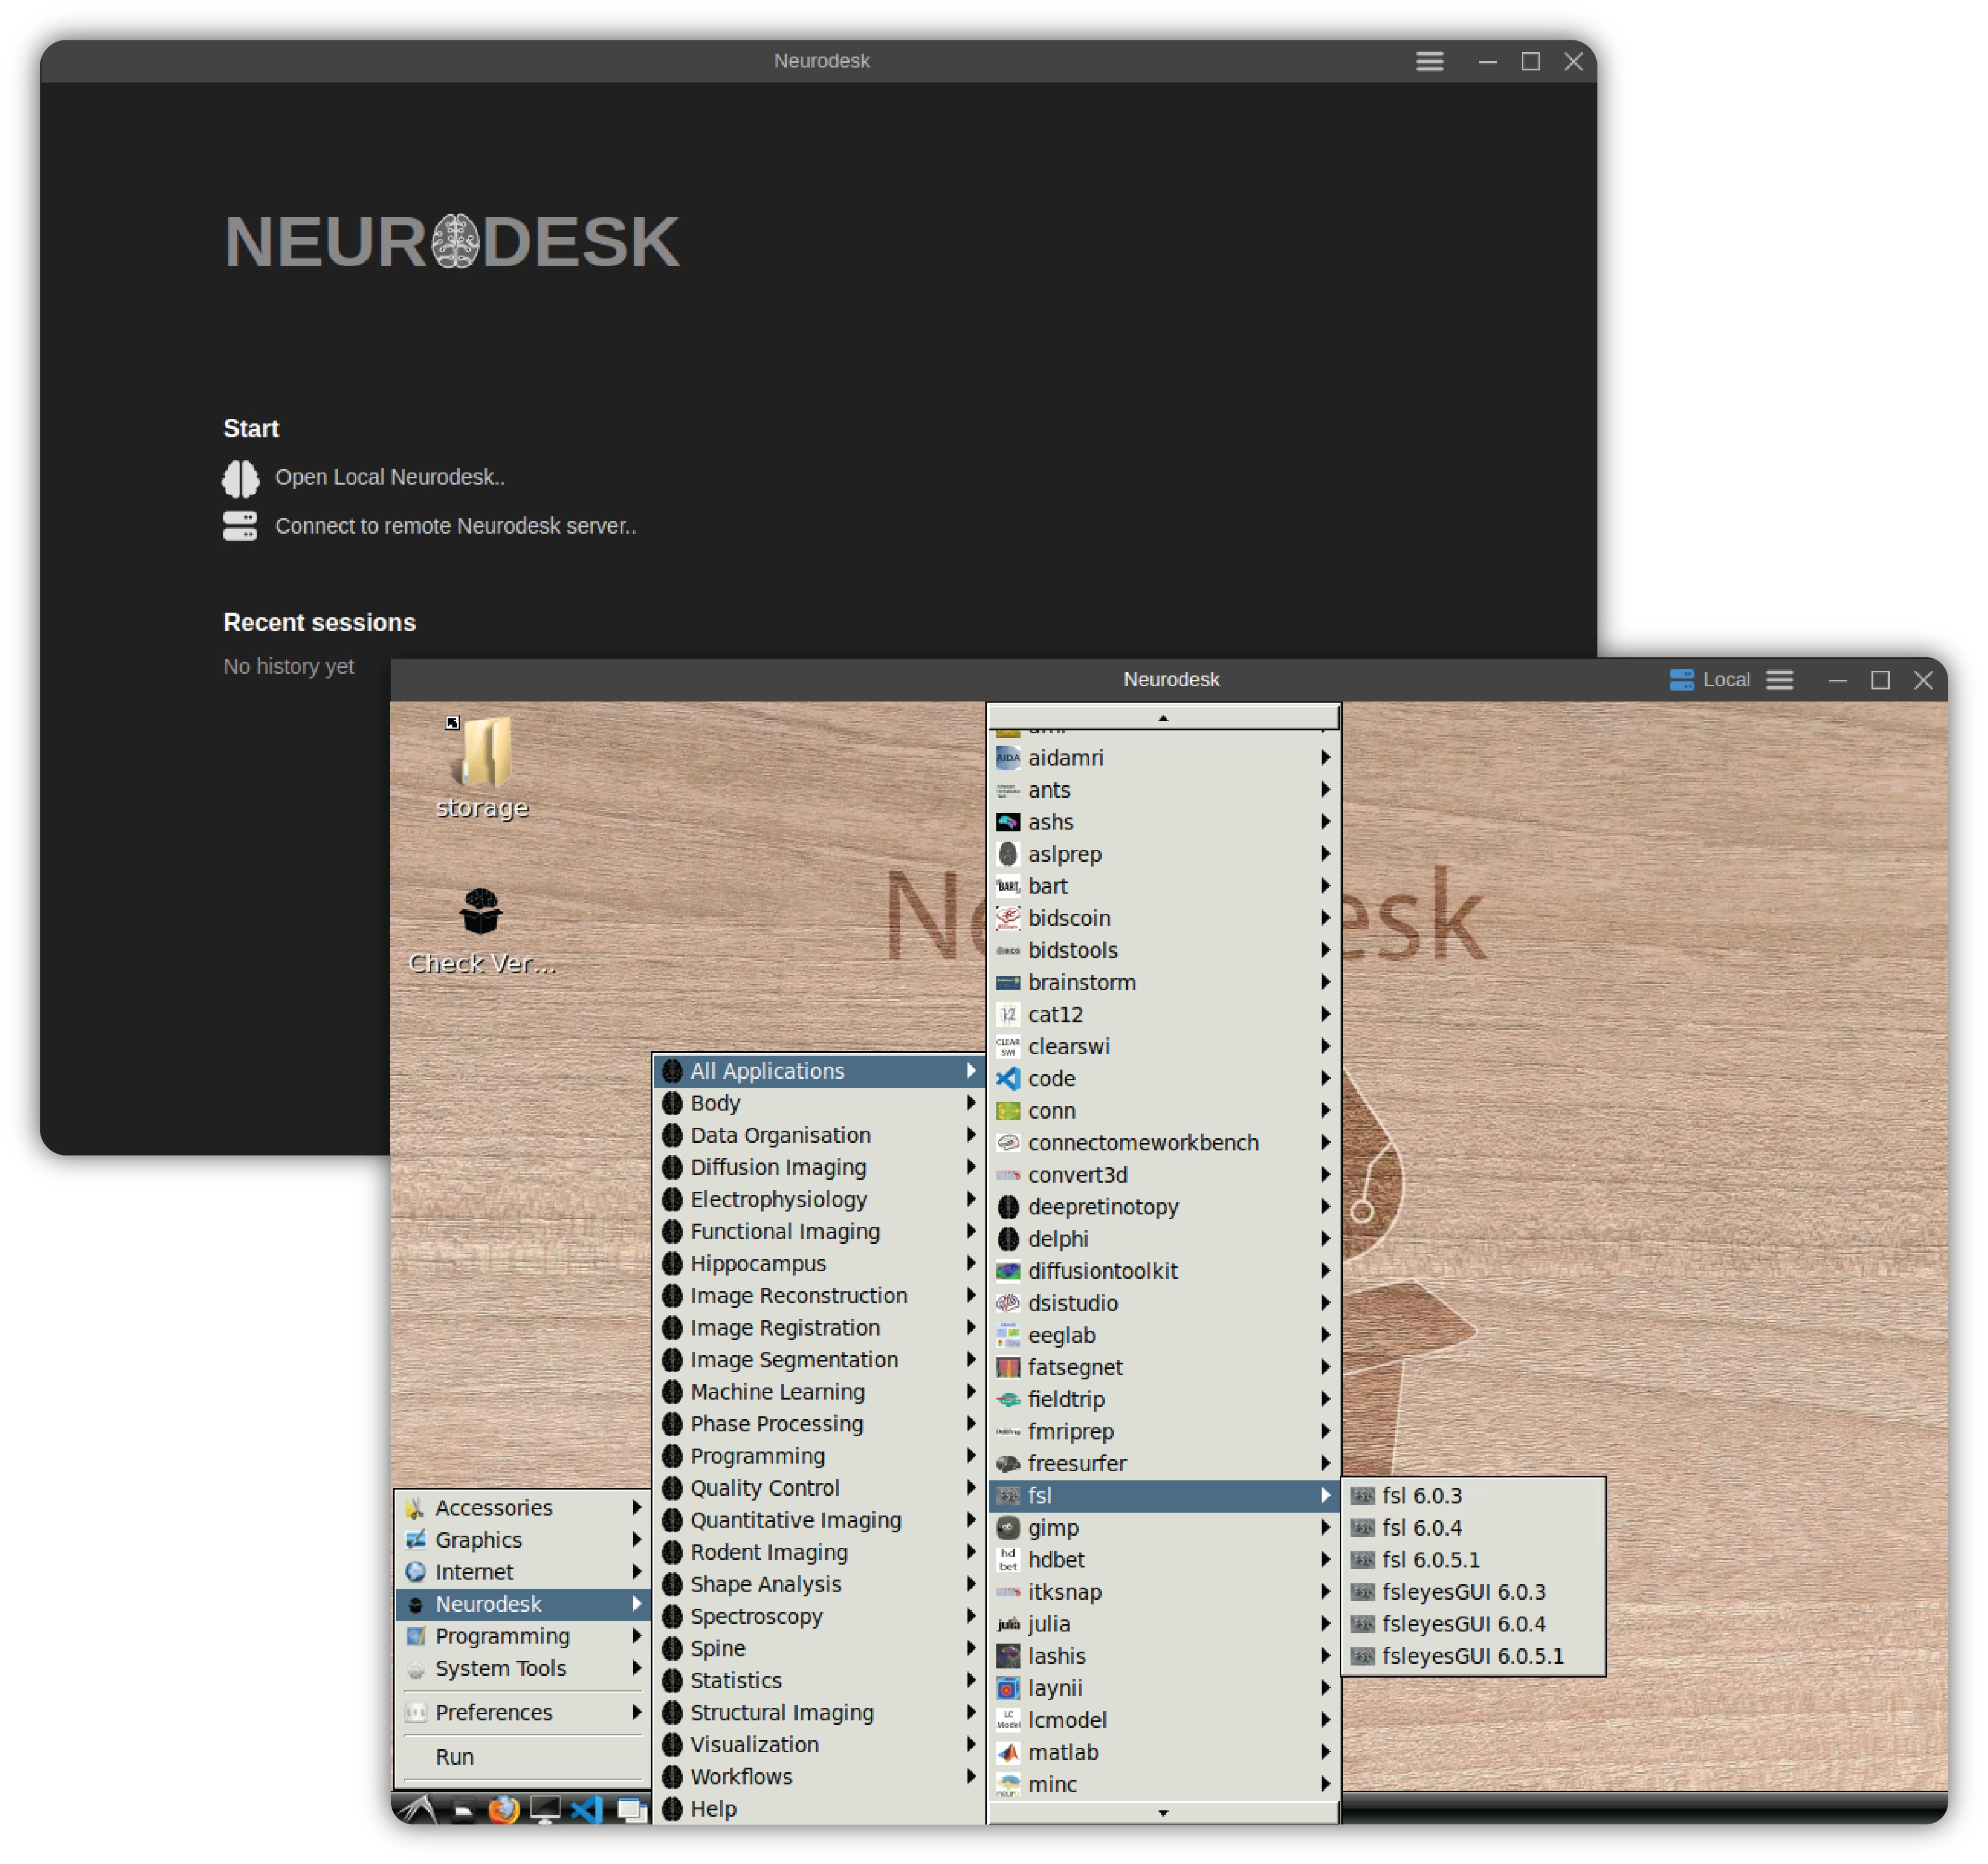
1.1 - Neurodesk App
A cross-platform desktop application for Neurodesk: The easiest way to use Neurodesktop
Determine System Privileges
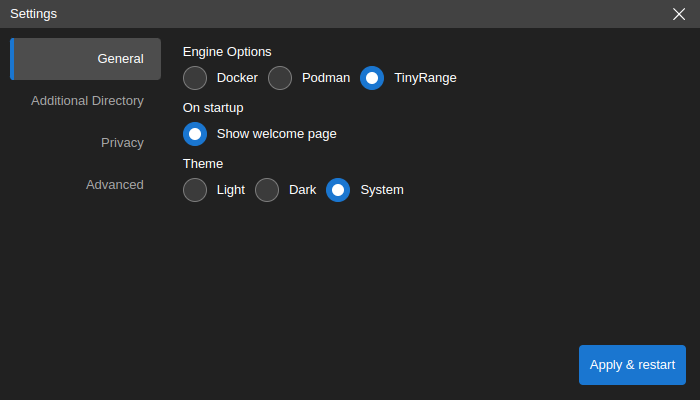
Before running the app, check whether your system has privileged access (root/admin permissions). This determines which engine you need to use to run the app:
If you have privileged access → Use Docker or Podman Engine
If you do NOT have privileged access → Use TinyRange Engine, or run remote instance
Minimum System Requirements
At least 5GB free space for neurodesktop base image.
One of the following options, depending on system privileges:
With privileged access: Docker or Podman to run respective engines
Without privileged access: QEMU and Go to use TinyRange Engine
After installation, open a terminal (Linux/macOS) or command prompt (Windows) and run the following command to verify that Docker is working correctly:
docker --version
docker run hello-world
Install QEMU
For Linux, QEMU can be installed with apt install qemu-system-x86_64 on Debian derived distributions and dnf install qemu-system-x86_64 on Red Hat derived distributions.
For macOS, QEMU can be installed with brew install qemu.
Once installed, open a terminal (Linux/macOS) or command prompt (Windows) and run the following command to verify:
qemu-system-x86_64 --version
For Windows, QEMU is packaged in the application so users don’t need to install it.
Installing Neurodesk App
If you have an existing Neurodesk App installation, please first uninstall it by following the uninstall instructions here. Then, install the app for your system:
Debian, Ubuntu Linux Installer: sudo apt install -f ./NeurodeskApp-Setup-Debian.deb
Red Hat, Fedora, SUSE Linux Installer: sudo rpm -i NeurodeskApp-Setup-Fedora.rpm
Arch-based package via AUR: yay neurodesk (or follow instructions here)
macOS Installer: Double click the downloaded dmg file, then drag the NeurodeskApp.app to the Applications folder; for starting the app: Right click on the NeurodeskApp.app and select “Open”. For Apple Silicon systems (M1/M2): Make sure to enable Rosetta support in the docker settings for best performance!
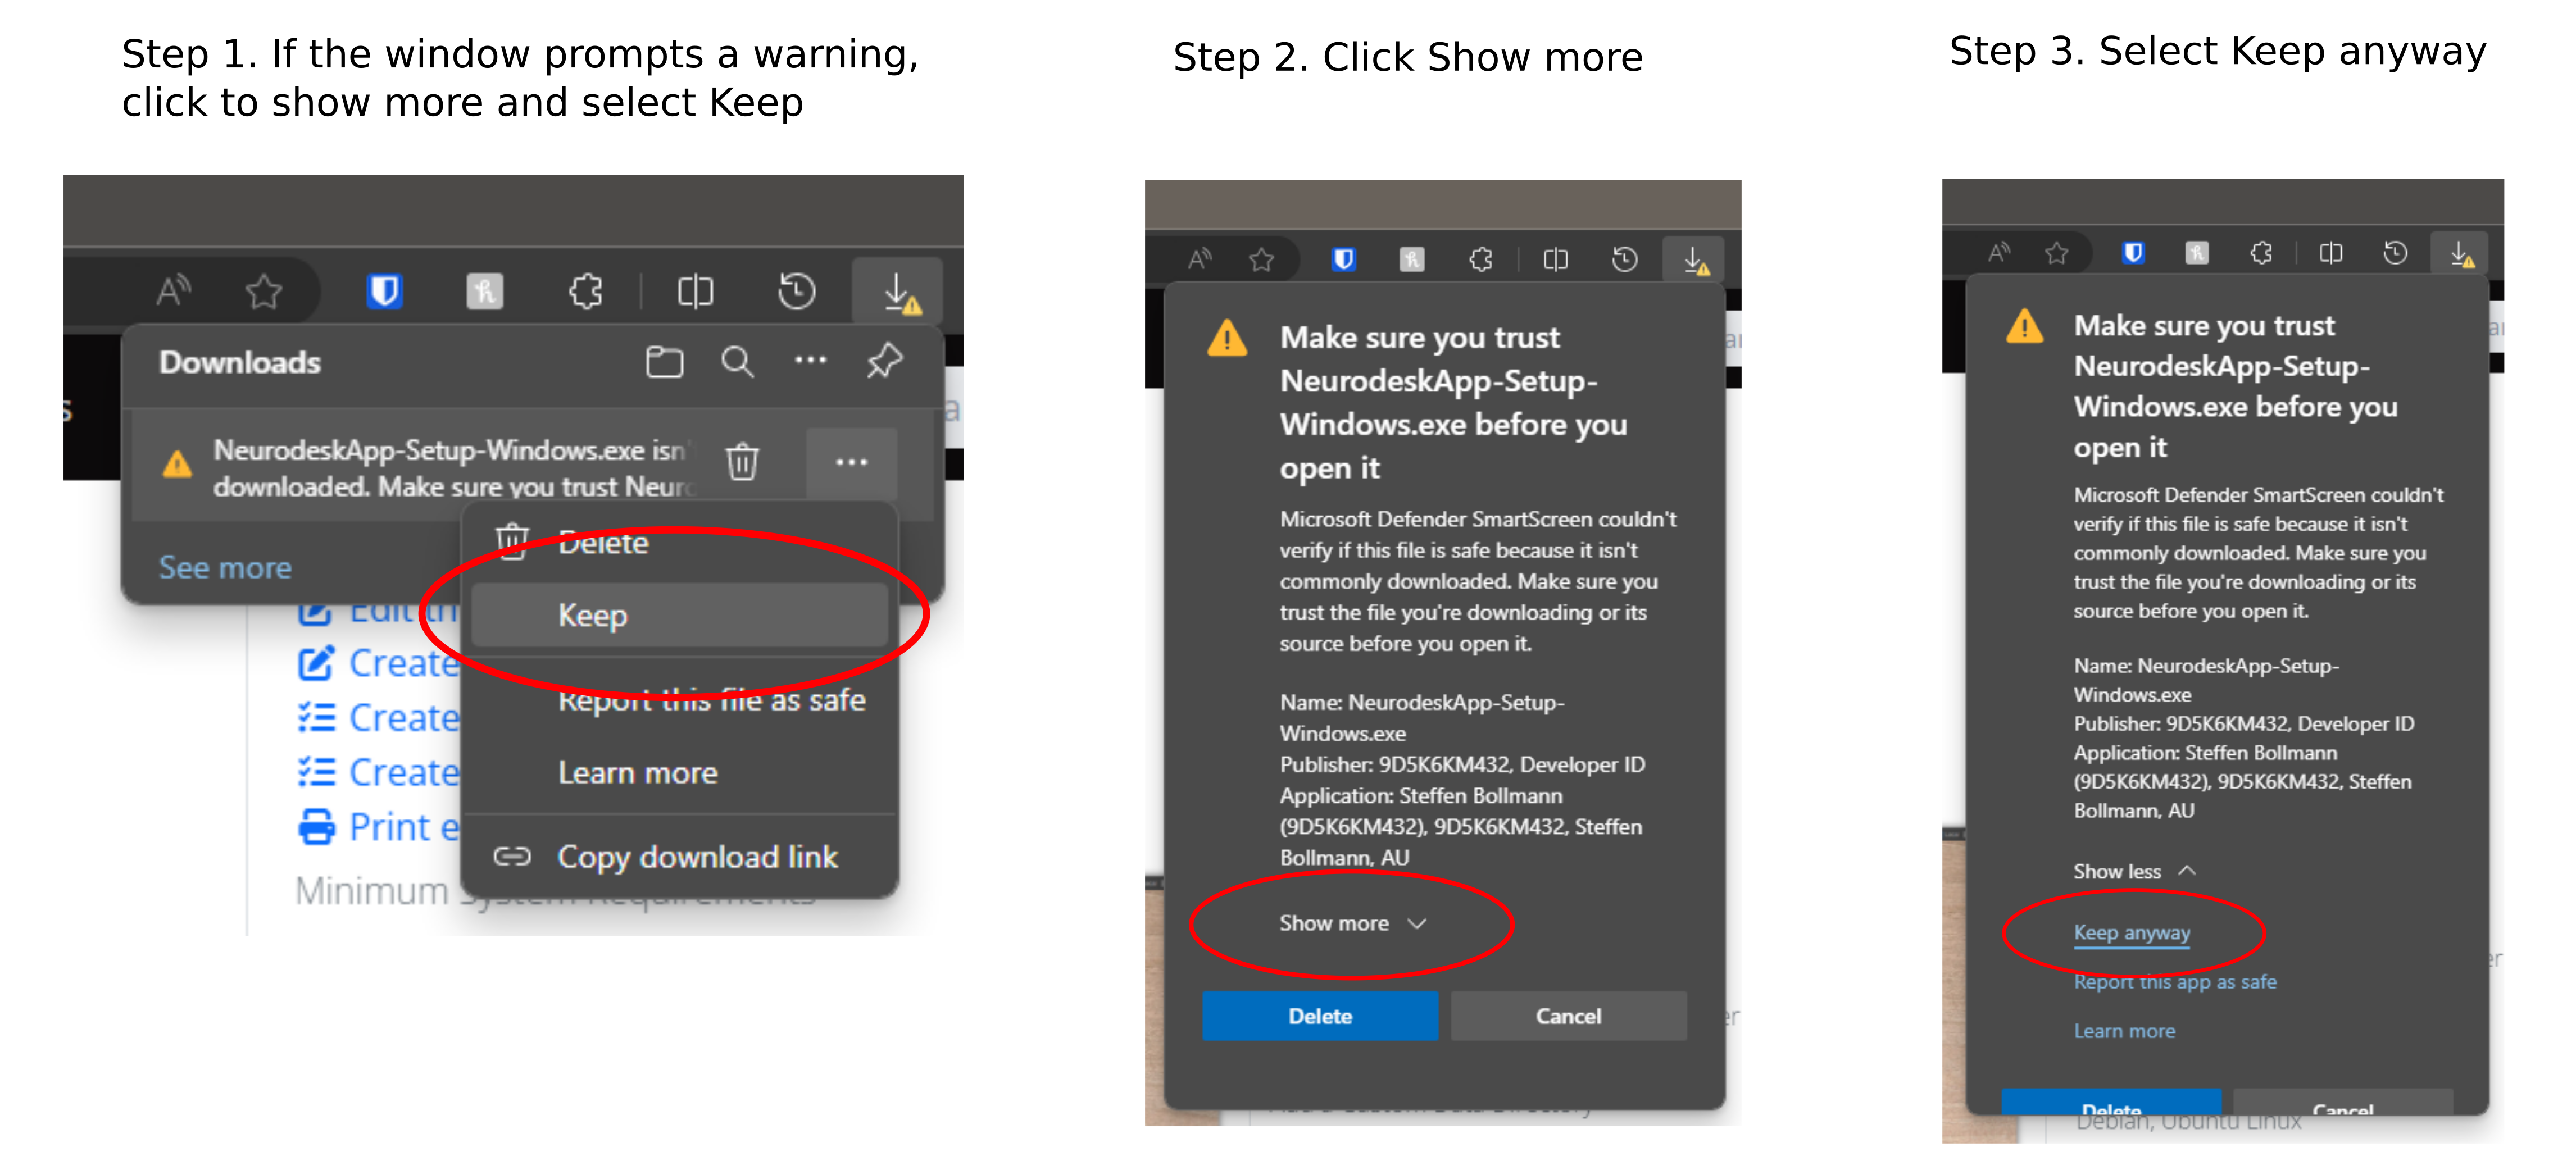
Windows Installer: Double click the downloaded exe file; Accept to install from an unknown publisher with Yes; then accept the license agreement and click finish at the end.
Launching Neurodesk App
The Neurodesk App can be launched directly from your operating system’s application menu, or by running the neurodeskapp command in the command line.
Note that the Neurodesk App will set the File Browser’s root directory based on the launch method used. The default working directory is the user’s home directory - this can be customized from the Settings dialog.
Sessions and Projects
Sessions represent local project launches and connections to existing Neurodesk servers. Each Neurodesk UI window in the app is associated with a separate session and sessions can be restored with the same configuration later on.
Session start options
You can start a new session by using the links at the Start section of the Welcome Page.
Open Local Neurodesk.. creates a new session in the default working directory.
Connect to remote Neurodesk server.. creates a session by connecting to a remote Neurodesk server.
Previously opened sessions are stored as part of application data and they are listed on the Welcome Page. Clicking an item in the Recent sessions list restores the selected session.
Connecting to local Neurodesk
Neurodesk App creates new Neurodesk sessions by launching a locally running Neurodesk server and connecting to it. To open a local instance, click the Open Local Neurodesk.. button in the Start section of the Welcome Page.
This will show a Jupyterlab interface. There are two options to interact with Neurodesk through this interface:
By clicking the NeurodeskApp icon on the right. This will launch a new window to start a Neurodesk interface.
By module loading containers on the left bar. You can interact with loaded modules through the command line interface.
Connecting to a remote Neurodesk Server
It can also connect to an existing Neurodesk server instance that is running remotely. In order to connect to a server, click the Connect to remote Neurodesk server.. button in the Start section of the Welcome Page.
This will launch a dialog that automatically lists the remote Neurodesk server instances.
Select a server from the list or enter the URL of the Neurodesk application server. If the server requires a token for authentication, make sure to include it as a query parameter of the URL as well (/lab?token=<token-value>). After entering a URL hit Enter key to connect.
If the Persist session data option is checked, then the session information is stored and Neurodesk App will re-use this data on the next launch. If this option is not checked, the session data is automatically deleted at the next launch and servers requiring authentication will prompt for re-login.
You can delete the stored session data manually at any time by using the Clear History option in the Privacy tab of Settings dialog.
Configuration and data files
Neurodesk App stores data in ~/neurodesktop-storage for Linux and Mac, or C:/neurodesktop-storage for Windows, as default.
Add a Custom Data Directory
Neurodesk App stores its data in the following locations:
By default, /home/jovyan/neurodesktop-storage in the app (which is bound with local directory ~/neurodesktop-storage in Unix/MacOS or C:/neurodesktop-storage in Windows)
By choice, in the settings window below, select Additional Directory on the left side bar, click Change button to select the local directory, then click Apply & restart. The next time you start the app, the data from the local directory can be found in /home/jovyan/data.
If you are using Windows it is currently not possible to mount external hard drives. We recommend copying data from the external drive to your local disk first and then processing it in Neurodesk.
If you are using MacOS and Docker mounting an external hard drive will work out of the box. If you are using Podman you have to modify the Podman machine settings with the following commands once and then set the path in the Neurodesk App:
If you see the error “FATAL:setuid_sandbox_host.cc(158)] The SUID sandbox helper binary was found, but is not configured correctly. Rather than run without sandboxing I’m aborting now. You need to make sure that /opt/NeurodeskApp/chrome-sandbox is owned by root and has mode 4755.
Trace/breakpoint trap (core dumped)” this is caused by a recent change in Ubuntu 24.04.
A temporary workaround: Create the file /etc/apparmor.d/neurodeskapp
With this content:
# This profile allows everything and only exists to give the
# application a name instead of having the label "unconfined"

abi <abi/4.0>,
include <tunables/global>

profile neurodeskapp "/opt/NeurodeskApp/neurodeskapp" flags=(unconfined) {
  userns,

  # Site-specific additions and overrides. See local/README for details.
  include if exists <local/neurodeskapp>
}
Then restart your computer. Then try to start the neurodesk app again.
Find the application installation NeurodeskApp.app in Finder (in /Applications or ~/Applications) and move to Trash by using CMD + Delete. Clean other application generated files using:
rm -rf ~/Library/neurodeskapp # to remove application cacherm -rf ~/Library/Application\ Support/neurodeskapp # to remove user data
Windows
On Windows, go to Windows Apps & Features dialog using Start Menu -> Settings -> Apps and uninstall Neurodesk App as shown below.
In order to remove application cache, delete C:\Users\<username>\AppData\Roaming\neurodeskapp directory. The AppData directory is a hidden directory - so make sure to activate hidden Items in the Windows explorer under View -> Show -> Hidden Items
2 - Hosted
For quick access to Neurodesk on the cloud or HPC systems
2.1 - Bunya
Use Neurodesk on Bunya (only for researchers with access to Bunya!)
Neurodesk is installed at the University of Queensland’s supercomputer “Bunya”. To access neurodesk tools you need to be in an interactive job (so either start a virtual desktop via Open On-Demand: https://bunya-ondemand.rcc.uq.edu.au/pun/sys/dashboard) or run:
module use /sw/local/rocky8/noarch/neuro/software/neurocommand/local/containers/modules/export APPTAINER_BINDPATH=/scratch,/QRISdata
Now you can list all modules (Neurodesk modules are the first ones in the list):
ml av
Or you can module load any tool you need:
ml qsmxt/6.4.1
If you want to use GUI applications (fsleyes, afni, suma, …) you need to overwrite the temporary directory to be /tmp (otherwise you get an error that it cannot connect to the DISPLAY):
export TMPDIR=/tmp
NOTE: MRIQC has its $HOME variable hardcoded to be /home/mriqc. This leads to problems on Bunya. A workaround is to run this before mriqc:
The plug-and-play, browser-accessible, containerised data analysis environment.
Video tutorial
See below for a 4 minute tutorial on Installation, Usage and Data Access with Neurodesktop
3.1 - Portable Unprivileged NeuroDesktop
An unprivileged option for running NeuroDesktop without Docker or Podman.
Minimum System Requirements
At least 5GB free space for neurodesktop base image
At least 8GB of RAM
Downloading TinyRange
TinyRange (https://github.com/tinyrange/tinyrange) is a lightweight runtime for running Virtual Machines and Containers. It runs without admin privileges and doesn’t need Docker or Podman installed to work.
CPU Cores: Add --cpu 8 to set the VM to 8 CPU cores.
RAM: Add --ram 8192 to set 8GB of RAM for the Virtual Machine.
Storage: Add --storage 16384 to allocate 16GB of disk for the Virtual MAchine.
Enabling Hardware Acceleration
Windows: This might require admin privileges in some cases. Search in your start menu for “Turn Windows features on or off.”. Find “Hyper-V Hypervisor” or “Windows Hypervisor Platform” and make sure it’s enabled. Then restart your computer.
Ubuntu/Other Linux: It should already work out of the box. If not make sure your user account has permission to read/write /dev/kvm.
MacOS: No extra steps required. It already works.
3.2 - Linux
Install neurodesktop on Linux
Minimum System Requirements
At least 3GB free space for neurodesktop base image
To set up Neurodesk on Ubuntu, ensure both Podman client and server are installed. Follow the Podman installation instructions provided at https://podman.io/docs/installation for server setup.
In Ubuntu 20.10 or newer versions, the packages to install Podman are included to download in the standard repository of the system. However, for Ubuntu 20.04, we manually have to add the repository of Podman.
If you get errors in neurodesktop then check if the ~/neurodesktop-storage directory is writable to all users. Otherwise run:
chmod a+rwx ~/neurodesktop-storage
If you get error that’s not assessable on your network or causes problems then you can try to use the DNS server 8.8.8.8 (Google Public DNS) in the Docker command.
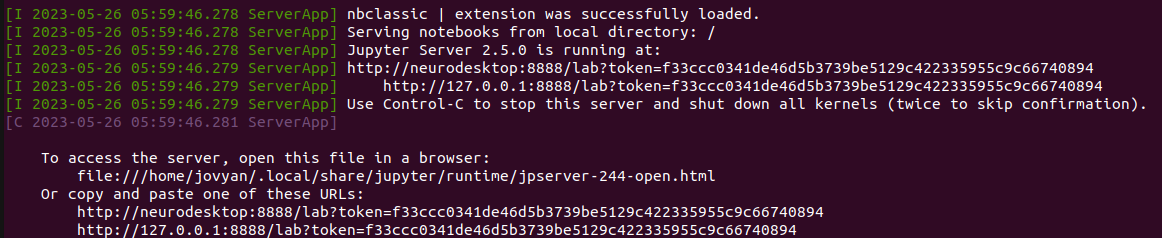
Once neurodesktop is downloaded, leave the terminal open and check which server neurodesktop is running on (Avoid pressing CTRL+C).
To access neurodesktop, open your web browser and type in one of the provided URLs in your terminal (e.g. http://127.0.0.1:8888/lab?token=your_unique_token).
If using Chrome, a pop-up may open with the text:
"http://127.0.0.1:8888 wants to
See text and images copied to the clipboard".
Press “Allow” to access your clipboard from within Neurodesktop.
If using Firefox, you might not be able to paste clipboard content into the virtual desktop from the host computer. In that case, please follow these instructions
Press on “Desktop Auto-Resolution” under “ALL CONNECTIONS”
If it is the first time you have used Neurodesktop, wait until the desktop appears (it may take a few seconds). Otherwise, it should appear instantaneously.
Neurodesk is now ready to use! See the tutorials page for advice on how to use Neurodesk.
The browser can be closed anytime, and Neurodesktop will continue running in the background. To reconnect to Neurodesktop, simply start over from step 3 above.
When done processing your data it is important to stop and remove the container - otherwise the next start or container update will give an error ("… The container name “/neurodesktop” is already in use…")
Note
Notice that any data that were saved outside of /neurodesktop-storage would be lost. Please make sure to move all your data to that folder before deleting neurodesktop.
Click on the terminal from which you ran neurodesktop
Connecting to a running Neurodesktop session via a plain shell
You can start a neurodesktop container using docker or the neurodeskapp. If you want to connect to this running session using a plain shell you can do this as well:
docker ps
# note the name of the running container, e.g. neurodeskapp-49977

# now connect to this container
docker exec -ti neurodeskapp-49977 bash

# then switch to the jovyan user
su jovyan
If you get errors in neurodesktop then check if the ~/neurodesktop-storage directory is writable for all users. If it is not, run chmod a+rwx ~/neurodesktop-storage
Once neurodesktop is downloaded, leave the terminal open and check which server neurodesktop running on (Avoid pressing CTRL+C).
To access neurodesktop, open your web browser and navigate to one of the URLs shown in your terminal (e.g. http://127.0.0.1:8888/lab?token=your_unique_token).
We recommend using Chrome over Firefox as it has an option to hide the Toolbar in full screen mode (go to the menu bar, click on View, and uncheck “Always Show Toolbar in Full Screen”). This allows for Neurodesktop to fully utilise the whole of your screen.
If prompted, press on “Desktop RDP - changes resolution by resizing window and waiting for refresh” or “Desktop VNC - changes resolution by running lxrandr on a terminal” under “ALL CONNECTIONS”
If it is the first time you use Neurodesktop, wait until the desktop appears (it may take a few seconds). Otherwise, it should appear instantaneously.
Neurodesk is ready to use! See the tutorials page for advice on how to use Neurodesk.
The browser can be closed anytime, and Neurodesktop will continue to run in the background. To reconnect to Neurodesktop, simply start over from step 3 above.
When done processing your data it is important to stop and remove the container - otherwise the next start or container update will give an error ("… The container name “/neurodesktop” is already in use…")
Note
Note that any data that were saved outside of /neurodesktop-storage would be lost. Please make sure to move all your data to that folder before deleting neurodesktop.
Click on the terminal from which you ran neurodesktop
Press control-C
Type:
docker stop neurodesktop
Type:
docker rm neurodesktop
3.4 - Windows
Install neurodesktop on Windows
Minimum System Requirements
At least 3GB free space for neurodesktop base image
The docker installation will reboot your computer a few times. There might be warnings regarding WSL2 and this also might require a few more installation steps that unfortunately differ for every system. Please get in touch if you are stuck and have a look at our troubleshooting page. Here is a detailed instruction on how Neurodesk was installed on Windows VMs from the team at Technion: Detailed Docker & Neurodesk installation instruction Windows
Alternatively, Neurodesk also works with Podman, follow the Podman installation instructions provided at https://podman.io/docs/installation.
2. Run Neurodesktop
Use one of the following options to run Neurodesktop:
Once neurodesktop is downloaded, leave the terminal open and check which server neurodesktop running on (Avoid pressing CTRL+C). ]
To access neurodesktop, open your web browser and type in one of the URLs provided in your terminal (e.g. http://127.0.0.1:8888/lab?token=your_unique_token).
Note
We do not recommend the use of the Firefox browser for accessing Neurodesktop on Windows 10, as firefox is not able to access localhost where neurodesk is running.
Press on “Desktop Auto-Resolution” under “ALL CONNECTIONS”
If it is the first time you use Neurodesktop, wait until the desktop appears (it may take a few seconds). Otherwise, it should appear instantaneously.
Neurodesk is ready to use! See the tutorials page for advice on how to use Neurodesk.
The browser can be closed anytime, and Neurodesktop will continue running in the background. To reconnect to Neurodesktop, simply start over from step 3 above.
When done processing your data it is important to stop and remove the container - otherwise the next start or container update will give an error ("… The container name “/neurodesktop” is already in use…")
Note
Note that any data that were saved outside of /neurodesktop-storage would be lost. Please make sure to move all your data to that folder before deleting neurodesktop.
Click on the terminal from which you ran neurodesktop
Press control-C
Type:
docker stop neurodesktop
Type:
docker rm neurodesktop
3.5 - Cloud
Run neurodesktop on cloud computing resources
Options for Running Neurodesk on cloud computing resources
There are a couple of ways how Neurodesktop can be run on cloud computing resources:
The most scalable solution is to run Neurodesk via Kubernetes. This setup is a bit more complex, but can handle many simultaneous users and is ideal for research groups and workshops. The easiest way to deploy Neurodesk on Kubernetes is to use Zero to Jupyterhub (https://z2jh.jupyter.org/en/stable/) - then you can use the Neurodesk image like any other jupyterhub image. If you do not want to run a privileged container you need to deploy the cvmfs setup on Kubernetes as well: https://github.com/cvmfs-contrib/cvmfs-csi/
3.6 - Data Storage
Add storage to Neurodesktop
Drag and Drop
Uploading files
You can drag-and-drop files into the browser window to get files into Neurodesktop. This will then start a file upload:
Downloading files
To download files from the desktop using the same mechanism you will need to open the guacamole settings by pressing CTRL-ALT-SHIFT (Control-Command-Shift on Mac). This will open a menu on the side:
where you can click on “Shared Drive”:
a click (or double click on Mac) on the file will start the download.
You can browse into folders in the shared drive by clicking (double clicking on Mac) on them. To get back to the base of the shared drive, press on the drive icon in the top left of the side menu (just below the “Shared Drive” title).
To close the side menu, click on CTRL-ALT-SHIFT once more (Control-Command-Shift on Mac).
Note that it is only possible to upload or download one file at a time through this interface. If you have multiple files in a directory we recommend zipping the directory and then transferring one zip archive:
zip files.zip files/
Local storage
If you are running Neurodesktop on your own hardware there will be a direct connection between the “Storage” folder on the Desktop, which is a link between “/neurodesktop-storage” in neurodesktop and the “neurodesktop-storage” folder on your C-drive (Windows) or home directory (Mac/Linux). This connection can be used for data processing and data transfer.
Mounting external storage on your host-computer
The -v C:/neurodesktop-storage:/neurodesktop-storage part of the docker command links the directory “neurodesktop-storage” on the “C drive” of your Windows computer to the directory /neurodesktop-storage inside the Desktop environment. Everything you store in there will be available inside the desktop and on the host computer. You can also mount additional directories by adding another -v parameter set (e.g. -v D:/moredata:/data) - this will mount the directory moredata from your D drive to /data inside neurodesktop. Important: the mountpoint inside neurodesktop needs to be named /data, otherwise the applications will not see the files without modifying the SINGULARITY_BINDPATH variable in your .bashrc.
If you are using the NeurodeskApp, you can set an additional storage location through the settings
If you are starting Neurodesk through the command line, here is an example for Windows adding another storage directory:
Note for Windows users: Connecting network shares from Windows to Neurodesk can cause problems, so be careful when attempting this. Also, be aware that processing large amounts of files stored on a Windows filesystem inside Neurodesk will come with a performance penality due to the file system translation in the background. One option to get around these problems is to directly accessing your storage infrastructure inside Neurodesk.
Cloud storage
Another way to get your data into Neurodesktop is to use a cloud storage provider like Dropbox, OneDrive, OwnCloud, Nextcloud or more general tools like rclone or davfs2. Another good option could be to utilize Globus for large amounts of data.
Nextcloud and Owncloud desktop clients
Under the menu item “Accessories” you can find “Nextcloud” and “ownCloud” desktop sync clients that you can configure with your cloud service accounts.
Mounting webdav storage using davfs2
Another option is to directly mount webdav storage. Here is an example how to mount OwnCloud Storage into Neurodesktop:
sudo mount -t davfs https://yourOwnCloudInstance.com/plus/remote.php/webdav/ /data/
It then asks you for a username and password, which you can generate in the settings: yourOwnCloudInstance/plus/settings/personal?sectionid=security
Rclone
Rclone is a command line tool that enables interaction with various cloud services. Here is an example how to setup rclone with an OwnCloud account:
start the configuration in a terminal window rclone config
Create a new remote: n
Provide a name for the remote: OwnCloud
For the “Storage” option choose: webdav
As “url” set: https://yourOwnCloudInstance.com/plus/remote.php/webdav/
As “vendor” set OwnCloud: 2
Set your OwnCloud username after generating an access token yourOwnCloudInstance/plus/settings/personal?sectionid=security
Choose to type in your own password: y
Enter the Password / Token from the OwnCloud App passwords page and confirm it again:
Leave blank the bearer_token: <hit Enter>
No advanced config necessary: <hit Enter>
accept the configuration: <hit Enter>
Quit the config: q
Now we can download data to the HPC easily: rclone copy --progress --transfers 8 OwnCloud:/raw-data-for-science-paper .
or upload data to OwnCloud: rclone copy --progress --transfers 8 . OwnCloud:/data-processed
Globus
We also provide the globus client, so you can transfer large amounts of data between globus endpoints and Neurodesktop. You can configure it by running the following commands in the Neurodesktop environment:
ml globus
# First run the setup:globusconnectpersonal -setup
#Follow the instructions in the terminal: #1) copy the URL into a browser and generate the Native App Authorization Code#2) then copy this code and paste it in the terminal#3) then name the endpoint, e.g. Neurodesktop# Then start the GUI:globusconnectpersonal -gui
# If the connection fails, reset the permissions on the key file:chmod 600 /home/jovyan/.globusonline/lta/relay-anonymous-key.pem
# If the connection still fails, start the client like this to get more informationglobusconnectpersonal -debug
Then add the directories you want to share with globus, by opening File -> Preferences:
and then add the paths required and hit Save:
Then you can go to the globus file-manager https://app.globus.org/file-manager and your neurodesktop instance will be an endpoint for globus. You can change the path to any location you specified in the Preferences:
Mount volume using SSHFS
It is theoretically possible to mount an SSH target inside Neurodesktop, but it’s not a very reliable way of mounting storage:
A better option is to use scp and copy data from an SSH endpoint:
scp /neurodesk/myfile user@remoteserver:/data/
An alternative is to mount the SSHFS target into a parent directory on your local machine or VM and then use the -v option in the docker run command to bind the parent directory of the SSHFS mount. NOTE: the SSHFS has to be mounted to a subdirectory inside a parent directory which is then bound to the docker container. If you directly bind to the mounted directory itself, your Neurodesktop container will stop being able to access it if the SSHFS mount disconnects and will not be able to access it again without restarting the Neurodesktop container.
Then add the following line to the docker run command when starting Neurodesktop (note the rshared flag):
-v /SSHFS_Mounts:/data:rshared \
TIP: If you use key pair authentication instead of password for your SSHFS mount, you can use the reconnect flag to reconnect automatically if the connection drops:
On HPC, you will likely have lmod and Singularity already installed - check with your sysadmin
Setup Instructions:
Install command line (e.g. running on Linux, HPC or CVL)
Load singularity
For optimal performance, ensure you are using Singularity version 3.x:
module load singularity/3.5.0
Load aria2 (Optional)
To speed up container downloads, you can optionally install or load aria2c:
module load aria2c
Clone and Set Up the Repository
Clone the repository into a directory with enough storage and ensure you are not using a symbolic link (to be sure run cd `pwd -P`). It’s recommended to perform this setup within a Python virtual environment (venv) or a Conda environment:
git clone https://github.com/NeuroDesk/neurocommand.git
cd neurocommand
pip3 install -r neurodesk/requirements.txt --user
bash build.sh --cli
bash containers.sh
export SINGULARITY_BINDPATH=`pwd -P`# OR, depending on your installation:export APPTAINER_BINDPATH=`pwd -P`
Install Containers
If these steps are successful, the help will be displayed
Install all or only specific containers by following the instructions, e.g.:
Search and Install Specific Containers
To search for containers that have “itksnap” in the name:
bash containers.sh itksnap
Install a Specific Version
To install a specific version, (e.g., itksnap version 4.0.2 from 20240117):
To download all containers (be careful - there are a lot of containers!):
bash containers.sh --all
Add your containers to lmod
To add each container to the module search path, run the following:
module use $PWD/local/containers/modules/
It may be a good idea to add this to your .bashrc if it works. When adding to your .bashrc you will need to replace $PWD to point to the correct path, i.e.
module use ~/neurocommand/local/containers/modules/
It is very important to also set the SINGULARITY_BINDPATH or the APPTAINER_BINDPATH variable in your .bashrc. This variable must contain a comma-separated list of directories you want to access with the Neurodesk tools.
e.g.:
export SINGULARITY_BINDPATH=/scratch/,/data/
# OR, depending on your installation:export APPTAINER_BINDPATH=/scratch/,/data/
#Note: User the correct line depending on your installation. Do not add a directory that does not exist, otherwise the containers will not start!
Run ml avail to see the installed containers at the top of the list (neurodesk containers will take preference over system modules with the same name), run:
module --ignore_cache avail
Every time you start a new shell you need to run module use PathToYourContainers or add this command to you .bashrc file.
GPU support
Some of our containers contain GPU-accelerated applications. Here is an example that runs the GPU accelerated program eddy in FSL:
Run bash build.sh --init (or bash build.sh --lxde --edit) lxde/mate: Mate installdir: Where all the neurocommand files will be stored (Default: ./local) appmenu: The linux menu xml file. (Usually /etc/xdg/menus/****-applications.menu) appdir: Location for the .desktop files for this linux desktop (Usually /usr/share/applications) deskdir: Location for the .directory files for this linux desktop (Typically /usr/share/desktop-directories)
For desktop menus
sudo bash install.sh to install Creates symlinks to menu files in installation dir
sudo bash uninstall.sh to uninstall Removes symlinks
For user-specific desktop menus in a shared Linux environment
Setup WSL2 using the following instructions (Ubuntu 18.04 recommended) https://docs.microsoft.com/en-us/windows/wsl/install-win10Proceed until a Ubuntu bash shell is available from the Windows Host Run the remaining commands in the Bash shell
sudo apt-get install lxde to install LXDE desktop in WSL
Reboot
sudo apt-get install xrdp to install XRDP in WSL
Open /etc/xrdp/xrdp.ini
Change port=3389 to port=3390 and save
Run echo startlxde > ~/.xsession
Running
sudo service xrdp start to start xrdp server
Open Microsoft Remote Desktop Connection in Windows host
Connect to localhost:3390
In the next login page, leave Session as Xorg. Enter your WSL username and password and click OK
This should open an LXDE Linux Desktop environment. Follow Linux guide from here on
4.3 - Visual Studio Code
Guide connecting your VS Code environment to Neurodesktop
The following guide is for connecting to Neurodesktop using a VS Code installation running on your host machine.
Please see additional instructions below if Neurodesktop is running remotely (i.e. Cloud, HPC, VM)
Pre-requisites
Visual Studio Code (https://code.visualstudio.com) installed on your host. Standalone version should work fine
Install the following VS Code extensions:
Open VS Code and open a Folder (File > Open Folder)
This can be any folder (e.g. home or project folder). VS Code runs into errors if no folder is opened.
Open the Command Palette (Ctrl+Shift+P).
Select Remote-Containers: Attach to Running Container from the dropdown panel
Start typing in ’neurodesktop. Select /neurodesktop from the list
This should open a VS Code Window connected to the neurodesktop as a Dev Container.
This may take about a minute if it is the first time you are connecting, as VS code has to install the VS Code server onto the container. Repeat connections should be faster.
First time connection
The first time connection will default to using neurodesktop root user. We want the default connection to be as the normal user to avoid permission issues.
To check which user is being used, open the terminal in the neurodesktop VS Code instance and check if the user is user or root
Follow the following steps to configure your VS Code instance to connect to neurodesktop as normal user by default:
Open the Command Palette (Ctrl+Shift+P).
Select Remote-Containers: Open Container Configuration File from the dropdown panel
This will open a neurodesktop%3alatest.json file. Overwrite the file with the following contents
Once installed create the keys and configure the servers used:
sudo mkdir -p /etc/cvmfs/keys/ardc.edu.au/


echo "-----BEGIN PUBLIC KEY-----
MIIBIjANBgkqhkiG9w0BAQEFAAOCAQ8AMIIBCgKCAQEAwUPEmxDp217SAtZxaBep
Bi2TQcLoh5AJ//HSIz68ypjOGFjwExGlHb95Frhu1SpcH5OASbV+jJ60oEBLi3sD
qA6rGYt9kVi90lWvEjQnhBkPb0uWcp1gNqQAUocybCzHvoiG3fUzAe259CrK09qR
pX8sZhgK3eHlfx4ycyMiIQeg66AHlgVCJ2fKa6fl1vnh6adJEPULmn6vZnevvUke
I6U1VcYTKm5dPMrOlY/fGimKlyWvivzVv1laa5TAR2Dt4CfdQncOz+rkXmWjLjkD
87WMiTgtKybsmMLb2yCGSgLSArlSWhbMA0MaZSzAwE9PJKCCMvTANo5644zc8jBe
NQIDAQAB
-----END PUBLIC KEY-----" | sudo tee /etc/cvmfs/keys/ardc.edu.au/neurodesk.ardc.edu.au.pub

echo "CVMFS_USE_GEOAPI=yes" | sudo tee /etc/cvmfs/config.d/neurodesk.ardc.edu.au.conf

echo 'CVMFS_SERVER_URL="http://cvmfs-geoproximity.neurodesk.org/cvmfs/@fqrn@;http://cvmfs.neurodesk.org/cvmfs/@fqrn@;http://s1osggoc-cvmfs.openhtc.io:8080/cvmfs/@fqrn@;http://s1fnal-cvmfs.openhtc.io:8080/cvmfs/@fqrn@;http://s1sampa-cvmfs.openhtc.io:8080/cvmfs/@fqrn@;http://s1brisbane-cvmfs.openhtc.io/cvmfs/@fqrn@;http://s1nikhef-cvmfs.openhtc.io/cvmfs/@fqrn@;http://s1bnl-cvmfs.openhtc.io/cvmfs/@fqrn@;http://s1perth-cvmfs.openhtc.io/cvmfs/@fqrn@"' | sudo tee -a /etc/cvmfs/config.d/neurodesk.ardc.edu.au.conf

echo 'CVMFS_KEYS_DIR="/etc/cvmfs/keys/ardc.edu.au/"' | sudo tee -a /etc/cvmfs/config.d/neurodesk.ardc.edu.au.conf

echo "CVMFS_HTTP_PROXY=DIRECT" | sudo tee  /etc/cvmfs/default.local
echo "CVMFS_QUOTA_LIMIT=5000" | sudo tee -a  /etc/cvmfs/default.local

sudo cvmfs_config setup
You can use the list above, but you can also pick a subset of servers that are close to you or fit your usecase better. To better understand what to choose, we use the following CVMFS server setup:
These CVMFS Stratum 1 servers are hosted by the Open Science Grid and every server has a Cloudflare CDN alias that is correctly located through the Maxmind GEOAPI service in the CVMFS client:
Every location has a health check attached to it and doesn’t forward to it if the destination is not working.
This domain is then used as a Cloudfront origin and can be accessed under cvmfs.neurodesk.org
Then we have 3 direct URLS without CDNs as well that are geolocation-steered:
cvmfs1.neurodesk.org:
South America -> sampacs01.if.usp.br
North America -> cvmfs-s1fnal.opensciencegrid.org
Default -> cvmfs-brisbane.neurodesk.org
Europe -> ec2-3-72-92-91.eu-central-1.compute.amazonaws.com
Asia -> cvmfs-perth.neurodesk.org
cvmfs2.neurodesk.org:
North America -> cvmfs-s1goc.opensciencegrid.org
Europe -> cvmfs01.nikhef.nl
Default -> cvmfs-s1goc.opensciencegrid.org
cvmfs3.neurodesk.org:
North America -> cvmfs-s1bnl.opensciencegrid.org
Asia -> cvmfs-brisbane.neurodesk.org
Default -> cvmfs-s1bnl.opensciencegrid.org
Oceania -> cvmfs-perth.neurodesk.org
These servers are currently NOT working and are NOT YET mirroring our repository (we are waiting for RAL to come back online, then the others will mirror that):
You will need to run this for each new WSL session:
sudo cvmfs_config wsl2_start
Test if the connection works:
sudo cvmfs_config chksetup

ls /cvmfs/neurodesk.ardc.edu.au

sudo cvmfs_talk -i neurodesk.ardc.edu.au host info

cvmfs_config stat -v neurodesk.ardc.edu.au
For Ubuntu 22.04 users
If configuring CVMFS returns the following error:
Error: failed to load cvmfs library, tried: './libcvmfs_fuse3_stub.so''/usr/lib/libcvmfs_fuse3_stub.so''/usr/lib64/libcvmfs_fuse3_stub.so''./libcvmfs_fuse_stub.so''/usr/lib/libcvmfs_fuse_stub.so''/usr/lib64/libcvmfs_fuse_stub.so'./libcvmfs_fuse3_stub.so: cannot open shared object file: No such file or directory
/usr/lib/libcvmfs_fuse3_stub.so: cannot open shared object file: No such file or directory
/usr/lib64/libcvmfs_fuse3_stub.so: cannot open shared object file: No such file or directory
./libcvmfs_fuse_stub.so: cannot open shared object file: No such file or directory
libcrypto.so.1.1: cannot open shared object file: No such file or directory
/usr/lib64/libcvmfs_fuse_stub.so: cannot open shared object file: No such file or directory
Failed to read CernVM-FS configuration
export VERSION=1.18.3 OS=linux ARCH=amd64 &&\
wget https://dl.google.com/go/go$VERSION.$OS-$ARCH.tar.gz &&\
sudo tar -C /usr/local -xzvf go$VERSION.$OS-$ARCH.tar.gz &&\
rm go$VERSION.$OS-$ARCH.tar.gz
echo 'export GOPATH=${HOME}/go' >> ~/.bashrc &&\
echo 'export PATH=/usr/local/go/bin:${PATH}:${GOPATH}/bin' >> ~/.bashrc &&\
source ~/.bashrc
go get -d github.com/sylabs/singularity
export VERSION=v3.10.0 # or another tag or branch if you like && \ cd $GOPATH/src/github.com/sylabs/singularity &&\
git fetch &&\
git checkout $VERSION# omit this command to install the latest bleeding edge code from masterexport VERSION=3.10.0 &&# adjust this as necessary \ mkdir -p $GOPATH/src/github.com/sylabs &&\
cd $GOPATH/src/github.com/sylabs &&\
wget https://github.com/sylabs/singularity/releases/download/v${VERSION}/singularity-ce-${VERSION}.tar.gz &&\
tar -xzf singularity-ce-${VERSION}.tar.gz &&\789 cd ./singularity-ce-${VERSION}&&\
./mconfig --without-seccomp --without-conmon
./mconfig --without-seccomp --without-conmon &&\
make -C ./builddir &&\
sudo make -C ./builddir install
export PATH="/usr/local/singularity/bin:${PATH}"
Use of Neurodesk CVMFS containers
The containers are now available in /cvmfs/neurodesk.ardc.edu.au/containers/ and can be started with:
Create a the new file /usr/share/module.sh with the content (NOTE: update the version, here 6.6, with your lmod version, e.g. 8.6.19):
# system-wide profile.modules ## Initialize modules for all sh-derivative shells ##----------------------------------------------------------------------#trap ""123case"$0" in
-bash|bash|*/bash) . /usr/share/lmod/6.6/init/bash ;;
-ksh|ksh|*/ksh) . /usr/share/lmod/6.6/init/ksh ;;
-zsh|zsh|*/zsh) . /usr/share/lmod/6.6/init/zsh ;;
-sh|sh|*/sh) . /usr/share/lmod/6.6/init/sh ;;
*) . /usr/share/lmod/6.6/init/sh ;; # default for scriptsesactrap - 123
Make the module system usable in the shell
Add the following lines to your ~/.bashrc file:
if[ -f '/usr/share/module.sh']; then source /usr/share/module.sh; fiif[ -d /cvmfs/neurodesk.ardc.edu.au/neurodesk-modules ]; then# export MODULEPATH="/cvmfs/neurodesk.ardc.edu.au/neurodesk-modules" module use /cvmfs/neurodesk.ardc.edu.au/neurodesk-modules/*
else export MODULEPATH="/neurodesktop-storage/containers/modules" module use $MODULEPATH export CVMFS_DISABLE=true
fiif[ -f '/usr/share/module.sh']; then echo 'Run "ml av" to see which tools are available - use "ml <tool>" to use them in this shell.'if[ -v "$CVMFS_DISABLE"]; thenif[ ! -d $MODULEPATH]; then echo 'Neurodesk tools not yet downloaded. Choose tools to install from the Application menu.'fififi
Restart the current shell or run
source ~/.bashrc
Use of containers in the module system
export SINGULARITY_BINDPATH='/cvmfs,/mnt,/home'module use /cvmfs/neurodesk.ardc.edu.au/neurodesk-modules/*
ml fsl
fslmaths
Troubleshooting and diagnostics
# Check serverssudo cvmfs_talk -i neurodesk.ardc.edu.au host probe
sudo cvmfs_talk -i neurodesk.ardc.edu.au host info
# Change settingssudo touch /var/log/cvmfs_debug.log.cachemgr
sudo chown cvmfs /var/log/cvmfs_debug.log.cachemgr
sudo touch /var/log/cvmfs_debug.log
sudo chown cvmfs /var/log/cvmfs_debug.log
sudo vi /etc/cvmfs/config.d/neurodesk.ardc.edu.au.conf
echo -e "\nCVMFS_DEBUGLOG=/var/log/cvmfs_debug.log" | sudo tee -a /etc/cvmfs/default.local
cat /etc/cvmfs/default.local
sudo cvmfs_config umount
sudo service autofs stop
sudo mount -t cvmfs neurodesk.ardc.edu.au /cvmfs/neurodesk.ardc.edu.au
# check if new settings are applied correctly:cvmfs_config showconfig neurodesk.ardc.edu.au
cat /var/log/cvmfs_debug.log
cat /var/log/cvmfs_debug.log.cachemgr
5.2 - DataLad
Neurodesktop containers can be used with datalad
install datalad, datalad-containers, and ReproNim containers repo
vi .datalad/config
# now change the version of the container you like# all available containers can be seen via `ls images/neurodesk`datalad save -m 'downgraded version of romeo to x.x.x'datalad containers-run -n neurodesk-romeo
Option 2: change version using freeze_versions script
# all available containers can be seen via `ls images/neurodesk`scripts/freeze_versions neurodesk-romeo=3.2.4
datalad save -m 'downgraded version of romeo to 3.2.4'datalad containers-run -n neurodesk-romeo
Then download the containers. One way is to use CURL:
curl -X GET https://neurocontainers.neurodesk.org/$container.simg -O
Singularity Containers and GPUs
Some of our containers contain GPU-accelerated applications. Here is an example that tests the GPU accelerated program eddy in FSL:
curl -X GET https://neurocontainers.neurodesk.org/fsl_6.0.5.1_20221016.simg -O
git clone https://github.com/neurolabusc/gpu_test.git
singularity shell --nv fsl_6.0.5.1_20221016.simg
cd gpu_test/etest/
bash runme_gpu.sh
Transparent Singularity
The singularity containers can be also be used in combination with our Transparent Singularity Tool, which wraps the executables inside a container to make them easily available for pipelines. More information can be found here: