This is the multi-page printable view of this section. Click here to print.
User Documentation
- 1: Neurodesk Overview
- 1.1: Acknowledgments
- 1.2: Code of Conduct
- 1.3: Neurodesk Publications
- 1.4: How to cite us
- 1.5: Neurodesk FAQ
- 1.6: Discussion Forum
- 1.7: Metrics
- 1.8: Release History
- 1.9: Contribute
- 1.10: Applications
- 2: Getting Started
- 2.1: Local
- 2.1.1: Neurodesk App
- 2.2: Hosted
- 2.2.1: Github Codespaces
- 2.2.2: Bunya
- 2.2.3: Nectar Virtual Desktop Service
- 2.2.4: Play
- 2.2.5: Google Colab
- 2.3: Neurodesktop
- 2.3.1: Portable Unprivileged NeuroDesktop
- 2.3.2: Linux
- 2.3.3: MacOS
- 2.3.4: Windows
- 2.3.5: Cloud
- 2.3.6: Data Storage
- 2.4: Neurocommand
- 2.4.1: Linux and HPC
- 2.4.2: Windows
- 2.4.3: Visual Studio Code
- 2.5: Neurocontainers
- 2.5.1: CVMFS
- 2.5.2: DataLad
- 2.5.3: Docker
- 2.5.4: Open Recon
- 2.5.5: Singularity
- 2.5.6: Windows 11 and Windows Subsystem for Linux
1 - Neurodesk Overview
What is Neurodesk?
Neurodesk provides a containerised data analysis environment to facilitate reproducible analysis of neuroimaging data. At Neurodesk, we believe that reproducibility should be a fundamental principle underlying neuroscientific data analysis (1). Analysis pipelines for neuroimaging data typically rely on specific versions of packages and software, and are dependent on their native operating system. These dependencies mean that a working analysis pipeline may fail or produce different results on a new computer, or even on the same computer after a software update. Neurodesk provides a platform in which anyone, anywhere, using any computer can reproduce your original research findings given the original data and analysis code.
The Neurodesk environment relies on software containers and allows users to build and use containers to analyse neuroimaging data. Containers can be compared to virtual machines, in that they allow users to create a virtual, isolated computing environment with an operating system separate to that of the host machine. However, containers differ from virtual machines in that they virtualise software rather than hardware. Practically, this means that container images require few system resources to install, start-up quickly, and are easily portable between computers.
We recommend watching this excellent short video from the Australian Research Data Commons (ARDC) on research applications of software containers. To read more about Docker containers, visit the Docker webpage
More information:
- A PowerPoint presentation including dynamic navigation and interactive buttons: Neurodesk Overview SlideShow - and PDF version of the presentation
- A 2 minute video explaining Neurodesk: Neurodesk in 2 minutes
- A 4 minute video getting started with Neurodesk: Neurodesk in 4 minutes
- An online interactive demo you can try RIGHT NOW in your browser: https://play.neurodesk.org/
In-depth information:
- A 15 minute video explaining what Neurodesk is: Neurodesk in 15 minutes
- A 30 minute video explaining Open Data processing in Neurodesk: MRItogether data management
- A 35 minute video explaining the technical details of Neurodesk: Neurodesk in 35 minutes - behind the scenes
- A 50 minute video explaining the goals and implementation details of Neurodesk, Neurodesktop and AEDAPT: ARDC TechTalk, Slides
- A 1 hour video showcasing Neurodesk live and explaining the background: ReproNim Webinar
- A video explaining using Neurodesk for open data and open analysis: OHBM Webinar
- A video on Neurodesk’s development journey and lessons learned: MRItogether 2024, journey
- A Neurodesk overview and live demo: MRItogether 2024, live demo
- A video on how data can be converted into BIDS using Neurodesk: MRItogether 2024, bids
What applications are included in Neurodesk?
You can check out the complete list of these applications
How should I cite the tools I am using and Neurodesk itself?
Background
Neurodesk originates from various projects at the Centre for Advanced Imaging that enabled running neuroimaging tools on HPCs and Linux workstations using software containers. The ideas and code from projects like “DICOM2CLOUD”. “transparent singularity” and “CAID” were combined during a hackathon project to create a “Virtual Neuro Machine”. The project was later renamed to Neurodesk and further developments were funded through the ARDC platform project “AEDAPT” with the goal to create a national platform for reproducible electrophysiology data analysis and sharing, accessible to all Australian researchers across a wide range of disciplines that conduct electrophysiological research.
References
- National Academies of Sciences, Engineering, and Medicine. 2019. Reproducibility and Replicability in Science. Washington, DC: The National Academies Press. https://doi.org/10.17226/25303.
MIT License
Copyright (c) 2021 NeuroDesk
Permission is hereby granted, free of charge, to any person obtaining a copy of this software and associated documentation files (the “Software”), to deal in the Software without restriction, including without limitation the rights to use, copy, modify, merge, publish, distribute, sublicense, and/or sell copies of the Software, and to permit persons to whom the Software is furnished to do so, subject to the following conditions:
The above copyright notice and this permission notice shall be included in all copies or substantial portions of the Software.
THE SOFTWARE IS PROVIDED “AS IS”, WITHOUT WARRANTY OF ANY KIND, EXPRESS OR IMPLIED, INCLUDING BUT NOT LIMITED TO THE WARRANTIES OF MERCHANTABILITY, FITNESS FOR A PARTICULAR PURPOSE AND NONINFRINGEMENT. IN NO EVENT SHALL THE AUTHORS OR COPYRIGHT HOLDERS BE LIABLE FOR ANY CLAIM, DAMAGES OR OTHER LIABILITY, WHETHER IN AN ACTION OF CONTRACT, TORT OR OTHERWISE, ARISING FROM, OUT OF OR IN CONNECTION WITH THE SOFTWARE OR THE USE OR OTHER DEALINGS IN THE SOFTWARE.
1.1 - Acknowledgments
We are deeply grateful to all the individuals, institutions, and communities that support the Neurodesk project through their time, expertise, infrastructure, and resources.
Cultural and Land Acknowledgement
We acknowledge and honour the Traditional Custodians and Indigenous Peoples of all lands on which we live, work, and connect around the world. These lands have been, and continue to be, places of deep cultural, spiritual, and ancestral significance for their First Peoples. We honour their resilience, knowledge, and contributions, and commit to respectful collaboration wherever our work reaches.
This project is not tied to a single place, but we honour Indigenous sovereignty wherever our work reaches — including digital spaces. We invite all who engage with this work to reflect on their own relationship with the lands they are on and the histories they are a part of.
Grant and Program Support
This work is supported by the Wellcome Trust with a Discretionary Award as part of the Chan Zuckerberg Initiative (CZI), The Kavli Foundation, and Wellcome’s Essential Open Source Software for Science (Cycle 6) Program (Grant Ref: [313306/Z/24/Z])
This project is also supported by the Australian Research Data Commons (ARDC) via the AEDAPT platform project:
Australian Electrophysiology Data Analytics Platform.


Infrastructure and Cloud Support
This work benefits from services and infrastructure provided by:
- The EGI Federation with support from CESNET-MCC
- Indiana University’s Jetstream2 Cloud
- ARDC Nectar Cloud
We are also grateful for:
- AWS Cloud Credits (providing cloud credits since 2024)
- Google Cloud Platform (support from 2024–2025)
- Oracle for Research (support from 2022–2023)


Citations and Credit
If you use Neurodesk in your work, please cite us and the tools you use appropriately. See the full citation guide here: How to Cite Neurodesk
1.2 - Code of Conduct
Neurodesk’s Code of Conduct
Neurodesk is an open, collaborative, and globally distributed initiative dedicated to building accessible tools for neuroimaging and neuroscience research. We value the contributions of individuals from all backgrounds and are committed to cultivating a diverse, inclusive, and respectful environment for everyone.
We expect all members of the Neurodesk community to engage respectfully and constructively in all interactions, both public and private. This Code of Conduct outlines our shared values, sets expectations for behavior, and describes pathways for addressing concerns.
1. Our Commitment to Diversity, Equity, and Inclusion
We believe that scientific progress depends on diverse perspectives, lived experiences, and equitable participation. We welcome contributors and users of all identities, including—but not limited to—those of different:
Ethnicities, races, national origins, and cultures
Genders and gender identities
Sexual orientations
Ages and life experiences
Religions and belief systems
Socioeconomic backgrounds
Abilities and disabilities
Career stages and domains of expertise
We acknowledge that structural inequities exist in science and technology, and we commit to proactively addressing these barriers within our community. This entails recognizing preferred titles and pronouns and maintaining a respectful tone. Although we don’t expect Neurodesk community members to be familiar with the cultural customs of all ethnic and cultural groups, we do expect them to acknowledge and respect the diversity within our community. This involves being willing to learn from others, share knowledge, and educate oneself.
2. Our Shared Values
We ask all members of the Neurodesk community to uphold the following values:
Respect: Treat everyone with dignity and professionalism. Avoid demeaning, discriminatory, or harassing behavior or speech.
Inclusion: Actively seek to make the community accessible and inclusive. Be mindful of power dynamics, language barriers, and cultural differences.
Collaboration: Foster a spirit of openness and cooperation. Value diverse perspectives, acknowledge contributions, and aim for shared success.
Integrity: Be transparent, honest, and accountable. Uphold scientific and professional standards in your work and communication.
Responsibility: Speak up if you witness behaviour that violates this Code. Offer support when others raise concerns, and be willing to learn and grow.
3. Our Standards
Examples of expected behaviours that contributes to a positive environment for our community include:
- Use welcoming and inclusive language
- Demonstrating empathy and kindness toward other people
- Being respectful of differing opinions, viewpoints, and experiences
- Giving and gracefully accepting constructive feedback
- Accepting responsibility and apologizing to those affected by our mistakes, and learning from the experience
- Focusing on what is best not just for us as individuals, but for the overall community
Examples of unacceptable behaviour include:
- The use of sexualized language or imagery, and sexual attention or advances of any kind
- Trolling, insulting or derogatory comments, and personal or political attacks
- Public or private harassment and microagressions*
- Publishing others’ private information, such as a physical or email address, without their explicit permission
- Abuse of position, power, or influence
- Other conduct which could reasonably be considered inappropriate in a professional setting, including scientific misconduct, such as plagiarism or data falsification
These behaviors are not tolerated under any circumstances and may result in removal from community spaces or other consequences.
Microaggressions
Incidents can take the form of “microaggressions,” which is a damaging form of harassment. Microaggressions are the everyday slights or insults which communicate negative messages to target individuals, often based upon their marginalized group membership. The micropedia of microaggression is an excellent resource to learn more on the may forms microaggression can take (see some examples in the note below). Over time, microagressions can take a great toll on mental and emotional health, and the target’s feeling of belonging in science and academia.
The following examples can all be labelled micro-aggressions:
- commenting on a woman’s appearance rather than her work;
- only directing questions at male colleagues when there are female experts in the room;
- telling someone of colour that they “speak such good English”;
- forcefully praising meat to an individual with a vegetarian diet;
- praising alcoholic drinks to an individual who do not consume them.
- exclusion from a group can be a common nonverbal form of microaggression.
- microaggressions can be couched in the form of a “compliment,” (e.g. “you’re too attractive to be a scientist”).
4. Reporting and Enforcement
Enforcement Responsibilities
Community leaders are responsible for clarifying and enforcing our standards of acceptable behaviour and will take appropriate and fair corrective action in response to any behaviour that they deem inappropriate, threatening, offensive, or harmful.
Community leaders also have the right and responsibility to remove, edit, or reject comments, commits, code, wiki edits, issues, and other contributions that are not aligned to this Code of Conduct, and will communicate reasons for moderation decisions when appropriate.
Enforcement
Instances of abusive, harassing, or otherwise unacceptable behavior may be reported to the community leaders responsible for enforcement at mail.neurodesk@gmail.com. All complaints will be reviewed and investigated promptly and fairly. All community leaders are obligated to respect the privacy and security of the reporter of any incident. We do not tolerate retaliation against individuals who raise concerns in good faith.
Violations of this Code of Conduct may also be reported in confidence to one of the designated contact persons below:
- Steffen Bollmann – s.bollmann@uq.edu.au
- Michèle Masson-Trottier – m.massontrottier@uq.edu.au
Alternatively, individuals affiliated with the University of Queensland may choose to report concerns via the official UQ complaints and appeals process.
Enforcement Guidelines
Violations may result in a range of actions, including warnings, temporary or permanent removal from Neurodesk platforms or events, or notification of institutional authorities where appropriate.
Community leaders will follow these Community Impact Guidelines in determining the consequences for any action they deem in violation of this Code of Conduct:
Guidelines
1. Correction
Community Impact:
Use of inappropriate language or other behavior deemed unprofessional or unwelcome in the community.
Consequence:
A private, written warning from community leaders, providing clarity around the nature of the violation and an explanation of why the behavior was inappropriate. A public apology may be requested.
2. Warning
Community Impact:
A violation through a single incident or series of actions.
Consequence:
A warning with consequences for continued behavior. No interaction with the people involved, including unsolicited interaction with those enforcing the Code of Conduct, for a specified period of time. This includes avoiding interactions in community spaces as well as external channels such as social media. Violating these terms may lead to a temporary or permanent ban.
3. Temporary Ban
Community Impact:
A serious violation of community standards, including sustained inappropriate behavior.
Consequence:
A temporary ban from any sort of interaction or public communication with the community for a specified period of time. No public or private interaction with the people involved—including unsolicited contact with those enforcing the Code of Conduct—is permitted during this period. Violating these terms may lead to a permanent ban.
4. Permanent Ban
Community Impact:
Demonstrating a pattern of violation of community standards, including sustained inappropriate behavior, harassment of an individual, or aggression toward or disparagement of classes of individuals.
Consequence:
A permanent ban from any sort of public interaction within the community.
Alignment with Institutional Policies
This Code of Conduct is informed by and consistent with:
All members affiliated with UQ are expected to follow these institutional policies in addition to this community code.
Continuous Improvement
We recognize that fostering an inclusive and respectful community is a continual effort. This Code of Conduct will be reviewed periodically and updated as needed. Suggestions for improvement can be submitted to Michèle Masson-Trottier or Steffen Bollman.
Attribution
This Code of Conduct is adapted from the Contributor Covenant, version 2.0, available at https://www.contributor-covenant.org/version/2/0/code_of_conduct.html.
Community Impact Guidelines were inspired by Mozilla’s code of conduct enforcement ladder, the Organisation of Human Brain Mapping’s Code of Conduct and the laboratory for brain simulation and exploration - SIMEXP’s Code of Conduct.
For answers to common questions about this code of conduct, see the FAQ at https://www.contributor-covenant.org/faq. Translations are available at https://www.contributor-covenant.org/translations.
1.3 - Neurodesk Publications
This page highlights peer-reviewed papers, preprints, and other research outputs that have used or cited Neurodesk in their methods, workflows, or infrastructure.
For instructions on how to cite Neurodesk and specific tools, visit our Citation Guide.
Featured Publications
- Renton, A.I., Dao, T.T., Johnstone, T., Civier, O., Sullivan, R. P., White, D. J., … Narayanan, A. & Bollmann, S. Neurodesk: an accessible, flexible and portable data analysis environment for reproducible neuroimaging. Nat Methods (2024). https://doi.org/10.1038/s41592-023-02145-x
If you’ve published work using Neurodesk, we’d love to include it here.
Submit Your Publication
Have you used Neurodesk in your research or teaching?
We welcome community contributions to this list. Submit your publication by opening a GitHub issue using the link below:
Alternatively, you can email the core team or tag us on social media to get in touch.
1.4 - How to cite us
If you used Neurodesk in your research or teaching, please cite our main paper and the relevant containerized tools to ensure reproducibility and proper attribution.
Citing Neurodesk
Please cite the Neurodesk paper. You can also access it via the open access link or refer to the preprint version.
If you used Neurodesktop, please include the version used (e.g., v2025-06-10). See examples below.
Full citation: Renton, A.I., Dao, T.T., Johnstone, T., Civier, O., Sullivan, R. P., White, D. J., … Narayanan, A. & Bollmann, S. Neurodesk: an accessible, flexible and portable data analysis environment for reproducible neuroimaging. Nat Methods (2024). https://doi.org/10.1038/s41592-023-02145-x
BibTeX:
 @article{Renton2024,
            author = {Renton, Angela I and Dao, Thuy T and Johnstone, Tom and Civier, Oren and Sullivan, Ryan P and White, David J and Lyons, Paris and Slade, Benjamin M and Abbott, David F and Amos, Toluwani J and Bollmann, Saskia and Botting, Andy and Campbell, Megan E J and Chang, Jeryn and Close, Thomas G and D{\"{o}}rig, Monika and Eckstein, Korbinian and Egan, Gary F and Evas, Stefanie and Flandin, Guillaume and Garner, Kelly G and Garrido, Marta I and Ghosh, Satrajit S and Grignard, Martin and Halchenko, Yaroslav O and Hannan, Anthony J and Heinsfeld, Anibal S and Huber, Laurentius and Hughes, Matthew E and Kaczmarzyk, Jakub R and Kasper, Lars and Kuhlmann, Levin and Lou, Kexin and Mantilla-Ramos, Yorguin-Jose and Mattingley, Jason B and Meier, Michael L and Morris, Jo and Narayanan, Akshaiy and Pestilli, Franco and Puce, Aina and Ribeiro, Fernanda L and Rogasch, Nigel C and Rorden, Chris and Schira, Mark M and Shaw, Thomas B and Sowman, Paul F and Spitz, Gershon and Stewart, Ashley W and Ye, Xincheng and Zhu, Judy D and Narayanan, Aswin and Bollmann, Steffen},
            doi = {10.1038/s41592-023-02145-x},
            issn = {1548-7105},
            journal = {Nature Methods},
            number = {5},
            pages = {804--808},
            title = {{Neurodesk: an accessible, flexible and portable data analysis environment for reproducible neuroimaging}},
            url = {https://doi.org/10.1038/s41592-023-02145-x},
            volume = {21},
            year = {2024}
        }
Citing specific tools
For reproducibility, please include the tool name, version number, and build date for any containerized application used in Neurodesk. This information is available in our application list.
In addition to citing Neurodesk, please remember to cite any original publication associated with each tool you use. Citation details can be found:
- in the tool’s
README.mdunder neurocontainers/recipes - Or in the tool’s interface within Neurodesktop
Citing EEG/MEG related tools
If you used any EEG/MEG/electrophysiology tools, please also cite the AEDAPT project.Examples
Here are some example excerts of how to cite Neurodesk:
“TGV QSM (v1.0.0_20210629, Langkammer et al, 2015) was run in Neurodesk (v2025-06-10, Renton et al, 2022)”
EEG example: “EEGlab (2020.0_20211026, Delorme & Makeig, 2004) was run in Neurodesk (v2025-06-10, Renton et al, 2022) part of the AEDAPT project.”
References
- Langkammer, C; Bredies, K; Poser, BA; Barth, M; Reishofer, G; Fan, AP; Bilgic, B; Fazekas, F; Mainero; C; Ropele, S. Fast Quantitative Susceptibility Mapping using 3D EPI and Total Generalized Variation. Neuroimage. 2015 May 1;111:622-30. doi: 10.1016/j.neuroimage.2015.02.041
- Renton, A.I., Dao, T.T., Johnstone, T., Civier, O., Sullivan, R. P., White, D. J., … Narayanan, A. & Bollmann, S. Neurodesk: an accessible, flexible and portable data analysis environment for reproducible neuroimaging. Nat Methods (2024). 10.1038/s41592-023-02145-x
- Delorme A & Makeig S (2004) EEGLAB: an open-source toolbox for analysis of single-trial EEG dynamics, Journal of Neuroscience Methods 134:9-21. doi: 10.1016/j.jneumeth.2003.10.009
1.5 - Neurodesk FAQ
General Overview
What is Neurodesk?
Neurodesk provides a containerised data analysis environment to facilitate reproducible analysis of neuroimaging data. Analysis pipelines for neuroimaging data typically rely on specific versions of packages and software, and are dependent on their native operating system. These dependencies mean that a working analysis pipeline may fail or produce different results on a new computer, or even on the same computer after a software update. Neurodesk provides a platform in which anyone, anywhere, using any computer can reproduce your original research findings given the original data and analysis code.
More information:
- A Neurodesk Overview
- A PowerPoint presentation including dynamic navigation and interactive buttons: Neurodesk Overview SlideShow - and PDF version of the presentation
- A 2 minute video explaining what Neurodesk is: Neurodesk in 2 minutes
- An online interactive demo you can try RIGHT NOW in your browser: https://play.neurodesk.org/
In-depth information:
- A 15 minute video explaining what Neurodesk is: Neurodesk in 15 minutes
- A 30 minute video explaining Open Data processing in Neurodesk: MRItogether data management
- A 35 minute video explaining the technical details of Neurodesk: Neurodesk in 35 minutes - behind the scenes
- A 1 hour video showcasing Neurodesk live and explaining the background: ReproNim Webinar
What applications are included in Neurodesk?
You can check out the complete list of these applications
How should I cite the tools I am using and Neurodesk itself?
Using Neurodesktop
Can I change the desktop resolution?
Yes.
In a Desktop RDP session, simply zoom or resize the window and the resolution will be adjusted.
In a Desktop VNC session, open a Terminal (LXTerminal) from the bottom toolbar and run lxrandr to change the desktop resolution
Can I run Neurodesk on an HPC without Docker?
Yes, our project aims to run on the hardware you have access to. However, without docker support you cannot use our desktop interface NeuroDesktop but you can still use the command line interface NeuroCommand on HPC. This works well for batch processing on HPCs once you developed your pipeline in our desktop interface. If your HPC provides a desktop interface you can use all our graphical applications without any issues and the GUIs even work via SSH x-forwarding - it’s not the most performant experience, but it works well enough.
How do I get my files into Neurodesk?
It depends where you are running Neurodesk and where your files are. We provide many different ways from drag-and-drop, to cloud storage to file mounts in Storage in Neurodesk.
Can I export a jupyter notebook as a PDF?
By default we don’t have all extensions installed to do this to keep the neurodesktop small. So you will see an error when trying to do File -> Save and Export Notebook As … -> Webpdf
To get webpdf export to work, open a terminal and run:
pip install nbconvert[webpdf]
playwright install chromium
Is there reduced performance when using containers?
If you are running containers on Linux there is no performance penalty - on an HPC with a Lustre filesystem it can even be faster to run our containers than running natively on the filesystem (because meta data operations are shifted to the compute node - more information can be found here:
Rioux, Pierre, Gregory Kiar, Alexandre Hutton, Alan C. Evans, and Shawn T. Brown. ‘Deploying Large Fixed File Datasets with SquashFS and Singularity’. ArXiv:2002.06129 [Cs], 14 February 2020. https://arxiv.org/abs/2002.06129 ).
However, running Neurodesktop on Windows and Mac will have a performance penalty, because Linux runs in a Hypervisor on these systems. Also, it is important to understand filesystem operation bottlenecks that can occur when accessing files across system boundaries (e.g. processing DICOM files stored on Windows inside Neurodesk).
How can I see how many compute resources Neurodesk containers need?
In Linux the containers run as normal processes and you can use htop and top to inspect the resource footprint. For Windows and Mac the information is not readily available, however, we have written a guide here: Troubleshooting
Can I just use the containers without neurodesktop or neurocommand?
Yes, there are multiple ways of using the containers directly and we provide an overview here: https://www.neurodesk.org/docs/getting-started/neurocontainers/
Can I keep my modifications in the container?
We designed neurodesk with reproducibility as a main goal, so the desktop containers should not be modified if one aims for full reproducibility. However, there is one good option to keep your settings across different container versions: You can write a shell script that installs additional packages and modifies the environment so it’s perfect for you. This script can then be re-executed in a new desktop version and will enable a reproducible customization.
Another option is to “save” your docker container including all changes you made. This could be useful when your changes are too difficult to write a shell script or when you do not care about reproducibility as much and you just want to get the job done. To do this you can commit (https://docs.docker.com/engine/reference/commandline/commit/) your container and by uploading the container to your own docker hub you could even share it.
Can I force a complete container download to my system?
To increase speed and reliability of Neurodesktop we mount the application containers from a CVMFS mount and download only the files required to run your current task. Although we aim to keep everything on there reproducible, there might be a reason that you want to fully download the containers to your system. You can force this behaviour by adding another parameter to the docker call: -e CVMFS_DISABLE=true
For windows an example would look like this:
docker run --shm-size=1gb -it --privileged --user=root --name neurodesktop -v C:/neurodesktop-storage:/neurodesktop-storage -e CVMFS_DISABLE=true -p 8888:8888 -e NEURODESKTOP_VERSION=2025-06-10 vnmd/neurodesktop:2025-06-10
How to restart a Neurodesk Lab session?
In the jupyter menu, click on File -> Hub Control Panel:
Then “Stop My Server”
Then “Start My Server”
How to restart a stuck Neurodesk when running locally in Docker or using the NeurodeskApp?
Open Docker Desktop Dashboard. Find the container under “Containers” and delete the Container there.
Troubleshooting Common Issues
Freeview 7.2.0 crashes when I open files
Freeview (and Freesurfer!) need a valid license to work and we are not allowed to distribute a license with Neurodesk!
You can follow these steps to run freeview 7.2.0 and open your files:
- apply for a license (https://surfer.nmr.mgh.harvard.edu/registration.html) and paste this license in ~/.license
then run
echo "export FS_LICENSE=~/.license" >> ~/.bashrc
then start freeview 7.2.0 and it should all work perfectly.
Matlab asks me to reactivate after restarting the desktop
There is one workaround for this problem. Fix the mac address for your session by including this in your docker command:
--mac-address 02:42:ac:11:00:02
Trouble installing neurodesk images
This may be a memory issue. First, ensure that there is enough free space on the disk. If there is, try resetting docker settings and data. To do this:
- Open the docker engine
- Navigate to “Troubleshooting” (the bug icon in the top right).
- Click “Reset to factory defaults”

If you are still experiencing issues after this, you may need to update docker to the latest version. This can be achieved through “settings” in the docker engine, or (on windows) by right clicking on the docker tray icon:

I got an error message ‘X killed’ or not enough memory
This may be due to Docker not having access to enough RAM from your host computer.
How to empty trash bin in Neurodesktop
If you have deleted files using the Neurodesktop GUI but your storage is not yet emptied, execute the following command in the terminal.
rm -rf ~/.local/share/Trash/
Keyboard, Clipboard, and Language Support
Keyboard and Multi-Language support
I am using a European keyboard layout and I cannot type symbols that require the ALT-GR key (like @ or \)
This seems to be a bug in Guacamole and RDP in combination with certain browsers. There are a few workarounds you can try:
- Use the connection option “Desktop Fixed-Resolution (VNC)” instead of Desktop Auto-Resolution (RDP)
- connect to the desktop using an RDP client instead of the browser (https://www.neurodesk.org/docs/getting-started/neurodesktop/windows/#using-an-rdp-client)
Clipboard issues
How do I copy and paste text?
You can copy and paste text within Neurodesktop and between Neurodektop and your host computer using the regular keyboard shortcuts (CTRL+C, CTRL+X, and CTRL+V). Note however that some applications (e.g., command-line terminal) are using other keyboard shortcuts. You can usually find them in the “Edit” menu of the relevant application.
Note for Mac Users: The Safari Browser is currently not compatible for copy and paste with Guacamole. Please either use the Neurodeskapp or a Edge/Firefox on MacOS. You will need to use a combination of CTRL and Command shortcuts in order to copy and paste text between Neurodesktop and the host computer. For example, copy text from your Mac with Command+C and then paste it into Neurodesktop using CTRL+V. For the other way around, you’d use CTRL+C in Neurodesktop and then Command+V on the Mac.
I cannot copy and paste text within Neurodesktop using keyboard shortcuts
If you’re using Mac, you might be trying to use Mac keyboard shortcuts, but Neurodesktop is using Linux keyboard shortcuts (CTRL+C and CTRL+V) If you use the terminal, please see “I fixed my internet browser clipboard, but copy or paste still do not work in the terminal” below.
Copying text from my host computer and pasting it inside Neurodesktop doesn’t work in Firefox
This is a “feature” of firefox and you can disable this “feature”:
- navigate to
about:configand “Accept the Risk and Continue” (“about:config” needs to be entered in the address bar of firefox and hit enter) - now search for clipboard and then set the following to “true”:
- dom.events.asyncClipboard.clipboardItem
- dom.events.asyncClipboard.read
- dom.events.testing.asyncClipboard
Then close firefox and restart. Then the clipboard should work as one would expect.
If the clipboard still does not work, check “I fixed my internet browser clipboard, but …” sections below.
Copy and paste between my host computer and Neurodesktop (or vice versa) doesn’t work in Chrome or Edge
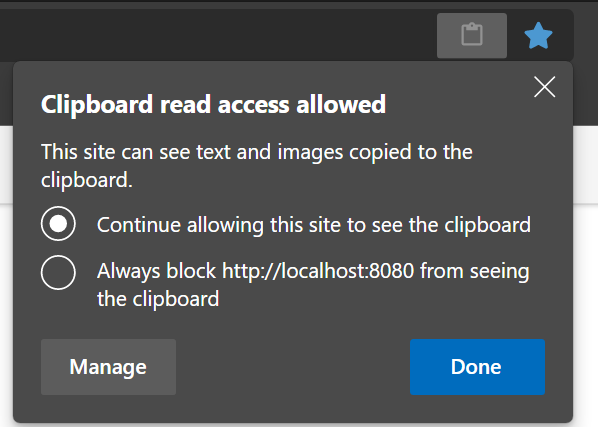
The browsers have a security feature to protect you from something stealing your clipboard content. Depending on your security settings you have to enable it explicitly - it’s a little icon in the browser address bar that looks like a clipboard.
After pressing the icon, you should choose the option shown below in the dialog that opens. After pressing “Done”, close the current browser tab and open a new one for the changes to take effect.
If the clipboard still does not work, check “I fixed my internet browser clipboard, but …” sections below.
I fixed my internet browser clipboard, but copy or paste still do not work in the terminal
The terminal is using special keyboard shortcuts, Shift+CTRL+C for copy, and Shift+CTRL+V for paste. Alternatively, you can copy and paste text by using the terminal’s “Edit” menu.
I fixed my internet browser clipboard, but copy or paste still do not work in the file browser
The copy and paste options in the “Edit” menu of the file browser are used to copy and paste files, not text. To copy and paste text from/into the file browser application (e.g., copy a path into the path field in the top), use the CTRL+C and CTRL+V keyboard shortcuts.
I fixed my internet browser clipboard, but copy or paste still do not work in a specific/all applications
If you’re using Mac, you might be trying to use Mac keyboard shortcuts, but Neurodesktop is using Linux keyboard shortcuts. For more details, read the “Note for Mac users” here.
It is also possible that the text you are trying to copy includes special characters (e.g., non-English characters), which may cause Neurodesktop to not execute your paste command (including the non specials characters). Give special attention to the following characters:
- Dash: the en (short) dash is the normal one and copies ok, but the em (long) dash is considered a special character. When in doubt, replace all the dashes in the text you want to copy with en dashes.
- Quotation mark: a strictly vertical quotation mark is fine, but a slightly leaning quotation mark / an apostrophe are special characters. When in doubt, replace all quotation marks in the text you want to copy with vertical quotation marks.
If it still does not work, please report the problem and we will do our best to help you:
- Copy some text from your host computer (CTRL+C, or Command+C)
- Open the Mousepad text editor in Neurodesktop (Start button → “Accessories” → “Mousepad”)
- Try to paste the text using the menu option “Edit” → “Paste”
- Try to paste the text again using CTRL+V
- If you don’t have one already, please create a Github account here
- Go to our discussion forum here
- If you are not logged into Github, please log in (upper right corner)
- Press “New Discussion” button
- In the message that you write, please specify your operating system, your internet browser, the application in question, and if you can copy/paste to Mousepad and how?
Docker, WSL, Memory
Docker
Docker: Shows an error that unprivileged user namespaces are not enabled.
This can be activated by running
echo "kernel.apparmor_restrict_unprivileged_userns = 0" >/etc/sysctl.d/99-userns.conf
sysctl --system
Docker: Cannot connect to the Docker daemon at unix:///var/run/docker.sock. Is the docker daemon running?.
This is usually a docker-related error, not related to neurodesktop itself. To troubleshoot docker, we can try a simpler container first:
docker run hello-world
Try the following solutions (in this order, until the above command works)
- Win/Mac: Open docker GUI and accept T&Cs. Check that the docker engine is running
- Linux: Make sure you started the docker daemon (sudo systemctl start docker)
- Add your user to the OS docker group (sudo usermod -aG docker $USER)
- docker.sock permissions need to be changed (sudo chown root:docker /var/run/docker.sock)
- Close and open the terminal and retry.
- Log out and login again, or restart the machine (current user environment does not fully know docker is running)
Windows
Windows users: WSL not installed properly
The Docker engine relies on the Windows subsystem for Linux (WSL) to run on a windows machine.
Note
We recommend the manual install instructions, as the simplified install requires an upgrade to a preview build of Windows that may be unstable.If WSL is properly installed, the Resources tab of the Docker settings should look something like this:

However, if WSL is missing or incorrectly configured, the Resources tab of the Docker settings may look something like this:

If this is the case, follow the manual install instructions to install WSL 2 (including installation of Ubuntu through Microsoft Store).
Windows users: Not enough free space on the partition in Windows and WSL2
This could help: https://yjmantilla.github.io/tutorials/wsl2-move-vhdx.html
Windows users: Failure to connect to Neurodesktop in Firefox
We recommend using Microsoft Edge or Google Chrome to access Neurodesktop.
If you are using Docker on Windows 10 with the WSL2 backend
then this is managed by Windows settings. Try the following steps to check how much RAM Docker has access to and increase the amount if necessary.
- Run Docker
- Open a terminal (ie. Powershell) in the PC you want to use to run Neurodesktop (not in Neurodesktop itself) and type the following command:
docker info
This will generate information about your Docker installation (make sure Docker is running during this step)
- Look for the line that says
Total Memory: **.**GiB
- If this value is ~2GB, try increasing it*:
- Create a .wslconfig file in your user directory (for more detail instructions see: https://docs.microsoft.com/en-us/windows/wsl/wsl-config)
- In the .wslconfig file include the following lines:
[wsl2] memory=32GB- Quit Docker (make sure it’s not running in the background, ie. system tray, check task manager)
- In the terminal, run the following command
This will list any running distributions. For the update to be successful, WSL needs to have completely stopped running (ie. no distributions running)wsl --running --list- Restart Docker and rerun steps 1-3 to confirm it was successful
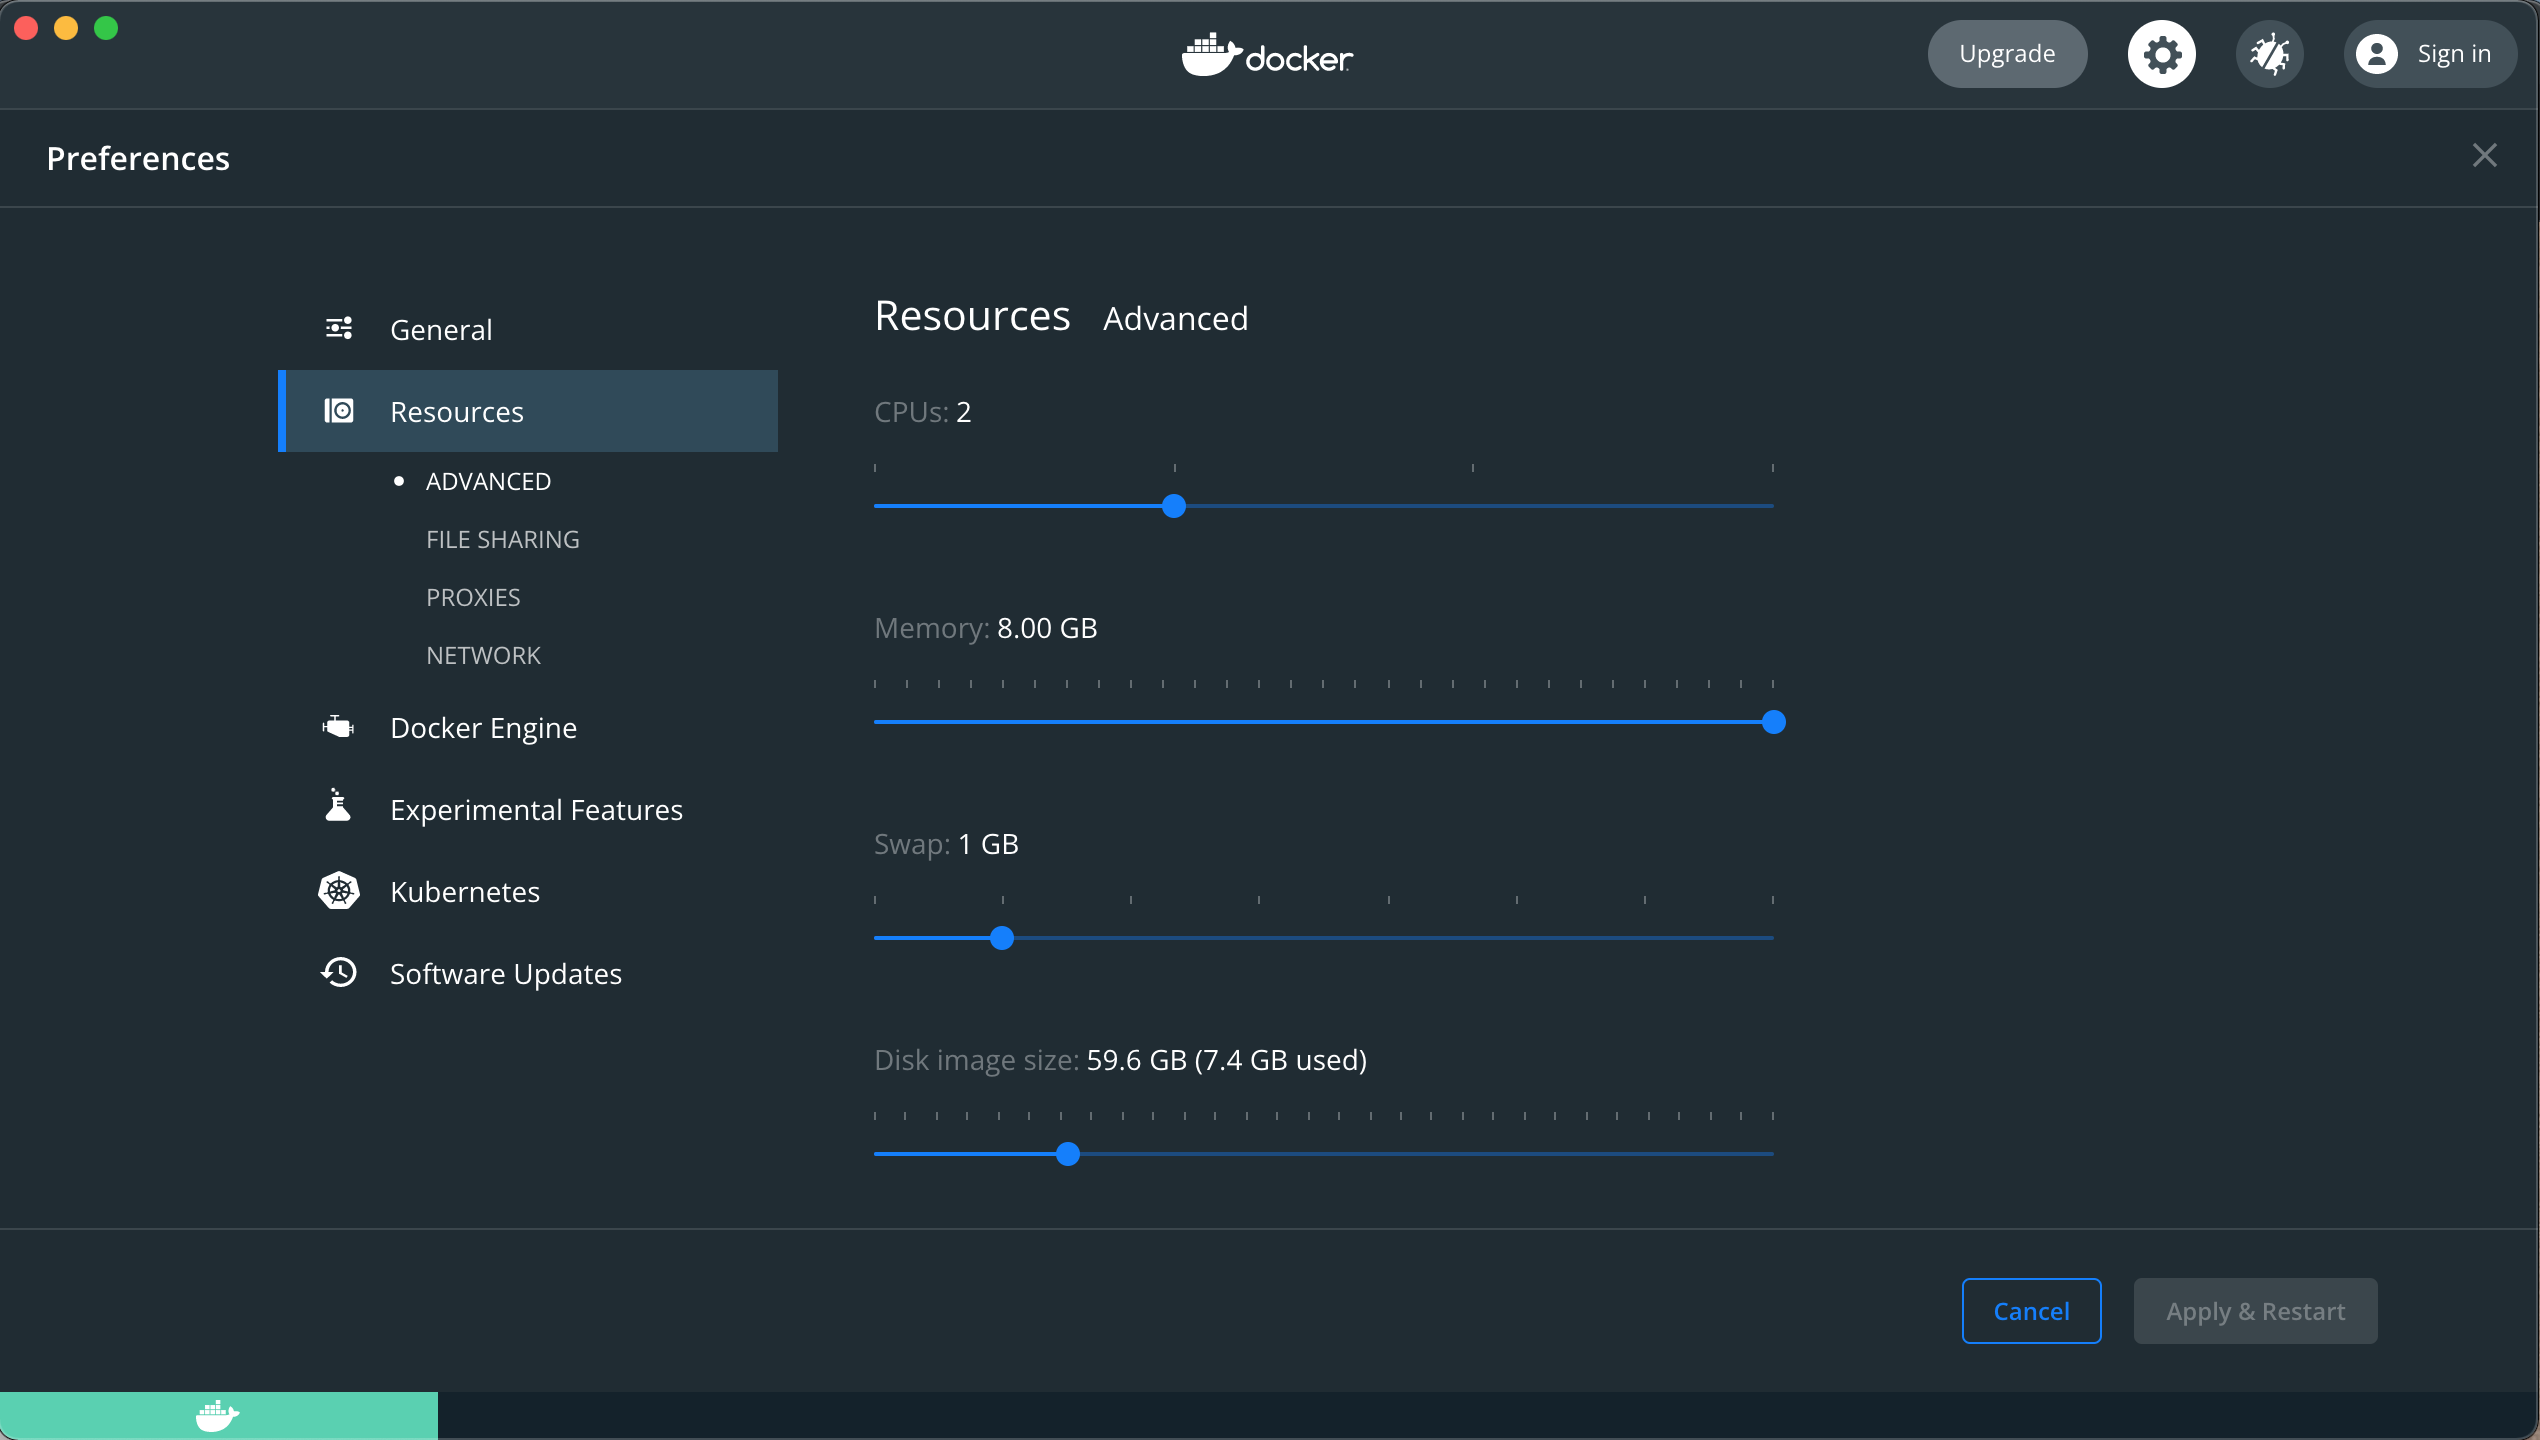
If you are not using WSL2, you can check and manage your RAM allocation in the Docker desktop application.
- Open the Docker application and navigate to settings > resources > advances
- Scroll down to the Memory option and use the sliding bar to adjust the setting
- Click apply and restart
*RAM requirements will vary based on the tools/data you are using. If the system you’re using has limited RAM, test out a few different amounts by running the above steps and then your analyses in Neurodesktop. Version 20220208 onwards has a memory monitor in the taskbar - you can use this to check how much memory Neurodesktop has access to and how much is being used by the analyses being run.
MacOS
If you are using Docker on MacOS
- The memory amount is managed via the Docker settings:
VScode
Vscode is not starting up (or starts many many copies of itself …)
This problem seems to be caused by a corrupted config directory. To fix this, run:
rm -rf ~/.config/Code
Contributing & Support
How can I contribute new containers?
We are still working on making this easier, but here is the current workflow to add new applications.
I couldn’t find the information I was looking for. Where can I get additional assistance?
Neurodesk is an open-source project that is always evolving. If you are experiencing an issue not listed here, you can reach out to us on Github. Post your question at https://github.com/orgs/NeuroDesk/discussions or open a new issue, so that we can aim to solve it and update our help documentation.
1.6 - Discussion Forum
Our main discussion forum is hosted on GitHub Discussions
Please use the link below to ask questions, share ideas, and connect with the NeuroDesk community.
1.7 - Metrics
Docker metrics
Total Neurodesktop container pulls:

Github metrics
| Repository | Stars | Open issues | Last Commit |
|---|---|---|---|
| neurodesktop |  |  |  |
| neurocommand |  |  |  |
| neurocontainers |  |  |  |
| transparent-singularity | |||
| example-notebooks |  |  |  |
| neurodesk.github.io |  |  |  |
| neurodesk-app |  |  |  |
Neurodesk App download metrics

User metrics
Uptime metrics
For service uptimes, use this link
https://stats.uptimerobot.com/NBE38IZWZM1.8 - Release History
- Latest Version
- 2025-06-10
Please consult this page for the template for new releases.
2025-06-10
New Features
- upgrade to jupyterhub 5.3.0
- added nbgitpuller, tcsh
- added neurodesk copilot: https://www.neurodesk.org/developers/neurodesk-copilot/
- added qsirecon
Improvements
- updated niivue (with breaking interface change!)
- updated jupyter-lmod (with breaking interface change!)
- moved cvmfs cache to home directory
- updated background to new Neurodesk logo
- updated ants to 2.6.0
Bug Fixes
- split cvmfs in 3 different regions
2025-04-08
New Features
Improvements
Bug Fixes
- Improved internet test by using DNS lookup instead of ping
2025-03-14
Bug Fixes
- Startup process was setting variables in different places
2025-03-12
New Features
- Added neurodesk copilot dependencies
Bug Fixes
- Apptainer didn’t mount binfmt, which was resulting in simg files not working in offline mode on apple silicon
2025-03-07
Bug Fixes
- CVMFS_DISABLED=false also disabled it.
2025-03-06
Improvements
- Add overlay directory on startup
Bug Fixes
- Only link from cvmfs if cvmfs is not disabled
2025-03-05
New Features
- Added support for downloading containers offline, can be activated by setting CVMFS_DISABLE=true
- Add synthstrip 7.4.1
- Add pydeface 2.0.2
- Add [fmriprep.org/en/stable/) 24.1.1 20250214
Improvements
- update [BIDScoin](https://BIDScoin.readthedocs.io/en/latest/) to 4.5.0
- update aslprep to 0.7.5
- update QSMxT to v7.3.1
- update QSMxT to v7.3.2
- changed from apptainer -w flag to overlay directory because it works with SIMG files
- disable automatic GPU flag –nv because it is causing problems on newer host OSs like Ubuntu 24.04
- automate zenodo doi creation and update to applist.json
- tweaks in chown of files in homedirectory (#268 #269)
2025-02-04
New Features
- Add latency check for cvmfs direct vs CDN
- Add fsl 6.0.7.16
- Add dicomtools container
Improvements
- update freesurfer 8.0.0 and nighres
2025-01-29
New Features
- Add freesurfer 8.0.0
Bug Fixes
- In JVM - parameters only worked for arm64, not x86
2025-01-24
New Features
Improvements
- update version in neurodesk.yml
- Change TinyRange share path to /data instead of /share
- updated deepRetinotopy version by
- update Matlab 2024b
Bug Fixes
- Added workaround for JVM bug on Apple M4
- added docker fix for MacOS to desktop
2024-12-06
- updated QSMxT: v7.2.2
- add heudiconv 1.3.1
- add mriqc 24.0.2 20241108
- add samsrfx v10.003
- add palmettobug 0.0.1 20241119
- add neurodock/pydesigner
- Update dcm2niix version to 20241125
- changed CVMFS servers
- added -w workaround for docker on apple silicon into dockerfile
- add static strace to /opt for container debugging
- enabled VNC again and fix RDP auto resizing
2024-10-22
- use cloudfront distribution only
- workaround for kernel bug on arm64
- add ipywidgets ipyvolume jupyterlab_widgets
- add fsl 6.0.7.14
- add QSMxT v7.2.1
2024-10-16
- add jupyter-resource-usage plugin
- disable VNC
- remove updating of example directory on startup
- update jupyter-server-proxy
- add more CVMFS servers
- Added relion 4.0.1.sm61 20240528
- update aslprep to 0.7.0
- update deepretinotpy to 1.0.5
- add quickshear
- add nighres 1.5.1
- update BIDScoin 4.3.3 and 4.4.0
- Added bart 0.9.00
- updated QSMxT to 7.1.0
- Added mrtrix3src (latest version)
- update VesselBoost to ver 1.0.0 by @KMarshallX in #301
- add qmrlab
- added niimath
- updated fsl to 6.0.7.8
- update aslprep to 0.7.2
- update ants to 2.5.3
- updated spinalcordtoolbox to 6.4
- Update afni to 24.2.07
- add dcm2niix
- add micapipe 0.2.3
- added brainnetviewer
- Added brainlifecli
- update fmriprep to 24.1.0
- Update dsistudio 2024.06.12
- add vmtk 1.5.0
2024-05-25
- add new CVMFS CDN servers
- add jupyter_scheduler and ipycanvas
- update guacamole version to 1.5.5 and tomcat to 9.0.87
- add rise extension for presentations
- https://github.com/NeuroDesk/neurocommand/releases/tag/2024-05-25
- fixed brkraw by @stebo85 in #268
- QSMxT: v6.4.1 by @astewartau in #270
- update mrtrix3 by @stebo85 in #271
- QSMxT: v6.4.2 by @astewartau in #272
- QSMxT: v6.4.3 by @astewartau in #274
- update BIDScoin to 4.3.2 by @stebo85 in #275
- update fmriprep by @stebo85 in #277
- add julia 1.9.4 by @stebo85 in #280
- update dsi_studio by @stebo85 in #283
- add glmsingle by @stebo85 in #284
- ants 2.5.1 20240429 by @stebo85 in #285
- QSMxT: v6.4.4 by @astewartau in #287
2024-03-27
- Switched from singularity to apptainer
- added (brkraw) and fixed multiple tools (mrtrix3, julia)
2024-01-12
- fixed fsl GUI error, when starting fsl in VNC mode (the USER was not exported)
- removed c.ServerApp.root_dir setting because it was causing an error when clicking on the Home button. Now it’s not possible to navigate outside of the homedirectory anymore in the side panel.
2023-11-28
- fixed a bug where the /proc/cpuinfo file under ARM did not contain a MHz entry, which stopped Matlab from starting up
- fixed a bug where the SINGULARITY_BINDPATH was not send in a jupyter notebook file
2023-10-29
- bugfix: conda and mamba environments are now initialized correctly when neurodesktop starts up (not just in jupyter)
2023-09-20
- the neurodesktop image is now multi-arch and supports x86 and ARM64
- fixed recursive link creation in /data
- switched to new cvmfs server geolocation DNS steering policy system: cvmfs[1,2,3].neurodesk.org resolve to 3 servers per region which are compared for speed by the client on startup
- fixed recursive execution of bash shell inside a singularity container
- fixed empty username
- switched release tag naming scheme to YYYY-MM-DD instead of YYYYMMDD for better readability
20230628
- directories can now be deleted in jupyter interface even if they contain files
- moved startup configurations out of .bashrc
- removed redundant chown of homedirectory (e.g. affecting windows startup time)
- added git extension to juputerlab
- more robust handling of CVMFS edge cases
20230531
- included neurodesktop version in hostname
- removed apt lists
- triggered automount externally
20230525
- used jupyter based image
- fixed environment variables for nipype
- fixed RDP upload permission errors
- added symlink on home if /data is mounted
20221216
- added VNC connection back into docker container because RDP currently causes issues for european keyboards
- added freesurfer into AFNI container to get @SUMA_Make_Spec_FS to work (issue: https://github.com/orgs/NeuroDesk/discussions/210#discussioncomment-4337927)
- added deepretinotopy tool in version 1.0.0 20221201 (contributed by Xincheng & Fernanda)
20221129
- updated QSMxT to 1.1.13 (contributed by Ashley)
- added nipype 1.8.3 (contributed by Steffen)
- added mneextended 1.1.0 (contributed by David)
- added new tool category “workflows”
- added new CVMFS mirror server in Phoenix
- added mimetypes so that nii/minc files now open in the respective applications
- Matlab licenses can now be saved from the activation GUI
- update rstudio to 2022.07.2 (and R version to 4.1.2 with new additional packages, like brms)
20220813
- updated QSMxT to 1.1.12 (contributed by Ashley)
- updated 3D Slicer to 5.0.3 and included MONAI Label (contributed by Xincheng)
- added Matlab 2022a (contributed by Oren)
- updated AFNI to 22.1.14 (contributed by Steffen)
- updated Spinal Cord Toolbox to 5.7 (contributed by Steffen)
- updated Oshyx to 0.4 (contributed by Jeryn)
- updated freesurfer to 7.3.2 (contributed by Steffen)
- added CVMFS mirror server in Perth and cleaned up server list to account for DNS geo location steering (contributed by Steffen)
20220701
- added laynii 2.2.1 - layer fMRI toolbox (contributed by Renzo Huber)
- added fieldtrip 20220617 - eeg processing (contributed by David White)
20220329
- added BIDScoin 3.7.0 (converting data to bids) contributed by Oren
- added sigviewer 0.6.4 (viewing electrophysiological data) contributed by Tom
- added niftyreg 1.4.0 (image registration tool) contributed by Steffen
- added mne 1.0.0 (EEG processing pipeline) contributed by David
20220302
- update of ROMEO (phase unwrapping) to latest version 3.2.8
- update of QSMxT (automated end-to-end QSM processing) to latest version 1.1.10
- added mritools 3.3.0 (includes clearswi 1.0.1, mcpc3ds 0.1.0, romeo 3.2.8 as compiled binaries)
20220222
- update for PhysIO toolbox (physiological noise correction for fMRI) to r2021a including the latest SPM r8224
- update of lcmodel to include basis sets for 1.5-9.4T
- added a memory display plugin to illustrate how much memory is available to the container and how much is consumed
- added a version checker to help with identifying if a new version is available
- added file upload via guacamole (+ update of guacamole to 1.4) - users can now drag and drop their files onto guacamole and they get copied to the desktop
20220128
- update of Spinalcordtoolbox to 5.5
- update of CAT12 to r1933
20220121
- MNE Python 0.23.4 container including VScode and extensions
- VScode container including Python/Julia Extensions and singularity to test “Inception Mode” (Running singularity containers within singularity containers)
- update of fsl to 6.0.5.1
- added CAT12 (a software that allows estimation of tissue volumes (and additional surface parameters such as cortical thickness, gyrification or fractal dimension) for different volume and surface-based atlas maps)
20220111
- a deep learning based vessel segmentation algorithm “vesselapp” was added in version 0.3.1
- palm - Permutation Analysis of Linear Models - was added in version alpha119
- niistat running in octave was added with version 1.0.20191216
- MRIcroGL was updated to a version with included python support, so the scripting is now working
- rabies - Rodent Automated Bold Improvement of EPI Sequences was added with version 0.3.5
- oshyx was updated to 0.3
20211220
- neurodesktop can now be accessed via native RDP client as well (e.g. for multi-monitor support): https://www.neurodesk.org/docs/getting-started/neurodesktop/windows/#using-an-rdp-client
- there is a new Help button in the menu :)
- updates of ants 2.3.4 (now includes Scripts as well, including antsCookTemplatePriors.sh) + newly added version 2.3.5
- new version of QSMxT 1.1.9 20211219
- new version of Spinal Cord Toolbox 5.4
- new tools: MRIcroGL and surfice - fantastic viewers for neuroimaging data
20211207
- Physio toolbox compiled and added to SPM + update of SPM
- added brainstorm
- new neurodesktop container management scripts for Linux, Mac and Windows: https://github.com/NeuroDesk/neurodesktop
- added fieldtrip
- Datalad is now in the main image, so datalad run should work
- added Oshy-X segmentation tool
- updated freesurfer 7.2.0
20211028
- added EEGLAB
20211018
- added Rstudio, R and multiple R packages (plotly, car, tidyverse, …)
- added ClearSWI and ROMEO for MRI phase processing (including new Tutorials: https://www.neurodesk.org/tutorials-examples/tutorials/phase_processing/)
- added more categories in applications menu (Body, Electrophysiology, Hippocampus, Phase Processing, Rodent Imaging, Shape Analysis, Spine, Statistics)
- bugfix: improved startup time of the desktop container (miniconda in homedirectory was causing chmod slowdown)
- bugfix: ssh, vnc and rdp servers are now restarted in case the container was stopped and started again (e.g. on Standby)
20210929
- fixed naming of aidmri to aidamri and added new category “Rodent Imaging”
- updated all tool icons and updated neurodesk icon including background image
- VScode now stores settings in persistent storage /neurodesktop-storage and with this keeps extensions and settings across different neurodesktop versions
- docker layers are now cached, so updating the desktop to the next version is very fast and consumes less disk space locally
- default theme of terminal changed from Solarized to Tango as the old theme was hiding information in tools like htop (same font colour on same background…)
20210923
- removed faulty mriqc 0.15.2 container
- neurodesk.github.io is now starting page in firefox browser
20210918
- added mriqc 0.16.1 and mrtrix 3.0.3
20210917
- included more tools for connecting to cloud storage services (rclone, owncloud, nextcloud, davfs2, globus). For more info: Storage
- styling of desktop interface, including background wallpaper and colour scheme in terminal window
- new categories in menu system (visualization) and added more categories to tools
20210916
- This is the first version of the newly renamed and rebuild neurodesktop (previously vnm and neuromachine)
- containers are mounted by default from CVMFS, but this can be deactivated by adding
-e CVMFS_DISABLE=trueto the docker call
1.9 - Contribute
Get Involved
Neurodesk is a community-driven project. We welcome contributions from people with diverse skill sets and backgrounds. Here are some of the ways you can get involved:
Contribute Code
Help us build better neuroimaging infrastructure by writing code, improving our containers, or developing new features.
- Add or update tools
- Help solve issues - visit our Github page and pick something out
Improve Documentation
Good documentation makes tools accessible. Contribute tutorials, usage guides, or improve existing documentation.
Create or Share Workflows
Make it easier for others to use Neurodesk by sharing reproducible analysis pipelines or creating new workflows.
- Submit an example notebook (feel free to have a look at the workflow examples already available)
Donate
Support our mission to make neuroimaging tools more accessible and reproducible. Every contribution helps sustain open infrastructure. Donations go towards paying for our cloud services and organising workshops.
Community & Conduct
We are committed to maintaining an inclusive, respectful, and welcoming environment for all contributors.
Meet the Team
Get to know the contributors powering Neurodesk.
Shaping the Future
Want to help shape what’s next for Neurodesk?
1.10 - Applications
Below is a list of the neurocontainer applications included in the most recent Neurodesk release.
To use these applications through the Neurodesk platform, find the correct instructions for getting started by selecting your computing environment details in the widget on our home page
Neurodesktop comes packaged with:
- programming software (e.g., Visual Studio Code, python, git)
- workflow systems (Nipype)
- data synchronization utilities (Rsync, Rclone, Nextcloud, Owncloud)
- system management tools (Lmod, Singularity, Htop)
- additional resources (Imagemagic, Firefox, OpenSSH client)
- access to Neurocontainers via the Neurodesk menu (see list below)
If you can’t find an application on the Nectar Desktop Service, visit our discussion forum to create a request
For more information on data synchronization, visit our Storage section
For guides and tutorials, refer to the respective tutorial and examples
2 - Getting Started
Release
Ensure you note the release date of the Neurodesktop container image during installation, as it is indicated in the docker run command, e.g.

We regularly update Neurodesktop for optimal performance and updated software. Check the Release History for past releases. To upgrade your container, replace the release number with your desired version. For replicable analysis pipelines, share the stable release number you used, enabling others to recreate your work environment anywhere.
Video tutorial
See below for a 14 minute tutorial on getting started.
You can also view this PowerPoint presentation that includes dynamic navigation and interactive buttons: Neurodesk Overview SlideShow - and PDF version of the presentation
2.1 - Local
2.1.1 - Neurodesk App
Determine System Privileges
Before running the app, check whether your system has privileged access (root/admin permissions). This determines which engine you need to use to run the app:
If you have privileged access → Use Docker or Podman Engine
If you do NOT have privileged access → Use TinyRange Engine, or run remote instance
Minimum System Requirements
- At least 5GB free space for neurodesktop base image.
- One of the following options, depending on system privileges:
With privileged access: Docker or Podman to run respective engines
Without privileged access: TinyRange Engine (included with Neurodesk App) and QEMU (only on macOS)
Downloading Neurodesk App
- Debian, Ubuntu Linux Installer x64
- Red Hat, Fedora, SUSE Linux Installer x64
- Debian, Ubuntu Linux Installer arm64
- Red Hat, Fedora, SUSE Linux Installer arm64
- Arch-based package via AUR
- macOS Intel Installer, macOS Apple silicon Installer
- Windows Installer
Installing Docker
If only connecting to a remote Neurodesk servers, you may skip Installing Docker
The Neurodesk App requires Docker to be installed on your computer. If you already have Docker installed, you can skip this step.
After installation, open a terminal (Linux/macOS) or command prompt (Windows) and run the following command to verify that Docker is working correctly:
docker --version
docker run hello-world
Installing QEMU
The easist way to install QEMU on macOS is using Homebrew:
brew install qemu
You can verify the installation by running:
qemu-system-aarch64 --version
Installing Neurodesk App
If you have an existing Neurodesk App installation, please first uninstall it by following the uninstall instructions here. Then, install the app for your system:
- Debian, Ubuntu Linux Installer:
sudo apt install -f ./NeurodeskApp-Setup-Debian.deb - Red Hat, Fedora, SUSE Linux Installer:
sudo rpm -i NeurodeskApp-Setup-Fedora.rpm - Arch-based package via AUR:
yay neurodesk(or follow instructions here) - macOS Installer: Double click the downloaded dmg file, then drag the NeurodeskApp.app to the Applications folder; for starting the app: Right click on the NeurodeskApp.app and select “Open”. For Apple Silicon systems (M1/M2): Make sure to enable Rosetta support in the docker settings for best performance!
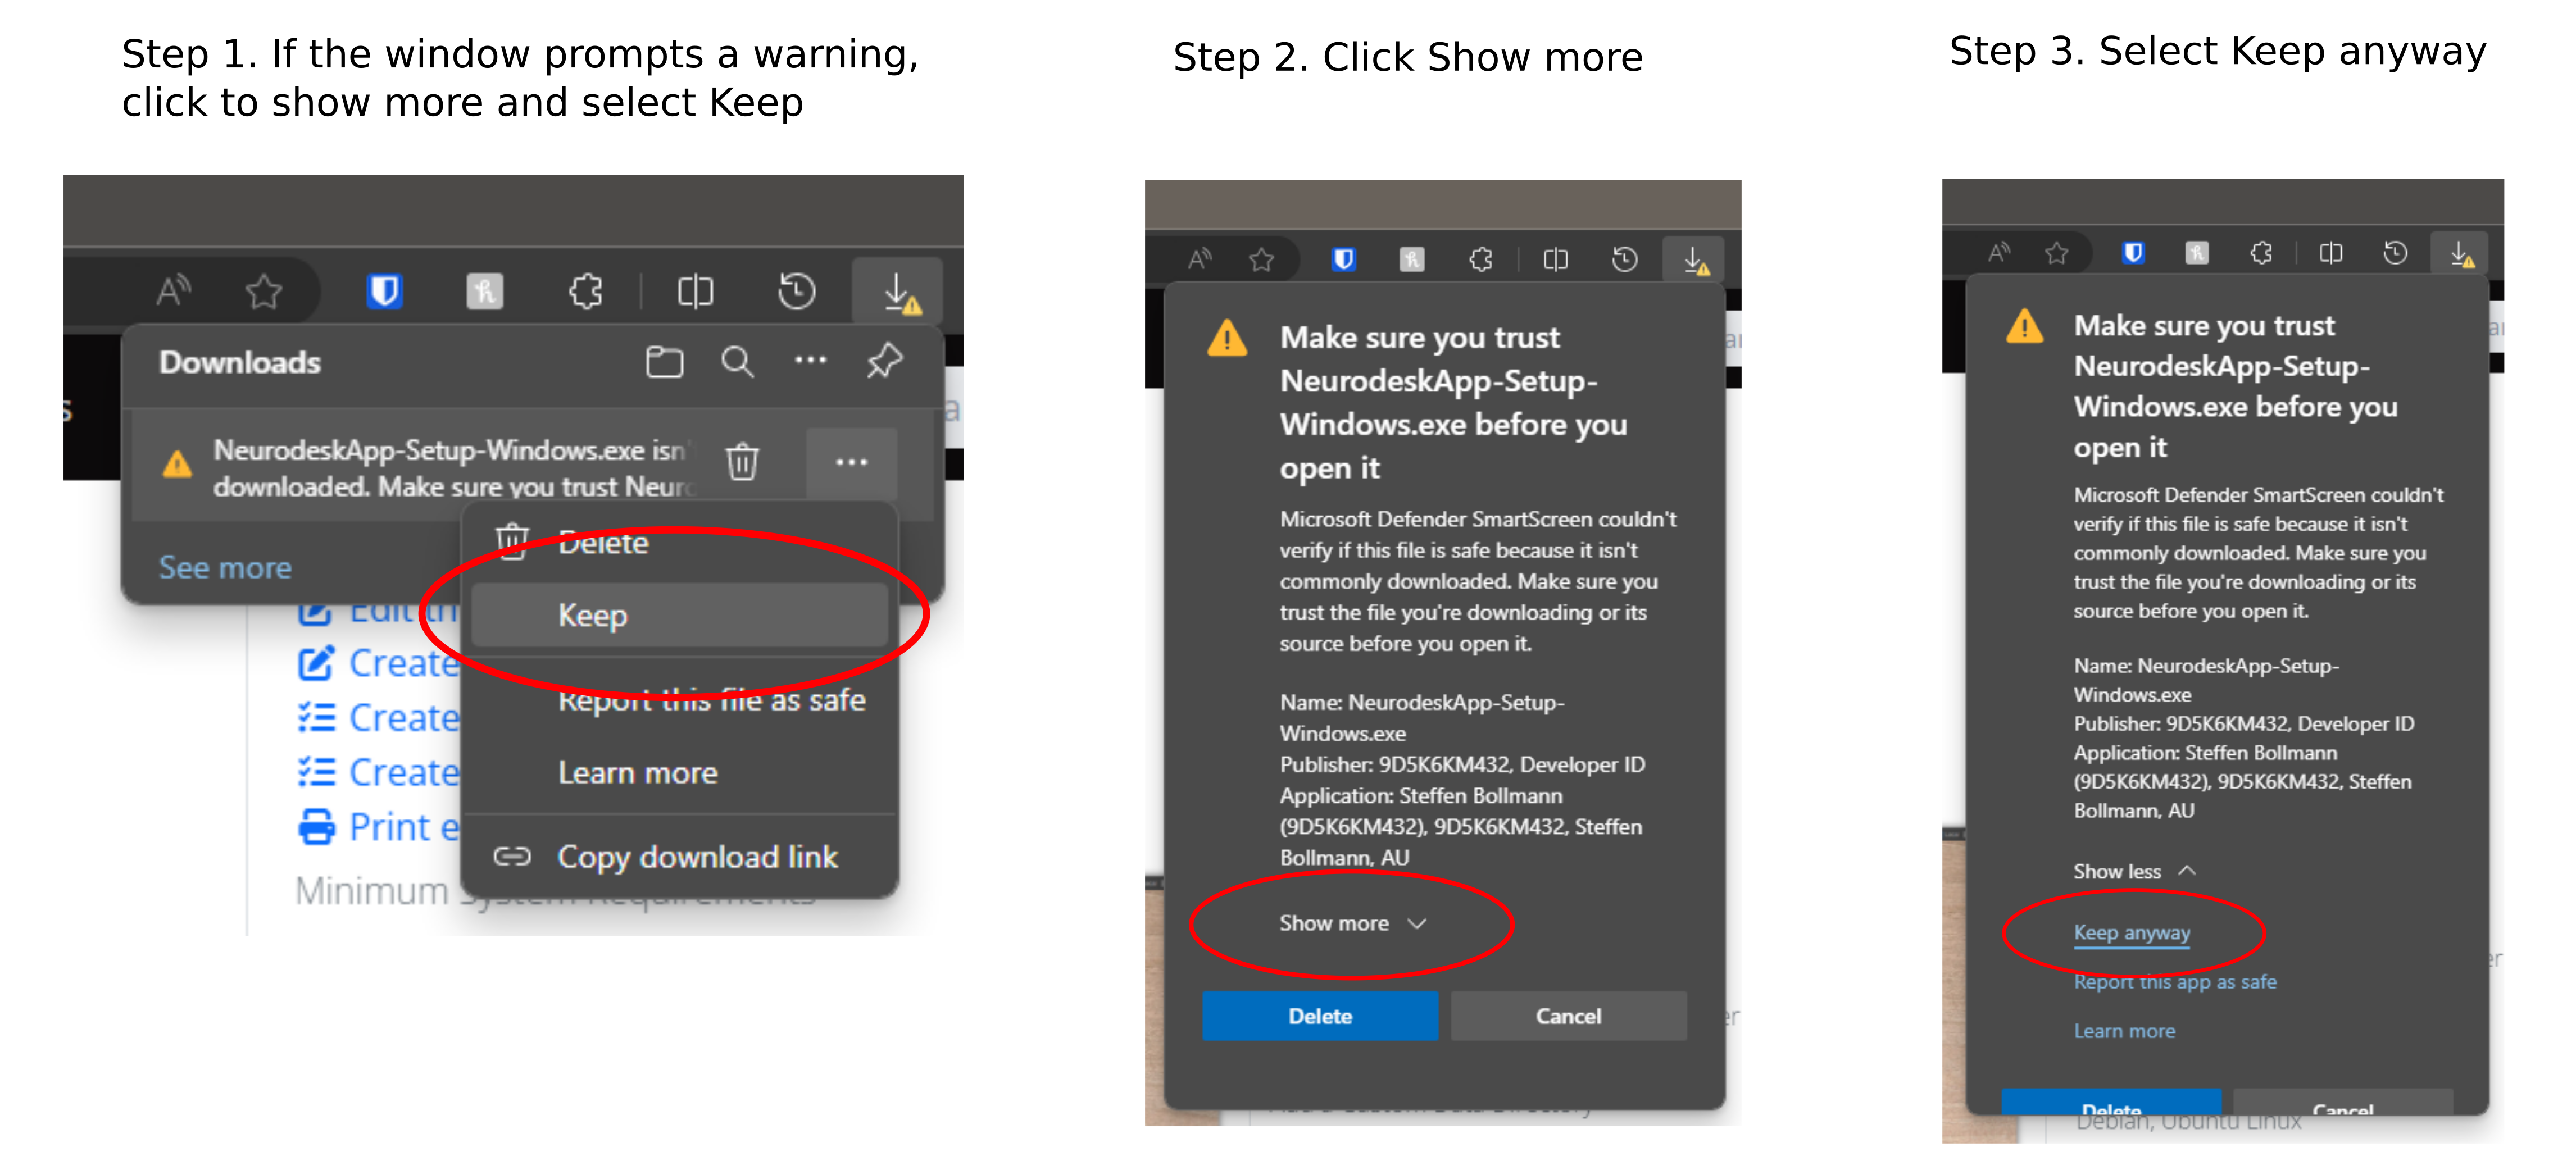
- Windows Installer: Double click the downloaded exe file; Accept to install from an unknown publisher with Yes; then accept the license agreement and click finish at the end.
Launching Neurodesk App
The Neurodesk App can be launched directly from your operating system’s application menu, or by running the neurodeskapp command in the command line.
Note that the Neurodesk App will set the File Browser’s root directory based on the launch method used. The default working directory is the user’s home directory - this can be customized from the Settings dialog.
Sessions and Projects
Sessions represent local project launches and connections to existing Neurodesk servers. Each Neurodesk UI window in the app is associated with a separate session and sessions can be restored with the same configuration later on.
Session start options
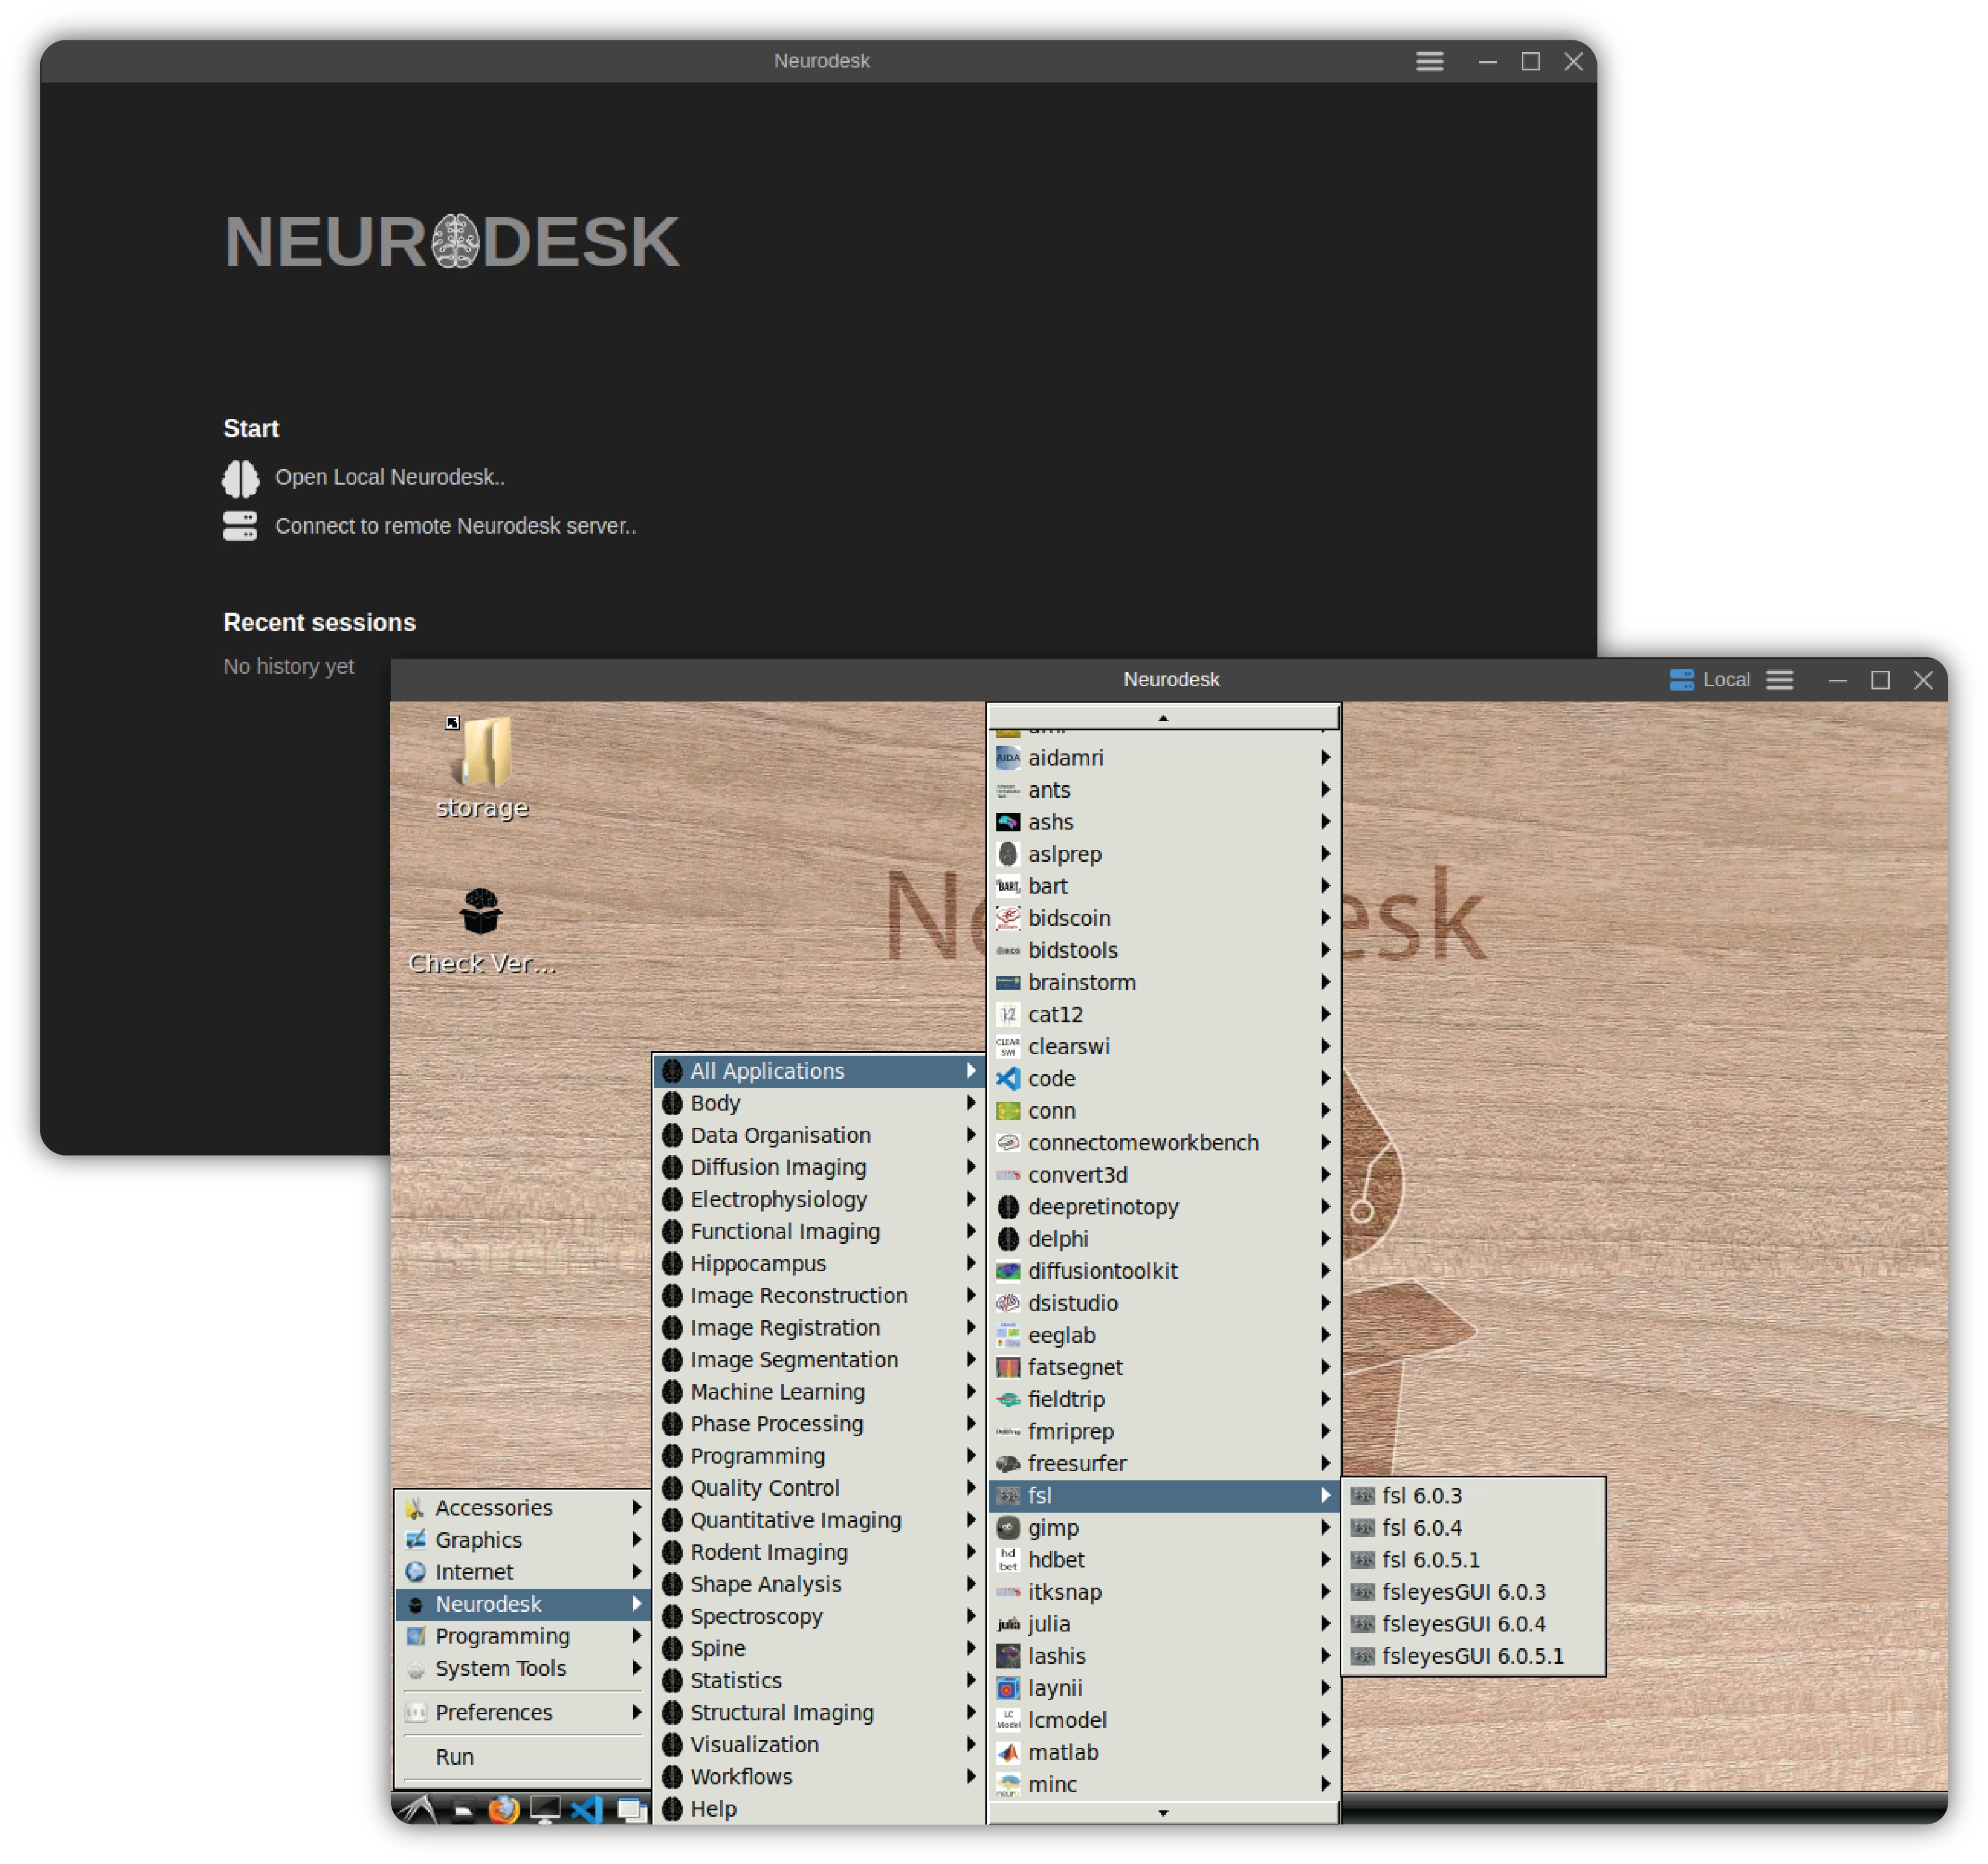
You can start a new session by using the links at the Start section of the Welcome Page.

Open Local Neurodesk..creates a new session in the default working directory.Connect to remote Neurodesk server..creates a session by connecting to a remote Neurodesk server.
Previously opened sessions are stored as part of application data and they are listed on the Welcome Page. Clicking an item in the Recent sessions list restores the selected session.
Connecting to local Neurodesk
Neurodesk App creates new Neurodesk sessions by launching a locally running Neurodesk server and connecting to it. To open a local instance, click the Open Local Neurodesk.. button in the Start section of the Welcome Page.
This will show a Jupyterlab interface. There are two options to interact with Neurodesk through this interface:
- By clicking the
NeurodeskAppicon on the right. This will launch a new window to start a Neurodesk interface. - By module loading containers on the left bar. You can interact with loaded modules through the command line interface.

Connecting to a remote Neurodesk Server
It can also connect to an existing Neurodesk server instance that is running remotely. In order to connect to a server, click the Connect to remote Neurodesk server.. button in the Start section of the Welcome Page.

This will launch a dialog that automatically lists the remote Neurodesk server instances.
Select a server from the list or enter the URL of the Neurodesk application server. If the server requires a token for authentication, make sure to include it as a query parameter of the URL as well (/lab?token=<token-value>). After entering a URL hit Enter key to connect.
If the Persist session data option is checked, then the session information is stored and Neurodesk App will re-use this data on the next launch. If this option is not checked, the session data is automatically deleted at the next launch and servers requiring authentication will prompt for re-login.
You can delete the stored session data manually at any time by using the Clear History option in the Privacy tab of Settings dialog.

Configuration and data files
Neurodesk App stores data in ~/neurodesktop-storage for Linux and Mac, or C:/neurodesktop-storage for Windows, as default.
Add a Custom Data Directory
Neurodesk App stores its data in the following locations:
By default, /home/jovyan/neurodesktop-storage in the app (which is bound with local directory ~/neurodesktop-storage in Unix/MacOS or C:/neurodesktop-storage in Windows)
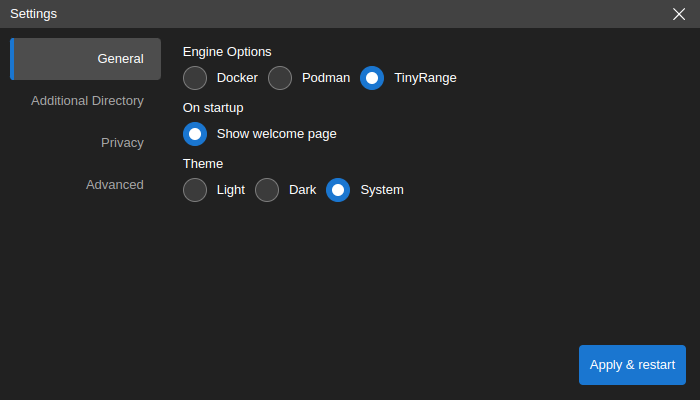
By choice, in the settings window below, select
Additional Directoryon the left side bar, clickChangebutton to select the local directory, then clickApply & restart. The next time you start the app, the data from the local directory can be found in /home/jovyan/data.
If you are using MacOS and Docker mounting an external hard drive will work out of the box. If you are using Podman you have to modify the Podman machine settings with the following commands once and then set the path in the Neurodesk App:
podman machine reset -f
podman machine init --rootful --now -v /Volumes:/Volumes -v $HOME:$HOME podman-machine-default

Troubleshooting Neurodesk App
/var/run/docker.sock: connect: permission denied, docker
This means that docker is not correctly setup yet, run:
sudo groupadd docker
sudo usermod -aG docker $USER
newgrp docker

sudo chown root:docker /var/run/docker.sock
sudo chmod 666 /var/run/docker.sock
FATAL:setuid_sandbox_host.cc(158)
If you see the error “FATAL:setuid_sandbox_host.cc(158)] The SUID sandbox helper binary was found, but is not configured correctly. Rather than run without sandboxing I’m aborting now. You need to make sure that /opt/NeurodeskApp/chrome-sandbox is owned by root and has mode 4755. Trace/breakpoint trap (core dumped)” this is caused by a recent change in Ubuntu 24.04.
A temporary workaround: Create the file /etc/apparmor.d/neurodeskapp With this content:
# This profile allows everything and only exists to give the
# application a name instead of having the label "unconfined"

abi <abi/4.0>,
include <tunables/global>

profile neurodeskapp "/opt/NeurodeskApp/neurodeskapp" flags=(unconfined) {
  userns,

  # Site-specific additions and overrides. See local/README for details.
  include if exists <local/neurodeskapp>
}
Then restart your computer. Then try to start the neurodesk app again.
Uninstalling Neurodesk App
Debian, Ubuntu Linux
sudo apt-get purge neurodeskapp # remove application
sudo rm /usr/bin/neurodeskapp # remove command symlink
rm -rf ~/.config/neurodeskapp # to remove application cache
Red Hat, Fedora, SUSE Linux
sudo rpm -e neurodeskapp # remove application
sudo rm /usr/bin/neurodeskapp # remove command symlink
rm -rf ~/.config/neurodeskapp # to remove application cache
Arch-based Linux distributions
sudo pacman -Rs neurodeskapp-bin
macOS
Find the application installation NeurodeskApp.app in Finder (in /Applications or ~/Applications) and move to Trash by using CMD + Delete. Clean other application generated files using:
rm -rf ~/Library/neurodeskapp # to remove application cache
rm -rf ~/Library/Application\ Support/neurodeskapp # to remove user data
Windows
On Windows, go to Windows Apps & Features dialog using Start Menu -> Settings -> Apps and uninstall Neurodesk App as shown below.
In order to remove application cache, delete C:\Users\<username>\AppData\Roaming\neurodeskapp directory. The AppData directory is a hidden directory - so make sure to activate hidden Items in the Windows explorer under View -> Show -> Hidden Items
2.2 - Hosted
2.2.1 - Github Codespaces
Start a GitHub Codespace in the repository of your choice: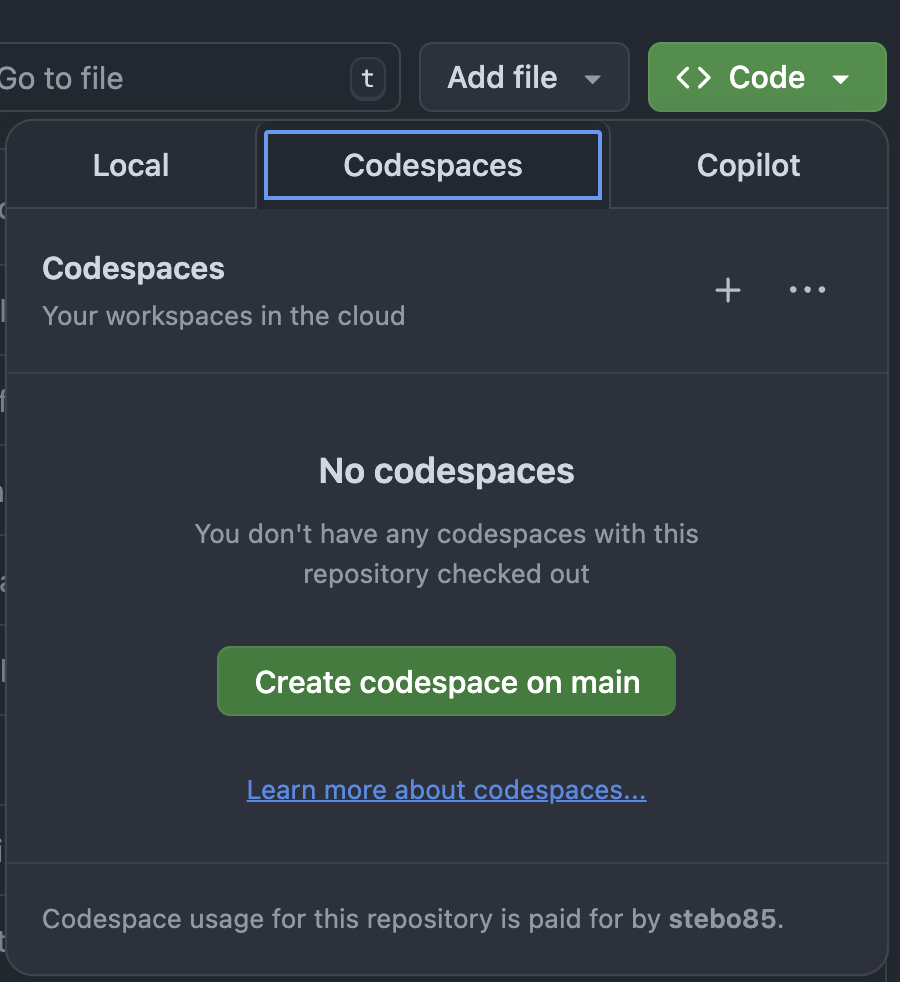
Then start the neurodesktop container in a terminal:
docker volume create neurodesk-home &&
sudo docker run \
  --shm-size=1gb -it --security-opt apparmor=neurodeskapp --privileged --user=root --name neurodesktop \
  -v ~/neurodesktop-storage:/neurodesktop-storage \
  --mount source=neurodesk-home,target=/home/jovyan \
  -e NB_UID="$(id -u)" -e NB_GID="$(id -g)" \
  -p 8888:8888 \
  -e NEURODESKTOP_VERSION=2025-06-10 ghcr.io/neurodesk/neurodesktop/neurodesktop:2025-06-10
Then open Neurodesktop in the browser by clicking the “Open in Browser” Button displayed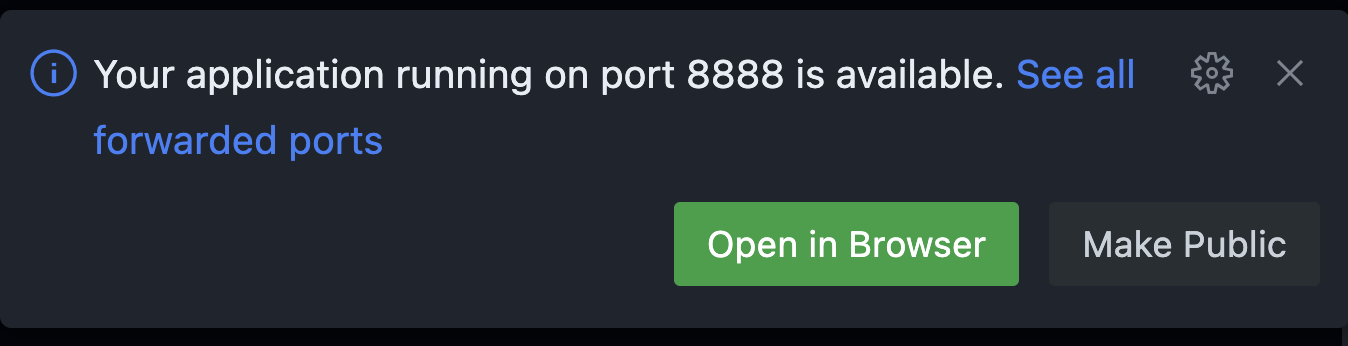
The token for authentication is displayed in the terminal:
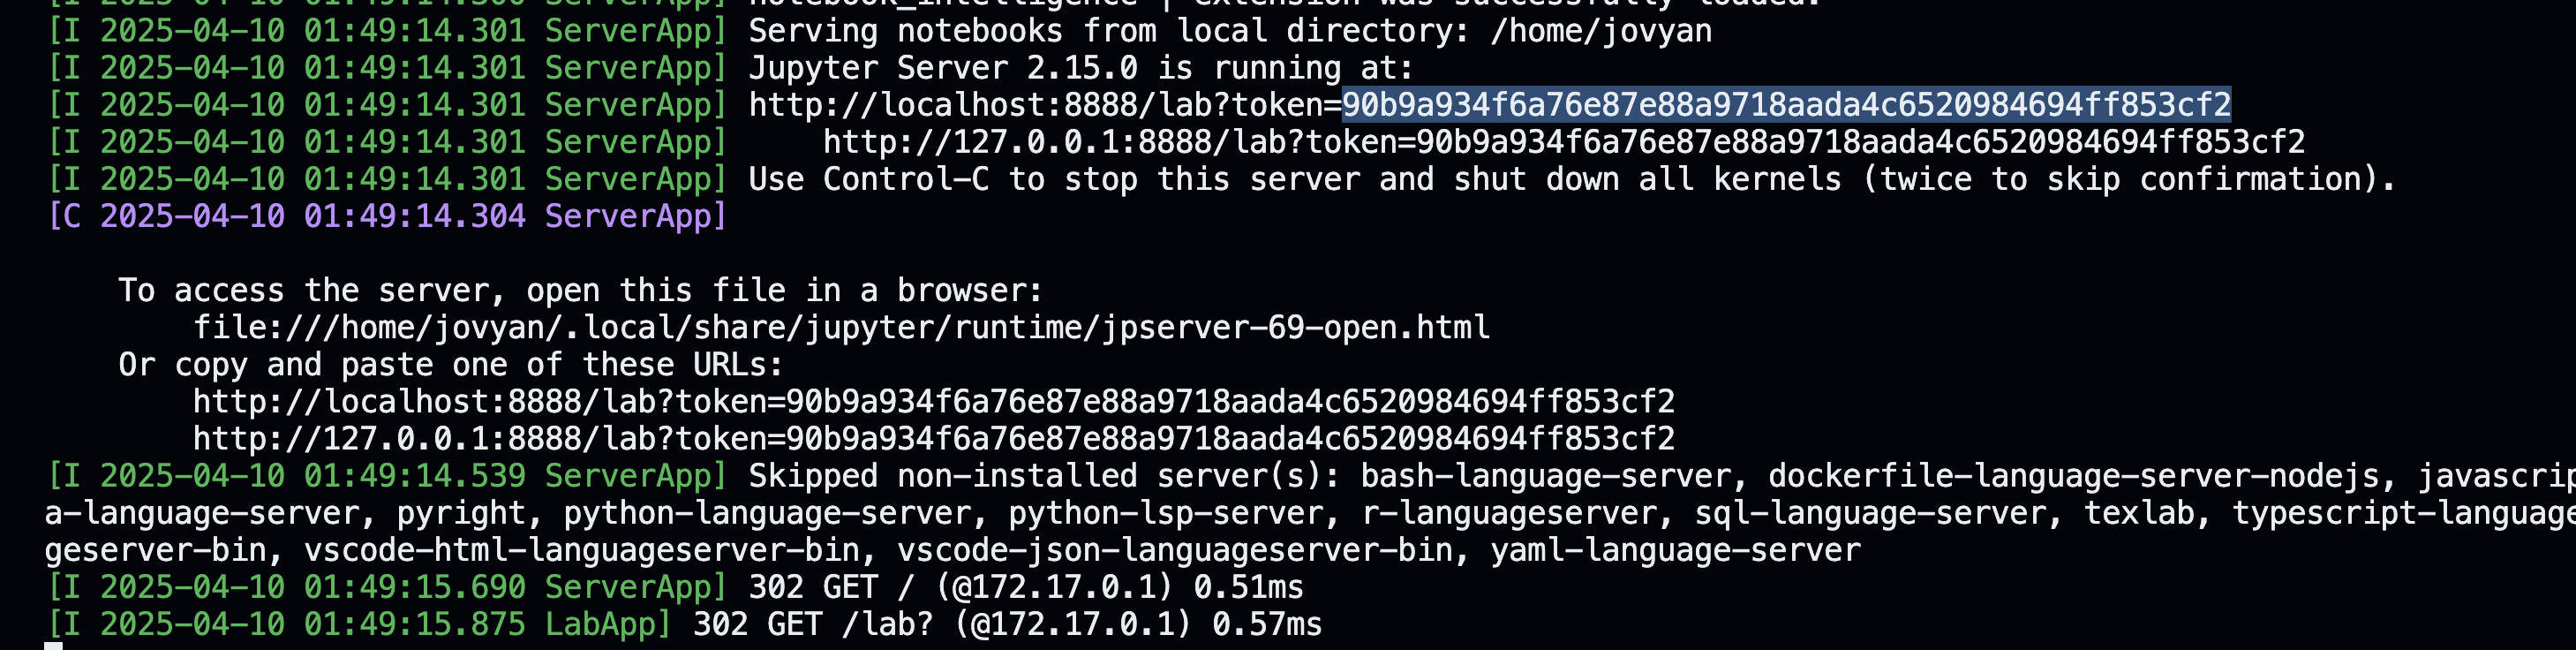
2.2.2 - Bunya
Neurodesk is installed at the University of Queensland’s supercomputer “Bunya”. To access neurodesk tools you need to be in an interactive job (so either start a virtual desktop via Open On-Demand: https://bunya-ondemand.rcc.uq.edu.au/pun/sys/dashboard) or run:
salloc --nodes=1 --ntasks-per-node=1 --cpus-per-task=1 --mem=5G --job-name=TinyInteractive --time=01:00:00 --partition=debug --account=REPLACE_THIS_WITH_YOUR_AccountString srun --export=PATH,TERM,HOME,LANG --pty /bin/bash -l
Then load the neurodesk modules:
module use /sw/local/rocky8/noarch/neuro/software/neurocommand/local/containers/modules/
export APPTAINER_BINDPATH=/scratch,/QRISdata
Now you can list all modules (Neurodesk modules are the first ones in the list):
ml av
Or you can module load any tool you need:
ml qsmxt/6.4.1
If you want to use GUI applications (fsleyes, afni, suma, …) you need to overwrite the temporary directory to be /tmp (otherwise you get an error that it cannot connect to the DISPLAY):
export TMPDIR=/tmp
NOTE: If you are using AFNI on Bunya then the default detach behavior will cause SIGBUS errors and a crash. To fix this run AFNI with:
afni -no_detach
NOTE: MRIQC has its $HOME variable hardcoded to be /home/mriqc. This leads to problems on Bunya. A workaround is to run this before mriqc:
export neurodesk_singularity_opts="--home $HOME:/home"
If you are missing an application, please contact mail.neurodesk@gmail.com and ask for the neurodesk installation to be updated on Bunya :)
Using this inside a jupyter notebook
You need to install this in addtion:
pip install jupyterlmod
Then start a notebook and run these commands:
import module
await module.load('niimath')
2.2.3 - Nectar Virtual Desktop Service
Note
Link to Nectar Virtual Desktop Service: https://desktop.rc.nectar.org.auThere are a few differences between the open-source version of Neurodesk and what’s hosted on Nectar VDI:
- There is no
/neurodesktop-storagefolder (the folder on the Desktop does not lead anywhere). - Files uploaded via drag and drop do not get stored on the desktop but in
/home/vdiuser/thinclient_drives/GUACFS
Instructions for use
Click on “Sign in”.
Choose the AAF option.
Choose your institution from the list.
Provide your email address and password.
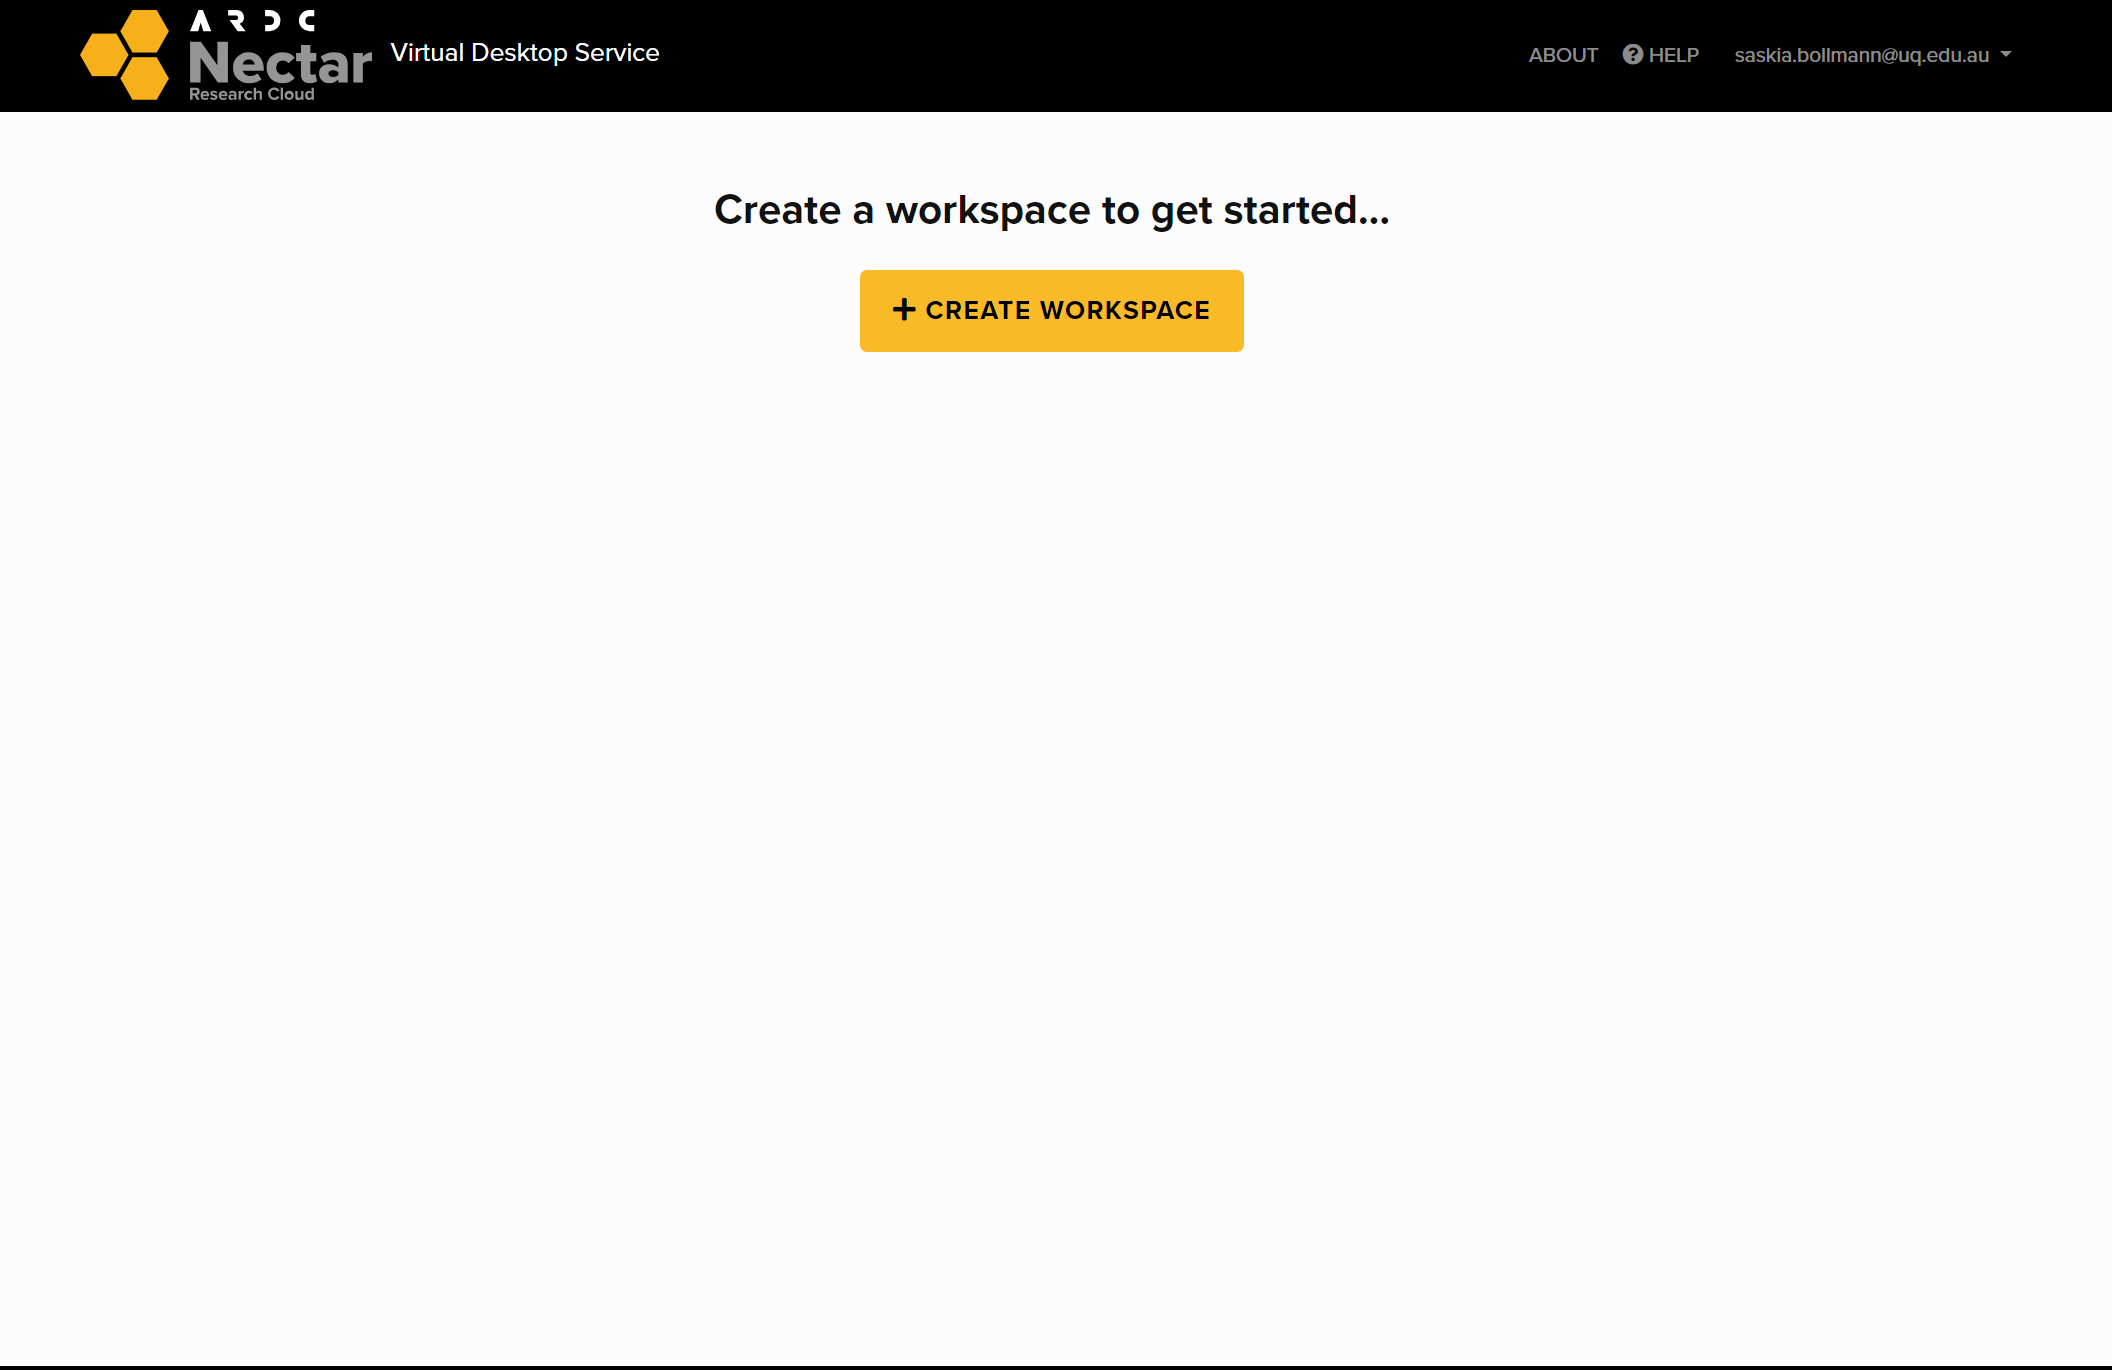
Click on create a Workspace (you only need to do this when you sign in for the first time).
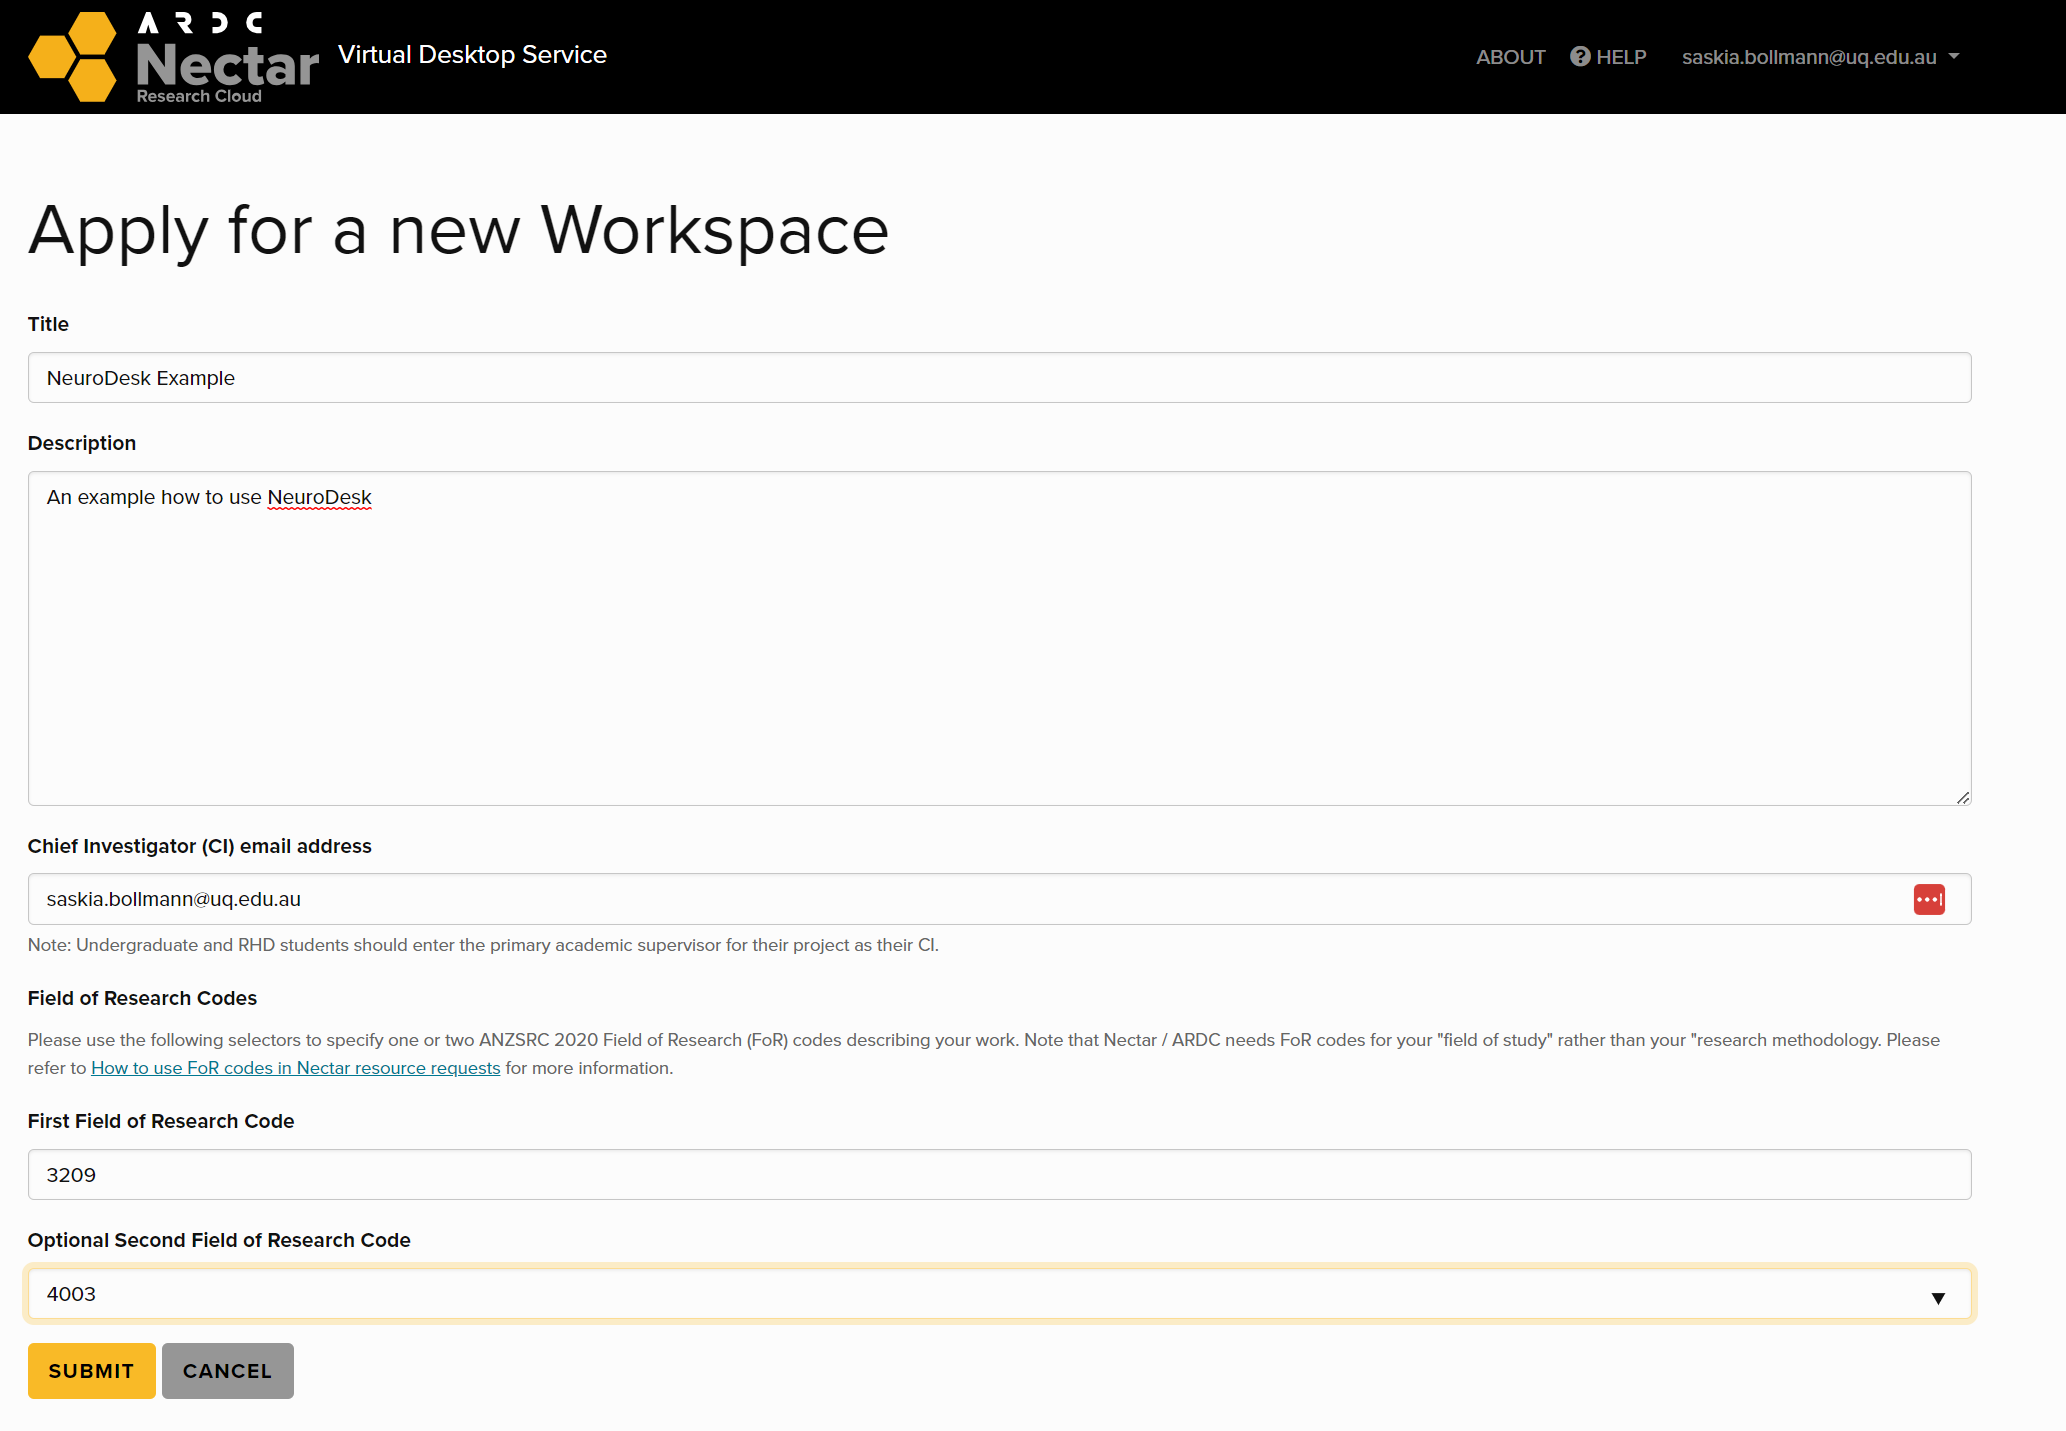
Fill form ‘Apply for new Workspace’ and submit.
Click on “EXPLORE”.
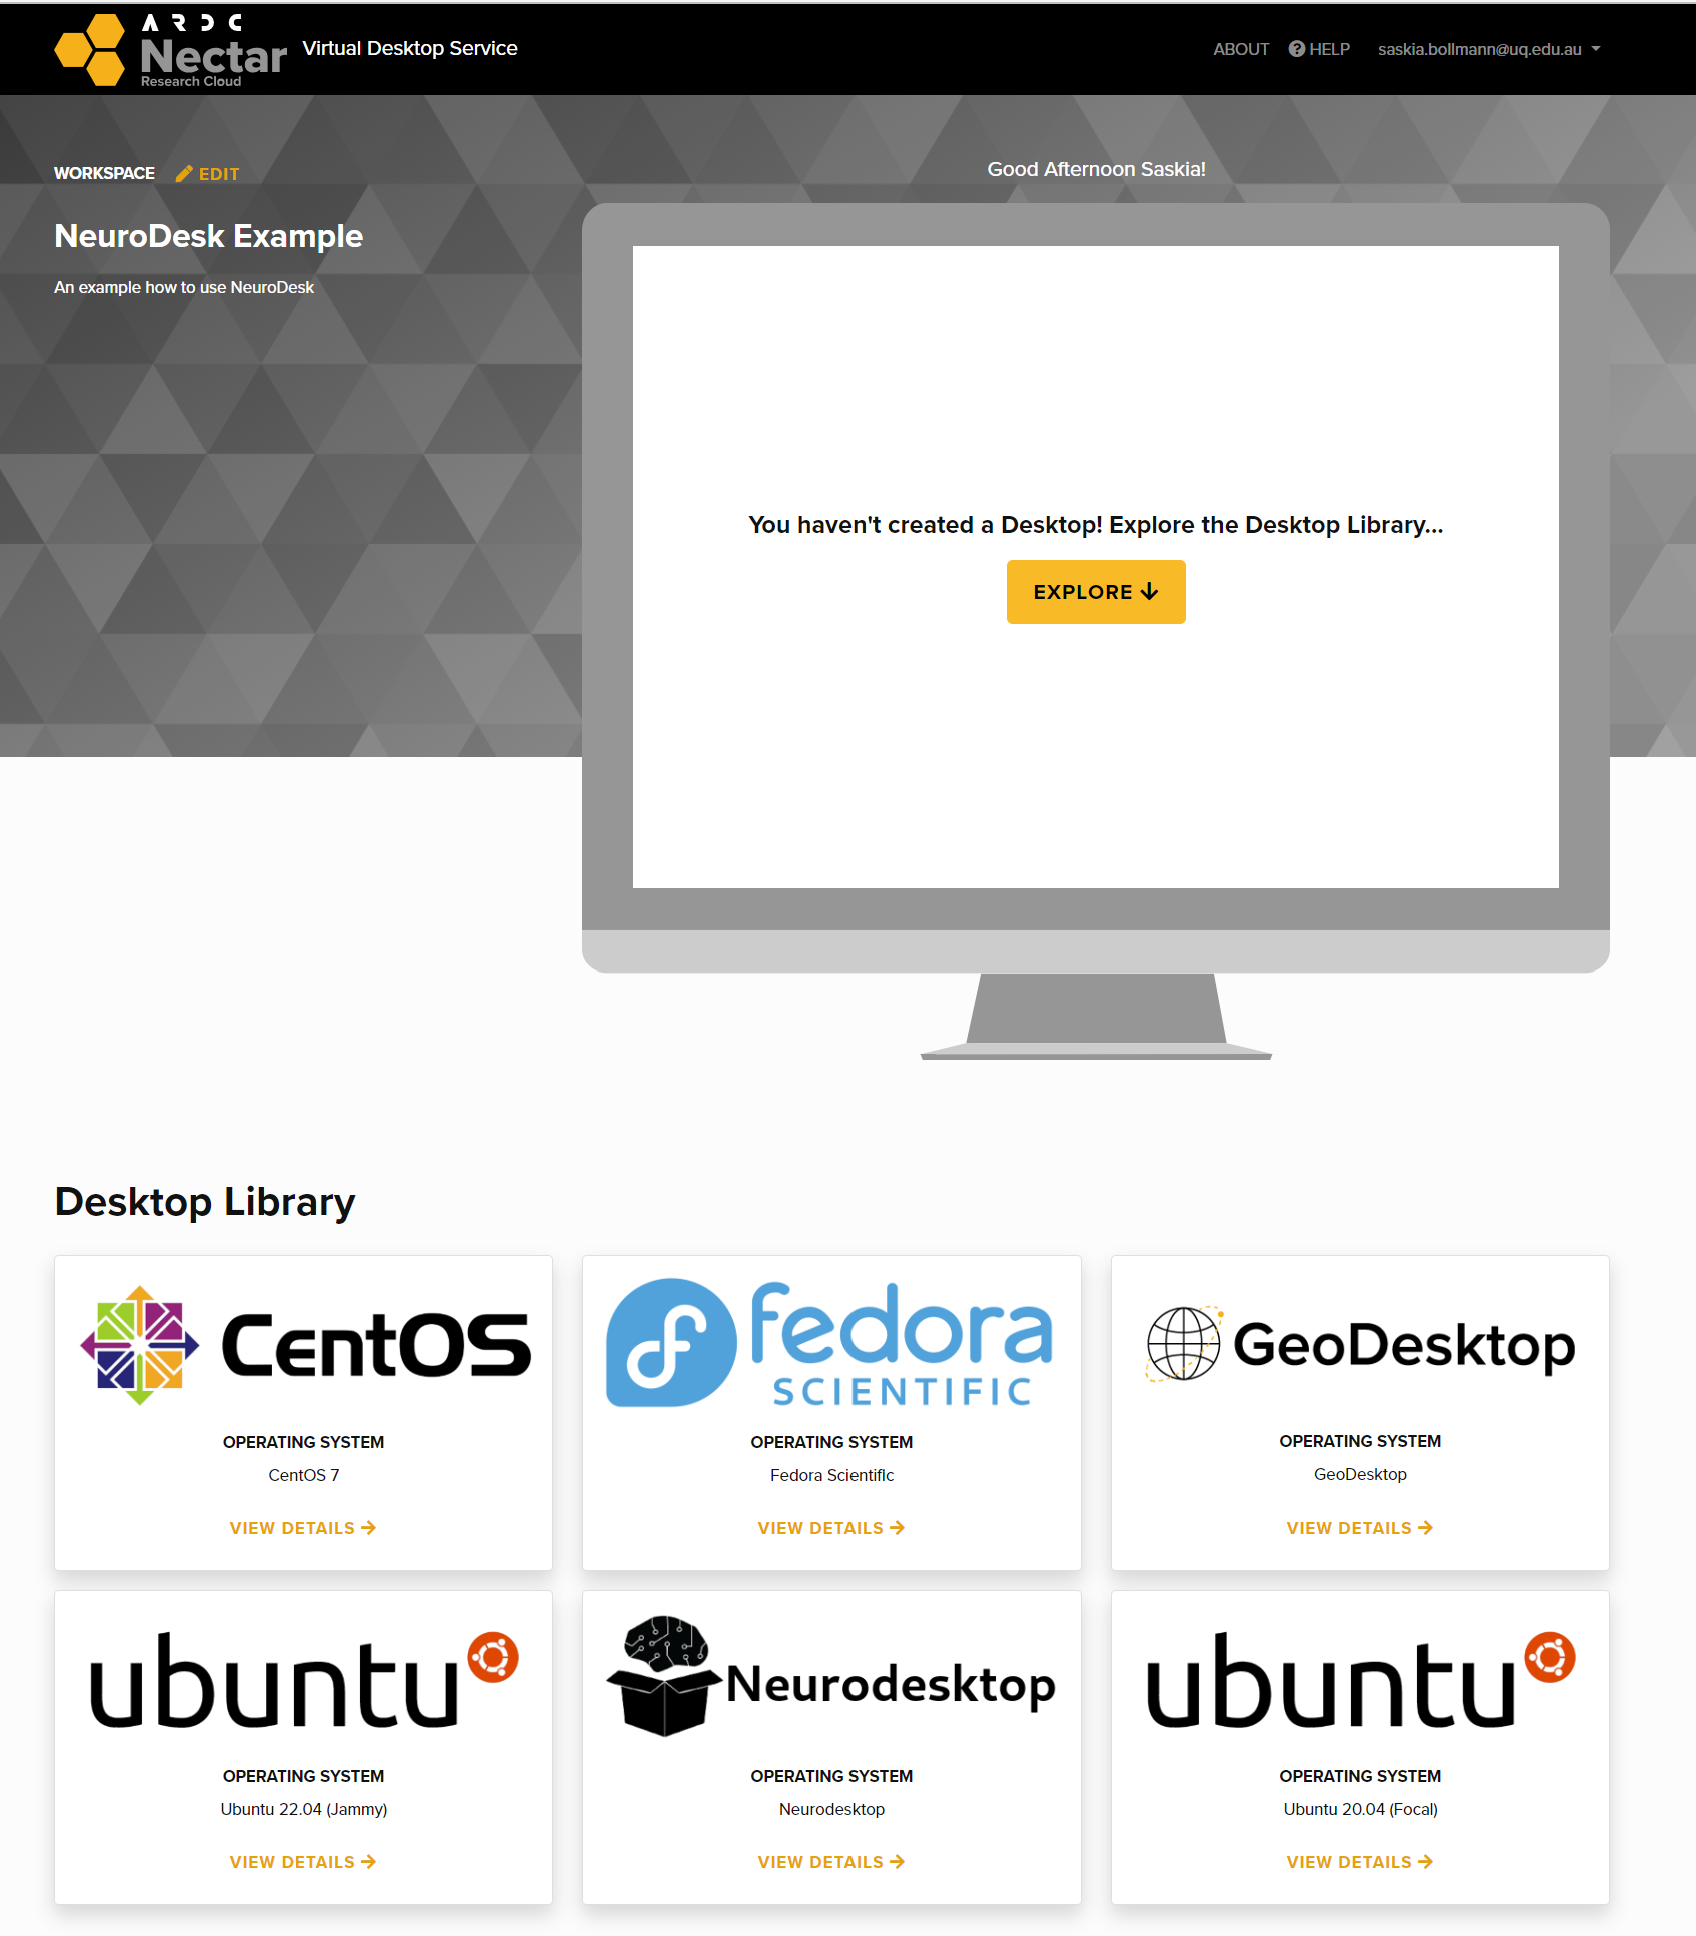
Click “VIEW DETAILS” under Neurodesktop:
Click “CREATE DESKTOP +” button on the top right corner.
Choose the desired availability zone.
Wait until everything is completed:
Click “OPEN DESKTOP ->”:

For a general guide on using the ARDC virtual desktops, click here: https://tutorials.rc.nectar.org.au/virtual-desktop-service/01-overview
For a specific explanation on how to launch the various applications available in the Neurodesktop desktop, follow the instructions here: https://www.neurodesk.org/docs/getting-started/neurodesktop/
2.2.4 - Play
Neurodesk Play is a publicly available service for accessing Neurodesk without any setup
2.2.5 - Google Colab
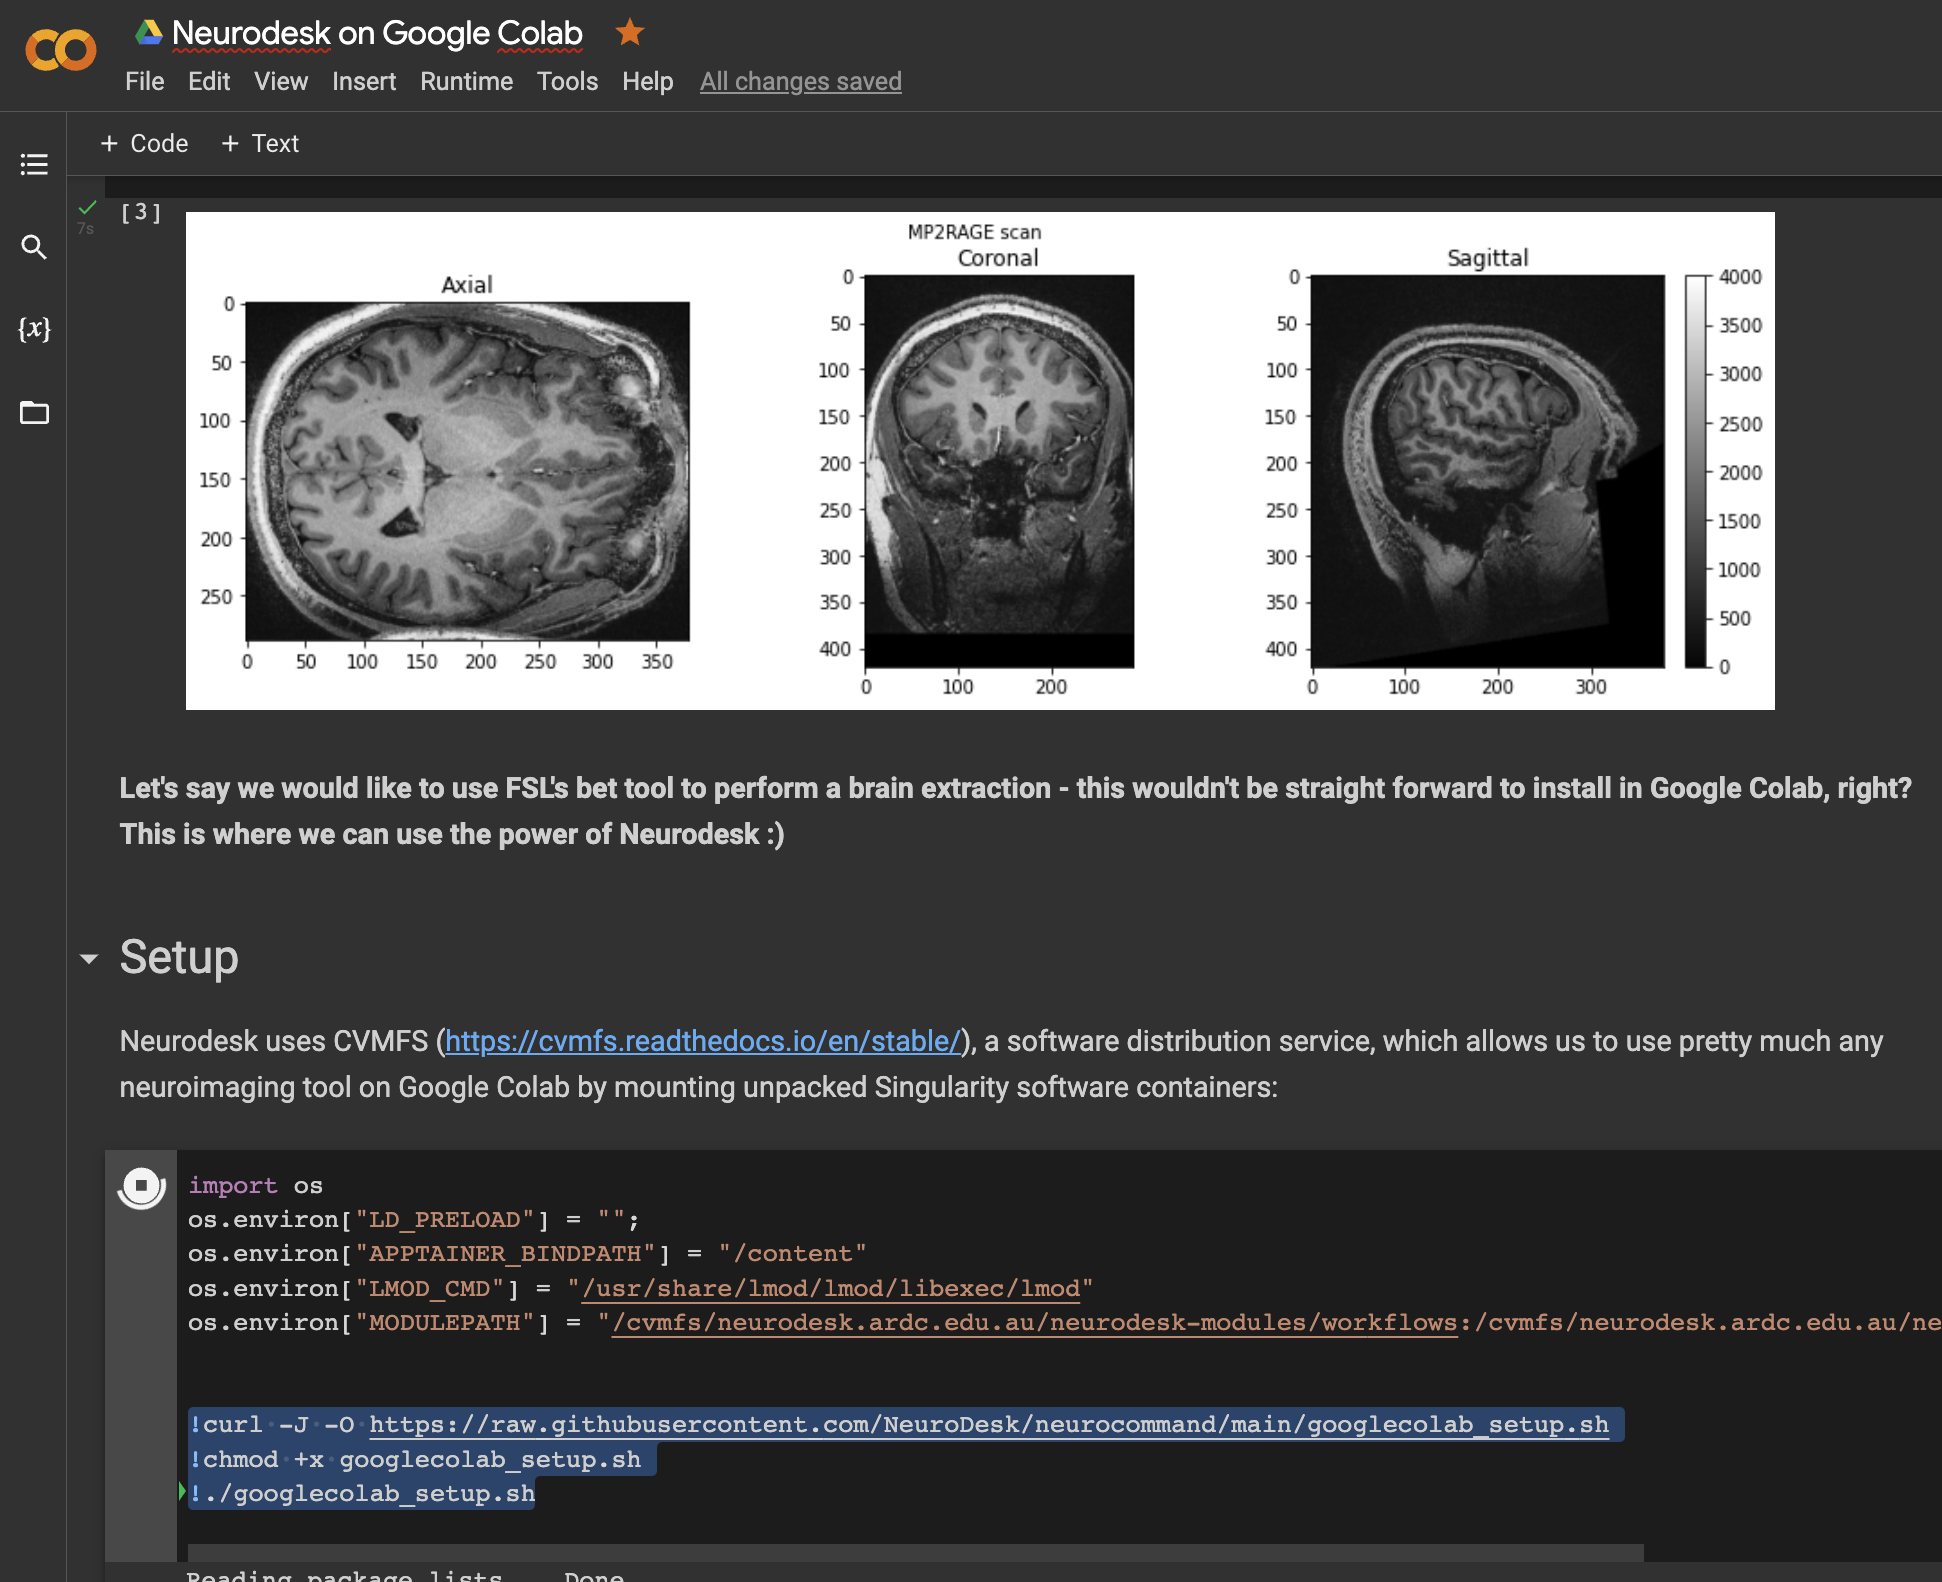
Open a notebook in Google Colab and run the following commands to set up the Neurodesk environment:
import os
os.environ["LD_PRELOAD"] = "";
os.environ["APPTAINER_BINDPATH"] = "/content"
os.environ["MPLCONFIGDIR"] = "/content/matplotlib-mpldir"
os.environ["LMOD_CMD"] = "/usr/share/lmod/lmod/libexec/lmod"

!curl -J -O https://raw.githubusercontent.com/NeuroDesk/neurocommand/main/googlecolab_setup.sh
!chmod +x googlecolab_setup.sh
!./googlecolab_setup.sh

os.environ["MODULEPATH"] = ':'.join(map(str, list(map(lambda x: os.path.join(os.path.abspath('/cvmfs/neurodesk.ardc.edu.au/neurodesk-modules/'), x),os.listdir('/cvmfs/neurodesk.ardc.edu.au/neurodesk-modules/')))))
Once this setup is completed you can list the available Neurodesk applications like this:
import lmod
await lmod.avail()
and use applications like this:
await lmod.load('fsl/6.0.4')
!bet
This notebook demonstrates how to use all Neurodesk applications in Google Colab: https://colab.research.google.com/drive/1g5cnZxj1llRaHmOs4xSglqsXnFkQYuol?usp=sharing
This is a google colab notebook that shows how to integrate with google drive and contains an example how to run fMRIprep in google colab: https://colab.research.google.com/drive/11wVBkjNvrzo2TkUAILtWnPumAeFAfqkl?usp=sharing
and more examples can be found in our example library
2.3 - Neurodesktop
Video tutorial
See below for a 4 minute tutorial on Installation, Usage and Data Access with Neurodesktop
2.3.1 - Portable Unprivileged NeuroDesktop
Minimum System Requirements
- At least 5GB free space for neurodesktop base image
- At least 8GB of RAM
Downloading TinyRange
TinyRange (https://github.com/tinyrange/tinyrange) is a lightweight runtime for running Virtual Machines and Containers. It runs without admin privileges and doesn’t need Docker or Podman installed to work.
Downlaod the latest version of TinyRange from: https://github.com/tinyrange/tinyrange/releases/latest
Installing TinyRange
- Unzip the archive to some local path on your computer. It’s recommended not to extract it to a network drive.
- Open a terminal in the extracted archive and run
./tinyrange loginortinyrange loginon Windows. - Once you see the
tinyrange:~#typeexit.
Enabling Hardware Acceleration
- Windows: This might require admin privileges in some cases. Search in your start menu for “Turn Windows features on or off.”. Find “Hyper-V Hypervisor” or “Windows Hypervisor Platform” and make sure it’s enabled. Alternatively, run
dism /online /enable-feature /featurename:"HypervisorPlatform"in an Administrator shell. Then restart your computer. To test if it’s working correctly run:tinyrange.exe env check-hv - Ubuntu/Other Linux: It should already work out of the box. If not make sure your user account has permission to read/write
/dev/kvm. - MacOS: No extra steps required. It already works.
2.3.2 - Linux
Minimum System Requirements
- At least 3GB free space for neurodesktop base image
- Docker requirements. Details found under https://docs.docker.com/get-docker/
Quickstart
0. Install Docker or Podman
Install Docker from here: https://docs.docker.com/get-docker/. Additional information is available below. Alternatively, Neurodesk also works with Podman (https://podman.io).
To set up Neurodesk on Ubuntu, ensure both Podman client and server are installed. Follow the Podman installation instructions provided at https://podman.io/docs/installation for server setup.
In Ubuntu 20.10 or newer versions, the packages to install Podman are included to download in the standard repository of the system. However, for Ubuntu 20.04, we manually have to add the repository of Podman.
sudo apt update && sudo apt upgrade -y
sudo apt install curl
echo "deb https://download.opensuse.org/repositories/devel:/kubic:/libcontainers:/stable/xUbuntu_20.04/ /" | sudo tee /etc/apt/sources.list.d/devel:kubic:libcontainers:stable.list
curl -L "https://download.opensuse.org/repositories/devel:/kubic:/libcontainers:/stable/xUbuntu_20.04/Release.key" | sudo apt-key add -
sudo apt update
sudo apt-get -y install podman
1. Optional: only for ARM64 hardware
Neurodesk supports ARM64 hardware through binfmt
To enable Neurodesk on ARM64 hardware run this setup step:
sudo docker run --privileged --rm tonistiigi/binfmt --install all
2. Run Neurodesktop
Before the first run, create a local folder where the downloaded applications will be stored, e.g. mkdir ~/neurodesktop-storage
Then use one of the following options to run Neurodesktop:
Option 1 (Recommended for local installations): Neurodesk-App
Instructions on installing and using the app: https://www.neurodesk.org/docs/getting-started/neurodesktop/neurodeskapp/
Option 2 (Advanced and for remote installations): Using Terminal
- If the Linux machine is remote (e.g. in the cloud), connect to the machine with a port forwarding first:
ssh -L 8888:127.0.0.1:8888 USER@IP
- then start neurodesktop:
docker volume create neurodesk-home &&
sudo docker run \
  --shm-size=1gb -it --security-opt apparmor=neurodeskapp --privileged --user=root --name neurodesktop \
  -v ~/neurodesktop-storage:/neurodesktop-storage \
  --mount source=neurodesk-home,target=/home/jovyan \
  -e NB_UID="$(id -u)" -e NB_GID="$(id -g)" \
  -p 8888:8888 \
  -e NEURODESKTOP_VERSION=2025-06-10 vnmd/neurodesktop:2025-06-10
or use the github container registry (in case docker hub is down or blocked in your firewall):
docker volume create neurodesk-home &&
sudo docker run \
  --shm-size=1gb -it --security-opt apparmor=neurodeskapp --privileged --user=root --name neurodesktop \
  -v ~/neurodesktop-storage:/neurodesktop-storage \
  --mount source=neurodesk-home,target=/home/jovyan \
  -e NB_UID="$(id -u)" -e NB_GID="$(id -g)" \
  -p 8888:8888 \
  -e NEURODESKTOP_VERSION=2025-06-10 ghcr.io/neurodesk/neurodesktop/neurodesktop:2025-06-10
or for podman:
podman volume create neurodesk-home &&
sudo podman run \
  --shm-size=1gb -it --privileged --user=root --name neurodesktop \
  -v ~/neurodesktop-storage:/neurodesktop-storage \
  --mount type=volume,source=neurodesk-home,target=/home/jovyan \
  -e NB_UID="$(id -u)" -e NB_GID="$(id -g)" \
  -p 8888:8888 \
  -e NEURODESKTOP_VERSION=2025-06-10 docker://vnmd/neurodesktop:2025-06-10
If you run Ubuntu > 23.10 you need to create this apparmor profile under /etc/apparmor.d/neurodeskapp
# This profile allows everything and only exists to give the
# application a name instead of having the label "unconfined"

abi <abi/4.0>,
include <tunables/global>

profile neurodeskapp "/opt/NeurodeskApp/neurodeskapp" flags=(unconfined) {
  userns,

  # Site-specific additions and overrides. See local/README for details.
  include if exists <local/neurodeskapp>
}
If you get errors in neurodesktop then check if the ~/neurodesktop-storage directory is writable to all users. Otherwise run:
chmod a+rwx ~/neurodesktop-storage
If you get error that’s not assessable on your network or causes problems then you can try to use the DNS server 8.8.8.8 (Google Public DNS) in the Docker command.
docker volume create neurodesk-home &&
sudo docker run \
  --shm-size=1gb -it --privileged --user=root --name neurodesktop \
  --dns 8.8.8.8 \
  -v ~/neurodesktop-storage:/neurodesktop-storage \
  --mount source=neurodesk-home,target=/home/jovyan \
  -e NB_UID="$(id -u)" -e NB_GID="$(id -g)" \
  -p 8888:8888 \
  -e NEURODESKTOP_VERSION=2025-06-10 vnmd/neurodesktop:2025-06-10
- Once neurodesktop is downloaded, leave the terminal open and check which server neurodesktop is running on (Avoid pressing CTRL+C).
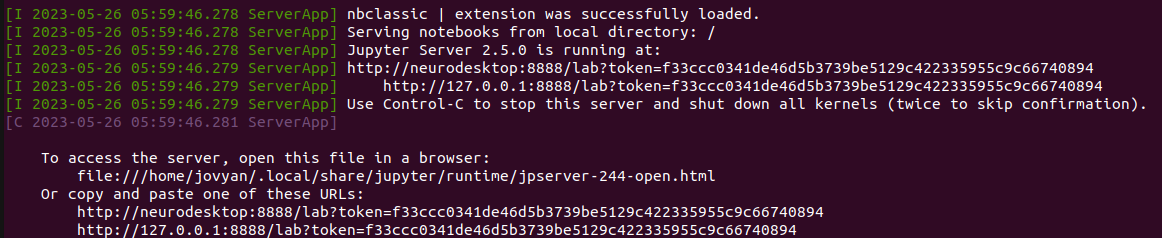
- To access neurodesktop, open your web browser and type in one of the provided URLs in your terminal (e.g.
http://127.0.0.1:8888/lab?token=your_unique_token).
If using Chrome, a pop-up may open with the text:
"http://127.0.0.1:8888 wants to
See text and images copied to the clipboard".
Press “Allow” to access your clipboard from within Neurodesktop.
Press on “Desktop Auto-Resolution” under “ALL CONNECTIONS”
If it is the first time you have used Neurodesktop, wait until the desktop appears (it may take a few seconds). Otherwise, it should appear instantaneously.
Neurodesk is now ready to use! See the tutorials page for advice on how to use Neurodesk.
For an optimal experience, switch your browser to full-screen mode by following the instructions for your browser here: https://www.thewindowsclub.com/open-chrome-edge-or-firefox-browser-in-full-screen-mode
Deleting neurodesktop:
When done processing your data it is important to stop and remove the container - otherwise the next start or container update will give an error ("… The container name “/neurodesktop” is already in use…")
Note
Notice that any data that were saved outside of /neurodesktop-storage would be lost. Please make sure to move all your data to that folder before deleting neurodesktop.Click on the terminal from which you ran neurodesktop
Press
Ctrl-CRun:
docker stop neurodesktop
- Run:
docker rm neurodesktop
Installing Docker
For general installation instructions, refer to https://docs.docker.com/get-docker/
RHEL/CentOS (yum-based)
Refer to https://docs.docker.com/engine/install/centos/
One example to install docker in a yum-based distribution could look like this:
sudo dnf install -y yum-utils
sudo yum-config-manager --add-repo https://download.docker.com/linux/centos/docker-ce.repo
sudo dnf install docker-ce docker-ce-cli containerd.io
# or if dnf not found: sudo yum install docker-ce docker-ce-cli containerd.io
sudo systemctl enable docker
sudo systemctl start docker
sudo docker version
sudo docker info
sudo groupadd docker
sudo usermod -aG docker $USER
sudo chown root:docker /var/run/docker.sock
newgrp docker
Ubuntu/Debian (apt-based)
Refer to https://docs.docker.com/engine/install/ubuntu/
One example to install docker in a apt-based distribution could look like this:
sudo apt-get update
sudo apt-get install ca-certificates curl gnupg
sudo install -m 0755 -d /etc/apt/keyrings
curl -fsSL https://download.docker.com/linux/ubuntu/gpg | sudo gpg --dearmor -o /etc/apt/keyrings/docker.gpg
sudo chmod a+r /etc/apt/keyrings/docker.gpg
echo \
  "deb [arch=$(dpkg --print-architecture) signed-by=/etc/apt/keyrings/docker.gpg] https://download.docker.com/linux/ubuntu \
  $(. /etc/os-release && echo "$VERSION_CODENAME") stable" | \
  sudo tee /etc/apt/sources.list.d/docker.list > /dev/null
sudo apt-get update
GPU support
RHEL/CentOS (yum-based)
sudo yum install nvidia-container-toolkit -y
Ubuntu/Debian (apt-based)
sudo apt install nvidia-container-toolkit -y
Running neurodesktop container with GPU
sudo docker run \
  --shm-size=1gb -it --privileged --user=root --name neurodesktop \
  -v ~/neurodesktop-storage:/neurodesktop-storage \
  -e NB_UID="$(id -u)" -e NB_GID="$(id -g)" \
  --gpus all \
  -p 8888:8888 -e NEURODESKTOP_VERSION=2025-06-10 \
  vnmd/neurodesktop:2025-06-10
Running tensorflow (w/ GPU)
Using tensorflow (python)
mamba install tensorflow-gpu
python
import tensorflow as tf
print("Num GPUs Available: ", len(tf.config.list_physical_devices('GPU')))

Using tensorflow (singularity container in neurodesktop)
singularity pull docker://tensorflow/tensorflow:latest-gpu
singularity run --nv tensorflow_latest-gpu.sif
python
import tensorflow as tf
print("Num GPUs Available: ", len(tf.config.list_physical_devices('GPU')))

2.3.3 - MacOS
Quickstart
1. Install Docker or Podman
Install Docker from here: https://docs.docker.com/get-docker/ Alternatively, Neurodesk also works with Podman, follow the Podman installation instructions provided at https://podman.io/docs/installation.
Docker for MacOS by default runs with 2GB Memory. For actual workloads, 4GB Memory minimum for docker is highly recommended. You need to adjust this:
- Open the Docker Desktop and Navigate to the Settings. Then navigate to the “Resources” section.
- Increase the Memory slider from 2.00 GB to 4.00 GB (or greater)
- Increase Swap slider from 1GB to 2GB (or greater)
2. Run Neurodesktop
Use one of the following options to run Neurodesktop:
Option 1 (Recommended): Neurodesk-App
Instructions on installing and using the app: https://www.neurodesk.org/docs/getting-started/neurodesktop/neurodeskapp/
Option 2 (Advanced): Using Terminal
Create a local folder where the downloaded applications will be stored, e.g. ~/neurodesktop-storage
- Open a terminal, and type the following command to automatically download the neurodesktop container and run it
docker volume create neurodesk-home &&
docker run \
--shm-size=1gb -it --privileged --user=root --name neurodesktop \
-v ~/neurodesktop-storage:/neurodesktop-storage \
--mount source=neurodesk-home,target=/home/jovyan \
-e NB_UID="$(id -u)" -e NB_GID="$(id -g)" \
-p 8888:8888 -e NEURODESKTOP_VERSION=2025-06-10 vnmd/neurodesktop:2025-06-10
If you get errors in neurodesktop then check if the ~/neurodesktop-storage directory is writable for all users. If it is not, run chmod a+rwx ~/neurodesktop-storage
- Once neurodesktop is downloaded, leave the terminal open and check which server neurodesktop running on (Avoid pressing CTRL+C).
- To access neurodesktop, open your web browser and navigate to one of the URLs shown in your terminal (e.g.
http://127.0.0.1:8888/lab?token=your_unique_token).
If prompted, press on “Desktop RDP - changes resolution by resizing window and waiting for refresh” or “Desktop VNC - changes resolution by running lxrandr on a terminal” under “ALL CONNECTIONS”
If it is the first time you use Neurodesktop, wait until the desktop appears (it may take a few seconds). Otherwise, it should appear instantaneously.
Neurodesk is ready to use! See the tutorials page for advice on how to use Neurodesk.
Deleting neurodesktop:
When done processing your data it is important to stop and remove the container - otherwise the next start or container update will give an error ("… The container name “/neurodesktop” is already in use…")
Note
Note that any data that were saved outside of /neurodesktop-storage would be lost. Please make sure to move all your data to that folder before deleting neurodesktop.Click on the terminal from which you ran neurodesktop
Press control-C
Type:
docker stop neurodesktop
- Type:
docker rm neurodesktop
2.3.4 - Windows
Minimum System Requirements
- At least 3GB free space for neurodesktop base image
- Docker requirements. Details found under https://docs.docker.com/get-docker/
- If installing docker using WSL, minimum 20GB space recommended for WSL with Ubuntu
Quickstart
1. Install Docker or Podman
Install Docker from here: https://docs.docker.com/get-docker/
Alternatively, Neurodesk also works with Podman, follow the Podman installation instructions provided at https://podman.io/docs/installation.
2. Run Neurodesktop
Use one of the following options to run Neurodesktop:
Option 1 (Recommended): Neurodesk-App
Instructions for installing and using the app: https://www.neurodesk.org/docs/getting-started/neurodesktop/neurodeskapp/
Option 2 (Advanced): Using Terminal
- Open a terminal (e.g. Powershell), and type the following command to automatically download the neurodesktop container and run it
docker volume create neurodesk-home
# This creates a docker volume to store your /home/jovyan data inside a docker volume
docker run --shm-size=1gb -it --privileged --user=root --name neurodesktop -v C:/neurodesktop-storage:/neurodesktop-storage --mount source=neurodesk-home,target=/home/jovyan -p 8888:8888 -e NEURODESKTOP_VERSION=2025-06-10 vnmd/neurodesktop:2025-06-10
- Once neurodesktop is downloaded, leave the terminal open and check which server neurodesktop running on (Avoid pressing CTRL+C). ]
- To access neurodesktop, open your web browser and type in one of the URLs provided in your terminal (e.g.
http://127.0.0.1:8888/lab?token=your_unique_token).
Note
We do not recommend the use of the Firefox browser for accessing Neurodesktop on Windows 10, as firefox is not able to access localhost where neurodesk is running.Press on “Desktop Auto-Resolution” under “ALL CONNECTIONS”
If it is the first time you use Neurodesktop, wait until the desktop appears (it may take a few seconds). Otherwise, it should appear instantaneously.
Neurodesk is ready to use! See the tutorials page for advice on how to use Neurodesk.
For an optimal experience, switch your browser to full-screen mode by following the instructions for your browser here: https://www.thewindowsclub.com/open-chrome-edge-or-firefox-browser-in-full-screen-mode
Deleting neurodesktop:
When done processing your data it is important to stop and remove the container - otherwise the next start or container update will give an error ("… The container name “/neurodesktop” is already in use…")
Note
Note that any data that were saved outside of /neurodesktop-storage would be lost. Please make sure to move all your data to that folder before deleting neurodesktop.Click on the terminal from which you ran neurodesktop
Press control-C
Type:
docker stop neurodesktop
- Type:
docker rm neurodesktop
2.3.5 - Cloud
Options for Running Neurodesk on cloud computing resources
There are a couple of ways how Neurodesktop can be run on cloud computing resources:
- The first and easiest option is to provision a virtual Linux machine and run docker on this machine similar to a local Linux setup: https://www.neurodesk.org/docs/getting-started/neurodesktop/linux/
- Another option is to use Windows VMs and some groups have had success with that. Here is a detailed instructions on this setup: https://github.com/NeuroDesk/neurodesk.github.io/blob/main/static/docs/getting-started/neurodesktop/Neurodesk_Windows_Technion.pdf
- This group runs jupyterhub with a neurodesk image through Docker Compose: https://github.com/wieluk/jupyterhub-neurodesk/
- The most scalable solution is to run Neurodesk via Kubernetes. This setup is a bit more complex, but can handle many simultaneous users and is ideal for research groups and workshops. The easiest way to deploy Neurodesk on Kubernetes is to use Zero to Jupyterhub (https://z2jh.jupyter.org/en/stable/) - then you can use the Neurodesk image like any other jupyterhub image. If you do not want to run a privileged container you need to deploy the cvmfs setup on Kubernetes as well: https://github.com/cvmfs-contrib/cvmfs-csi/
2.3.6 - Data Storage
Drag and Drop
Uploading files
You can drag-and-drop files into the browser window to get files into Neurodesktop. This will then start a file upload:

Downloading files
To download files from the desktop using the same mechanism you will need to open the guacamole settings by pressing CTRL-ALT-SHIFT (Control-Command-Shift on Mac). This will open a menu on the side:

where you can click on “Shared Drive”:

a click (or double click on Mac) on the file will start the download.
You can browse into folders in the shared drive by clicking (double clicking on Mac) on them. To get back to the base of the shared drive, press on the drive icon in the top left of the side menu (just below the “Shared Drive” title).
To close the side menu, click on CTRL-ALT-SHIFT once more (Control-Command-Shift on Mac).
Note that it is only possible to upload or download one file at a time through this interface. If you have multiple files in a directory we recommend zipping the directory and then transferring one zip archive:
zip files.zip files/
Local storage
If you are running Neurodesktop on your own hardware there will be a direct connection between the “Storage” folder on the Desktop, which is a link between “/neurodesktop-storage” in neurodesktop and the “neurodesktop-storage” folder on your C-drive (Windows) or home directory (Mac/Linux). This connection can be used for data processing and data transfer.
Mounting external storage on your host-computer
The -v C:/neurodesktop-storage:/neurodesktop-storage part of the docker command links the directory “neurodesktop-storage” on the “C drive” of your Windows computer to the directory /neurodesktop-storage inside the Desktop environment. Everything you store in there will be available inside the desktop and on the host computer. You can also mount additional directories by adding another -v parameter set (e.g. -v D:/moredata:/data) - this will mount the directory moredata from your D drive to /data inside neurodesktop. Important: the mountpoint inside neurodesktop needs to be named /data, otherwise the applications will not see the files without modifying the SINGULARITY_BINDPATH variable in your .bashrc.
If you are using the NeurodeskApp, you can set an additional storage location through the settings
If you are starting Neurodesk through the command line, here is an example for Windows adding another storage directory:
docker run --shm-size=1gb -it --privileged --user=root --name neurodesktop -v C:/neurodesktop-storage:/neurodesktop-storage -v D:/moredata:/data -p 8888:8888 -e NEURODESKTOP_VERSION=2025-06-10 vnmd/neurodesktop:2025-06-10
Note for Windows users: Connecting network shares from Windows to Neurodesk can cause problems, so be careful when attempting this. Also, be aware that processing large amounts of files stored on a Windows filesystem inside Neurodesk will come with a performance penality due to the file system translation in the background. One option to get around these problems is to directly accessing your storage infrastructure inside Neurodesk.
Cloud storage
Another way to get your data into Neurodesktop is to use a cloud storage provider like Dropbox, OneDrive, OwnCloud, Nextcloud or more general tools like rclone or davfs2. Another good option could be to utilize Globus for large amounts of data.
Nextcloud and Owncloud desktop clients
Under the menu item “Accessories” you can find “Nextcloud” and “ownCloud” desktop sync clients that you can configure with your cloud service accounts.
Mounting webdav storage using davfs2
Another option is to directly mount webdav storage. Here is an example how to mount OwnCloud Storage into Neurodesktop:
sudo mount -t davfs https://yourOwnCloudInstance.com/plus/remote.php/webdav/ /data/
It then asks you for a username and password, which you can generate in the settings: yourOwnCloudInstance/plus/settings/personal?sectionid=security
Rclone
Rclone is a command line tool that enables interaction with various cloud services. Here is an example how to setup rclone with an OwnCloud account:
- start the configuration in a terminal window
rclone config - Create a new remote:
n - Provide a name for the remote:
OwnCloud - For the “Storage” option choose:
webdav - As “url” set:
https://yourOwnCloudInstance.com/plus/remote.php/webdav/ - As “vendor” set OwnCloud:
2 - Set your OwnCloud username after generating an access token yourOwnCloudInstance/plus/settings/personal?sectionid=security
- Choose to type in your own password: y
- Enter the Password / Token from the OwnCloud App passwords page and confirm it again:
- Leave blank the bearer_token:
<hit Enter> - No advanced config necessary:
<hit Enter> - accept the configuration:
<hit Enter> - Quit the config:
q - Now we can download data to the HPC easily:
rclone copy --progress --transfers 8 OwnCloud:/raw-data-for-science-paper . - or upload data to OwnCloud:
rclone copy --progress --transfers 8 . OwnCloud:/data-processed
Globus
We also provide the globus client, so you can transfer large amounts of data between globus endpoints and Neurodesktop. You can configure it by running the following commands in the Neurodesktop environment:
ml globus
# First run the setup:
globusconnectpersonal -setup

#Follow the instructions in the terminal:
#1) copy the URL into a browser and generate the Native App Authorization Code
#2) then copy this code and paste it in the terminal
#3) then name the endpoint, e.g. Neurodesktop

# Then start the GUI:
globusconnectpersonal -gui

# If the connection fails, reset the permissions on the key file:
chmod 600 /home/jovyan/.globusonline/lta/relay-anonymous-key.pem

# If the connection still fails, start the client like this to get more information
globusconnectpersonal -debug
Then add the directories you want to share with globus, by opening File -> Preferences:
and then add the paths required and hit Save:
Then you can go to the globus file-manager https://app.globus.org/file-manager and your neurodesktop instance will be an endpoint for globus. You can change the path to any location you specified in the Preferences:
Mount volume using SSHFS
It is theoretically possible to mount an SSH target inside Neurodesktop, but it’s not a very reliable way of mounting storage:
sudo mkdir /mnt/data_mount
sudo chmod a+rwx /mnt/data_mount
sshfs -o allow_root USER@TARGET_HOST:TARGET_PATH /mnt/data_mount
A better option is to use scp and copy data from an SSH endpoint:
scp /neurodesk/myfile user@remoteserver:/data/
An alternative is to mount the SSHFS target into a parent directory on your local machine or VM and then use the -v option in the docker run command to bind the parent directory of the SSHFS mount. NOTE: the SSHFS has to be mounted to a subdirectory inside a parent directory which is then bound to the docker container. If you directly bind to the mounted directory itself, your Neurodesktop container will stop being able to access it if the SSHFS mount disconnects and will not be able to access it again without restarting the Neurodesktop container.
For example, on a local Linux machine or VM:
sshfs -o allow_root USER@TARGET_HOST:TARGET_PATH/MyData SOURCE_PATH/SSHFS_Mounts/MyData
Then add the following line to the docker run command when starting Neurodesktop (note the rshared flag):
-v /SSHFS_Mounts:/data:rshared \
TIP: If you use key pair authentication instead of password for your SSHFS mount, you can use the reconnect flag to reconnect automatically if the connection drops:
sshfs -o IdentityFile=~/.ssh/id_rsa,allow_root,ServerAliveInterval=5,ServerAliveCountMax=3 USER@TARGET_HOST:TARGET_PATH/MyData SOURCE_PATH/SSHFS_Mounts/MyData
2.4 - Neurocommand
Neurocommand requires a Linux host machine, virtual machine or WSL for Windows.
2.4.1 - Linux and HPC
Ways of using Neurocommand in Linux and HPC:
- You can use the module files for Neurocontainers directly via CVMFS: https://www.neurodesk.org/docs/getting-started/neurocontainers/cvmfs/
- or you can install Neurocommand as described here:
Requirements:
- python 3.6+ https://www.anaconda.com/docs/getting-started/miniconda/install#linux-terminal-installer
- singularity https://docs.sylabs.io/guides/3.5/user-guide/quick_start.html
- git
- lmod https://lmod.readthedocs.io/en/latest/
Setup Instructions:
Install command line (e.g. running on Linux or HPC)
- Load singularity For optimal performance, ensure you are using Singularity version 3.x:
module load singularity/3.5.0
#or
module load singularity
#or
module load apptainer
If this doens’t work it might already be loaded. Just run singularity and check.
- Load aria2 (Optional) To speed up container downloads, you can optionally install or load aria2c:
module load aria2c
- Clone and Set Up the Repository Clone the repository into a directory with enough storage and ensure you are not using a symbolic link (to be sure run cd `pwd -P`). It’s recommended to perform this setup within a Python virtual environment (venv) or a Conda environment:
git clone https://github.com/NeuroDesk/neurocommand.git
cd neurocommand
pip3 install -r neurodesk/requirements.txt --user
bash build.sh --cli
bash containers.sh
export SINGULARITY_BINDPATH=`pwd -P`
# OR, depending on your installation:
export APPTAINER_BINDPATH=`pwd -P`
Install Containers
- If these steps are successful, the help will be displayed
- Install all or only specific containers by following the instructions, e.g.:
- Search and Install Specific Containers To search for containers that have “itksnap” in the name:
bash containers.sh itksnap
- Install a Specific Version To install a specific version, (e.g., itksnap version 4.0.2 from 20240117):
./local/fetch_containers.sh itksnap 4.0.2 20240117
To install all containers with that name:
bash containers.sh --itksnap
To download all containers (be careful - there are a lot of containers!):
bash containers.sh --all
Add your containers to lmod
- To add each container to the module search path, run the following:
module use $PWD/local/containers/modules/
- It may be a good idea to add this to your .bashrc if it works. When adding to your .bashrc you will need to replace $PWD to point to the correct path, i.e. the output of this
echo "module use $PWD/local/containers/modules/"
- It is very important to also set the SINGULARITY_BINDPATH or the APPTAINER_BINDPATH variable in your .bashrc. This variable must contain a comma-separated list of directories you want to access with the Neurodesk tools.
e.g.:
export SINGULARITY_BINDPATH=/scratch/,/data/
# OR, depending on your installation:
export APPTAINER_BINDPATH=/scratch/,/data/
#Note: User the correct line depending on your installation. Do not add a directory that does not exist, otherwise the containers will not start!
- Run
ml availto see the installed containers at the top of the list (neurodesk containers will take preference over system modules with the same name), run:
module --ignore_cache avail
- Every time you start a new shell you need to run
module use PathToYourContainersor add this command to you .bashrc file.
GPU support
Some of our containers contain GPU-accelerated applications. Here is an example that runs the GPU accelerated program eddy in FSL:
module load fsl/6.0.5.1
export neurodesk_singularity_opts='--nv'
eddy_cuda9.1
For Lxde desktops
bash build.sh --lxde --edit
For Mate desktops
Run bash build.sh --init (or bash build.sh --lxde --edit)
lxde/mate: Mate
installdir: Where all the neurocommand files will be stored (Default: ./local)
appmenu: The linux menu xml file. (Usually /etc/xdg/menus/****-applications.menu)
appdir: Location for the .desktop files for this linux desktop (Usually /usr/share/applications)
deskdir: Location for the .directory files for this linux desktop (Typically /usr/share/desktop-directories)
For desktop menus
sudo bash install.sh to install
Creates symlinks to menu files in installation dir
sudo bash uninstall.sh to uninstall
Removes symlinks
For user-specific desktop menus in a shared Linux environment
mkdir -p $HOME/.config/menus
mkdir -p $HOME/.local/share/applications
mkdir -p $HOME/.local/share/desktop-directories
ln -sfn /PATH_TO_YOUR_INSTALLATION/neurocommand/local/xfce-applications.menu $HOME/.config/menus
ln -sfn /PATH_TO_YOUR_INSTALLATION/neurocommand/local/neurodesk-applications.menu $HOME/.config/menus
ln -sfn /PATH_TO_YOUR_INSTALLATION/neurocommand/local/applications $HOME/.local/share/applications/neurodesk
ln -sfn /PATH_TO_YOUR_INSTALLATION/neurocommand/local/desktop-directories $HOME/.local/share/desktop-directories/neurodesk
To update
1. Update the Neurocommand Repository
First, ensure your local repository is up to date by pulling the latest changes:
git pull
Next, rebuild Neurocommand by running:
bash build.sh
2. Update Containers
To update the containers, navigate to the neurodesktop directory and run:
bash containers.sh
3. Update Specific Modules
Choose the module you want to update for example you want to update mrtrix3/3.0.2 module with the eddy_cuda fix:
~/neurocommand/local/fetch_containers.sh mrtrix3 3.0.2 20221108 mrview $@
Examples for specific HPCs:
Greatlakes - University of Michigan
Setup on a desktop
module load singularity
# now change to a directory with enough storage, e.g. /nfs/turbo/username
git clone https://github.com/NeuroDesk/neurocommand.git
cd neurocommand
pip3 install -r neurodesk/requirements.txt --user
bash build.sh --cli
bash containers.sh
export SINGULARITY_BINDPATH=`pwd -P`
bash containers.sh itksnap
# now select a version of itksnap to install. For this copy and paste the installation
echo "module load singularity" >> ~/.bashrc
echo "module use $PWD/local/containers/modules/" >> ~/.bashrc
echo "export SINGULARITY_BINDPATH=/nfs/,/scratch/" >> ~/.bashrc
Setup on with a jupyter notebook
Start new Jupyter notebook by entering “load singularity” in the Module Commands field:
Then run these commands:
!pip install jupyterlmod

# Restart the kernel by clicking Kernel -> Restart Kernel

import module
await module.load('niimath')
2.4.2 - Windows
WSL (w/ Ubuntu + LXDE)
For more information on WSL: https://docs.microsoft.com/en-us/windows/wsl
Setting up
- Setup WSL2 using the following instructions (Ubuntu 18.04 recommended)
https://docs.microsoft.com/en-us/windows/wsl/install-win10 Proceed until a Ubuntu bash shell is available from the Windows Host
Run the remaining commands in the Bash shell sudo apt-get install lxdeto install LXDE desktop in WSL- Reboot
sudo apt-get install xrdpto install XRDP in WSL- Open
/etc/xrdp/xrdp.iniChangeport=3389toport=3390and save - Run
echo startlxde > ~/.xsession
Running
sudo service xrdp startto start xrdp server- Open Microsoft Remote Desktop Connection in Windows host
- Connect to
localhost:3390 - In the next login page, leave Session as
Xorg. Enter your WSL username and password and clickOK - This should open an LXDE Linux Desktop environment. Follow Linux guide from here on
2.4.3 - Visual Studio Code
The following guide is for connecting to Neurodesktop using a VS Code installation running on your host machine.
Please see additional instructions below if Neurodesktop is running remotely (i.e. Cloud, HPC, VM)
Pre-requisites
Visual Studio Code (https://code.visualstudio.com) installed on your host. Standalone version should work fine Install the following VS Code extensions:
- Docker extension (Required)
- Remote development extension pack. Includes the following extensions
- Remote - Containers (Required)
- Remote - WSL (For windows hosts)
Connecting to Neurodesktop
Open VS Code and open a Folder (File > Open Folder)
This can be any folder (e.g. home or project folder). VS Code runs into errors if no folder is opened.
Open the Command Palette (Ctrl+Shift+P).
Select Remote-Containers: Attach to Running Container from the dropdown panel
Start typing in ’neurodesktop. Select /neurodesktop from the list
This should open a VS Code Window connected to the neurodesktop as a Dev Container.
This may take about a minute if it is the first time you are connecting, as VS code has to install the VS Code server onto the container. Repeat connections should be faster.
First time connection
The first time connection will default to using neurodesktop root user. We want the default connection to be as the normal user to avoid permission issues. To check which user is being used, open the terminal in the neurodesktop VS Code instance and check if the user is
userorroot
Follow the following steps to configure your VS Code instance to connect to neurodesktop as normal user by default:
Open the Command Palette (Ctrl+Shift+P).
Select
Remote-Containers: Open Container Configuration Filefrom the dropdown panelThis will open a
neurodesktop%3alatest.jsonfile. Overwrite the file with the following contents
{
	"workspaceFolder": "/home/user",
	"remoteUser": "jovyan"
}
- Close this VS Code window. Use steps in previous section to connect normally
Useful Additions
Plugins to view neuroimaging data inside VScode:


2.5 - Neurocontainers
2.5.1 - CVMFS
Install the CernVM File System (CVMFS)
To begin, install CVMFS. Follow the official instructions here: https://cvmfs.readthedocs.io/en/stable/cpt-quickstart.html#getting-the-software
An example installation for Ubuntu in Windows Subsystem for Linux (WSL) would look like this:
sudo apt-get install lsb-release
wget https://ecsft.cern.ch/dist/cvmfs/cvmfs-release/cvmfs-release-latest_all.deb
sudo dpkg -i cvmfs-release-latest_all.deb
rm -f cvmfs-release-latest_all.deb
sudo apt-get update
sudo apt-get install build-essential
sudo apt-get install cvmfs
Ubuntu 24.04 might have an issue with this, so try installing dependies manually:
sudo apt install libattr1=1:2.5.2-1build1 libuuid1=2.39.3-9ubuntu6
Configure CVMFS
Once installed create the keys and configure the servers used:
sudo mkdir -p /etc/cvmfs/keys/ardc.edu.au/


echo "-----BEGIN PUBLIC KEY-----
MIIBIjANBgkqhkiG9w0BAQEFAAOCAQ8AMIIBCgKCAQEAwUPEmxDp217SAtZxaBep
Bi2TQcLoh5AJ//HSIz68ypjOGFjwExGlHb95Frhu1SpcH5OASbV+jJ60oEBLi3sD
qA6rGYt9kVi90lWvEjQnhBkPb0uWcp1gNqQAUocybCzHvoiG3fUzAe259CrK09qR
pX8sZhgK3eHlfx4ycyMiIQeg66AHlgVCJ2fKa6fl1vnh6adJEPULmn6vZnevvUke
I6U1VcYTKm5dPMrOlY/fGimKlyWvivzVv1laa5TAR2Dt4CfdQncOz+rkXmWjLjkD
87WMiTgtKybsmMLb2yCGSgLSArlSWhbMA0MaZSzAwE9PJKCCMvTANo5644zc8jBe
NQIDAQAB
-----END PUBLIC KEY-----" | sudo tee /etc/cvmfs/keys/ardc.edu.au/neurodesk.ardc.edu.au.pub

echo "CVMFS_USE_GEOAPI=yes" | sudo tee /etc/cvmfs/config.d/neurodesk.ardc.edu.au.conf

echo 'CVMFS_SERVER_URL="http://cvmfs-geoproximity.neurodesk.org/cvmfs/@fqrn@;http://cvmfs.neurodesk.org/cvmfs/@fqrn@;http://s1osggoc-cvmfs.openhtc.io:8080/cvmfs/@fqrn@;http://s1fnal-cvmfs.openhtc.io:8080/cvmfs/@fqrn@;http://s1sampa-cvmfs.openhtc.io:8080/cvmfs/@fqrn@;http://s1brisbane-cvmfs.openhtc.io/cvmfs/@fqrn@;http://s1nikhef-cvmfs.openhtc.io/cvmfs/@fqrn@;http://s1bnl-cvmfs.openhtc.io/cvmfs/@fqrn@;http://s1perth-cvmfs.openhtc.io/cvmfs/@fqrn@"' | sudo tee -a /etc/cvmfs/config.d/neurodesk.ardc.edu.au.conf

echo 'CVMFS_KEYS_DIR="/etc/cvmfs/keys/ardc.edu.au/"' | sudo tee -a /etc/cvmfs/config.d/neurodesk.ardc.edu.au.conf

echo "CVMFS_HTTP_PROXY=DIRECT" | sudo tee  /etc/cvmfs/default.local
echo "CVMFS_QUOTA_LIMIT=5000" | sudo tee -a  /etc/cvmfs/default.local

sudo cvmfs_config setup
You can use the list above, but you can also pick a subset of servers that are close to you or fit your usecase better. To better understand what to choose, we use the following CVMFS server setup:
These CVMFS Stratum 1 servers are hosted by the Open Science Grid and every server has a Cloudflare CDN alias that is correctly located through the Maxmind GEOAPI service in the CVMFS client:
- Illinois, USA: s1fnal-cvmfs.openhtc.io:8080 -> cvmfs-s1fnal.opensciencegrid.org:8000
- Sao Paulo, Brazil: s1sampa-cvmfs.openhtc.io:8080 -> sampacs01.if.usp.br:8000
- Nebraska, USA: s1osggoc-cvmfs.openhtc.io:8080 -> cvmfs-s1goc.opensciencegrid.org:8000
- New York, US: s1bnl-cvmfs.openhtc.io:8080 -> cvmfs-s1bnl.opensciencegrid.org:8000
This server is currently down:
- Netherlands, Europe: s1nikhef-cvmfs.openhtc.io:8080 -> cvmfs01.nikhef.nl:8000
This CVMFS Stratum 1 server is hosted by ARDC Nectar Cloud and also has a Cloudflare CDN alias.
- Brisbane, Queensland, Australia: s1brisbane-cvmfs.openhtc.io -> cvmfs-brisbane.neurodesk.org
- Sydney, New South Wales, Australia: s1sydney-cvmfs.openhtc.io -> cvmfs-sydney.neurodesk.org
This CVMFS Stratum 1 server is hosted by Pawseys Nimbus Cloud and also has a Cloudflare CDN alias.
- Perth, Western Australia, Australia: s1perth-cvmfs.openhtc.io -> cvmfs-perth.neurodesk.org
This CVMFS Stratum 1 server is hosted by AWS:
- Frankfurt, Germany: cvmfs-frankfurt.neurodesk.org -> ec2-3-72-92-91.eu-central-1.compute.amazonaws.com
This CMVFS Stratum 1 server is hosted by Jetstream:
- Indiana, US: cvmfs-jetstream.neurodesk.org -> 149.165.172.188
Then we have a one geolocation-steered domain: cvmfs-geoproximity.neurodesk.org
153.02 (Longitude),-27.46 (Latitude) -> cvmfs-brisbane.neurodesk.org
151.2073 (Longitude),-33.8678 (Latitude) -> cvmfs-sydney.neurodesk.org
115.86,-31.95 -> cvmfs-perth.neurodesk.org
-88.30,41.84 -> cvmfs-s1fnal.opensciencegrid.org
-96.66,40.83 -> cvmfs-s1goc.opensciencegrid.org
4.90,52.37 -> cvmfs01.nikhef.nl
8.68,50.11 -> ec2-3-72-92-91.eu-central-1.compute.amazonaws.com
-46.63,-23.54 -> sampacs01.if.usp.br
-86.45,39.22 -> cvmfs-jetstream.neurodesk.org
Every location has a health check attached to it and doesn’t forward to it if the destination is not working.
Then we have 3 direct URLS without CDNs as well that are geolocation-steered: cvmfs1.neurodesk.org: South America -> sampacs01.if.usp.br North America -> cvmfs-s1fnal.opensciencegrid.org Default -> cvmfs-brisbane.neurodesk.org Europe -> ec2-3-72-92-91.eu-central-1.compute.amazonaws.com Asia -> cvmfs-perth.neurodesk.org
cvmfs2.neurodesk.org: North America -> cvmfs-s1goc.opensciencegrid.org Europe -> cvmfs01.nikhef.nl Default -> cvmfs-s1goc.opensciencegrid.org
cvmfs3.neurodesk.org: North America -> cvmfs-s1bnl.opensciencegrid.org Asia -> cvmfs-brisbane.neurodesk.org Default -> cvmfs-s1bnl.opensciencegrid.org Oceania -> cvmfs-perth.neurodesk.org
These servers are currently NOT working and are NOT YET mirroring our repository (we are waiting for RAL to come back online, then the others will mirror that):
- UK: s1ral-cvmfs.openhtc.io:8080 -> cvmfs-egi.gridpp.rl.ac.uk:8000
- Swinburne, Australia: s1swinburne-cvmfs.openhtc.io:8080 -> cvmfs-s1.hpc.swin.edu.au:8000
- China: s1ihep-cvmfs.openhtc.io:8080 -> cvmfs-stratum-one.ihep.ac.cn:8000
For WSL users
You will need to run this for each new WSL session:
sudo cvmfs_config wsl2_start
Test if the connection works:
sudo cvmfs_config chksetup

ls /cvmfs/neurodesk.ardc.edu.au

sudo cvmfs_talk -i neurodesk.ardc.edu.au host info

cvmfs_config stat -v neurodesk.ardc.edu.au
For Ubuntu 22.04 users
If configuring CVMFS returns the following error:
Error: failed to load cvmfs library, tried: './libcvmfs_fuse3_stub.so' '/usr/lib/libcvmfs_fuse3_stub.so' '/usr/lib64/libcvmfs_fuse3_stub.so' './libcvmfs_fuse_stub.so' '/usr/lib/libcvmfs_fuse_stub.so' '/usr/lib64/libcvmfs_fuse_stub.so'
./libcvmfs_fuse3_stub.so: cannot open shared object file: No such file or directory
/usr/lib/libcvmfs_fuse3_stub.so: cannot open shared object file: No such file or directory
/usr/lib64/libcvmfs_fuse3_stub.so: cannot open shared object file: No such file or directory
./libcvmfs_fuse_stub.so: cannot open shared object file: No such file or directory
libcrypto.so.1.1: cannot open shared object file: No such file or directory
/usr/lib64/libcvmfs_fuse_stub.so: cannot open shared object file: No such file or directory


Failed to read CernVM-FS configuration
A temporary workaround is:
wget https://mirror.umd.edu/ubuntu/ubuntu/pool/main/o/openssl/libssl1.1_1.1.1f-1ubuntu2.15_amd64.deb
dpkg -i libssl1.1_1.1.1f-1ubuntu2.15_amd64.deb
Install singularity/apptainer
e.g for Ubuntu/Debian install apptainer:
sudo apt-get install -y software-properties-common
sudo add-apt-repository -y ppa:apptainer/ppa
sudo apt-get update
sudo apt-get install -y apptainer
sudo apt-get install -y apptainer-suid
e.g. for Ubuntu/Debian install singularity:
export VERSION=1.18.3 OS=linux ARCH=amd64 && \
    wget https://dl.google.com/go/go$VERSION.$OS-$ARCH.tar.gz && \
    sudo tar -C /usr/local -xzvf go$VERSION.$OS-$ARCH.tar.gz && \
    rm go$VERSION.$OS-$ARCH.tar.gz

echo 'export GOPATH=${HOME}/go' >> ~/.bashrc && \
    echo 'export PATH=/usr/local/go/bin:${PATH}:${GOPATH}/bin' >> ~/.bashrc && \
    source ~/.bashrc

go get -d github.com/sylabs/singularity

export VERSION=v3.10.0 # or another tag or branch if you like && \
    cd $GOPATH/src/github.com/sylabs/singularity && \
    git fetch && \
    git checkout $VERSION # omit this command to install the latest bleeding edge code from master

export VERSION=3.10.0 && # adjust this as necessary \
    mkdir -p $GOPATH/src/github.com/sylabs && \
    cd $GOPATH/src/github.com/sylabs && \
    wget https://github.com/sylabs/singularity/releases/download/v${VERSION}/singularity-ce-${VERSION}.tar.gz && \
    tar -xzf singularity-ce-${VERSION}.tar.gz && \789
    cd ./singularity-ce-${VERSION} && \
    ./mconfig --without-seccomp --without-conmon

./mconfig --without-seccomp --without-conmon && \
    make -C ./builddir && \
    sudo make -C ./builddir install

export PATH="/usr/local/singularity/bin:${PATH}"
Use of Neurodesk CVMFS containers
The containers are now available in /cvmfs/neurodesk.ardc.edu.au/containers/ and can be started with:
singularity shell /cvmfs/neurodesk.ardc.edu.au/containers/itksnap_3.8.0_20201208/itksnap_3.8.0_20201208.simg
make sure that SINGULARITY_BINDPATH includes the directories you want to work with:
export SINGULARITY_BINDPATH='/cvmfs,/mnt,/home'
For WSL users
The homedirectory might not be supported. Avoid mounting it with
singularity shell --no-home /cvmfs/neurodesk.ardc.edu.au/containers/itksnap_3.8.0_20201208/itksnap_3.8.0_20201208.simg
or configure permanently:
sudo vi /etc/singularity/singularity.conf
set
mount home = no
Install module system
sudo yum install lmod
or
sudo apt install lmod
Use of containers in the module system
Configuration for module system
Create a the new file /usr/share/module.sh with the content (NOTE: update the version, here 6.6, with your lmod version, e.g. 6.6 (Ubuntu 20.04/22.04), 8.6.19 (Ubuntu 24.04)):
# system-wide profile.modules                                          #
# Initialize modules for all sh-derivative shells                      #
#----------------------------------------------------------------------#
trap "" 1 2 3

case "$0" in
    -bash|bash|*/bash) . /usr/share/lmod/YOURLMODVERSION_HERE/init/bash ;;
       -ksh|ksh|*/ksh) . /usr/share/lmod/YOURLMODVERSION_HERE/init/ksh ;;
       -zsh|zsh|*/zsh) . /usr/share/lmod/YOURLMODVERSION_HERE/init/zsh ;;
          -sh|sh|*/sh) . /usr/share/lmod/YOURLMODVERSION_HERE/init/sh ;;
                    *) . /usr/share/lmod/YOURLMODVERSION_HERE/init/sh ;;  # default for scripts
esac

trap - 1 2 3
Make the module system usable in the shell
Add the following lines to your ~/.bashrc file or to /etc/bash.bashrc for a global install:
if [ -f '/usr/share/module.sh' ]; then source /usr/share/module.sh; fi

if [ -d /cvmfs/neurodesk.ardc.edu.au/neurodesk-modules ]; then
        # export MODULEPATH="/cvmfs/neurodesk.ardc.edu.au/neurodesk-modules"
        module use /cvmfs/neurodesk.ardc.edu.au/neurodesk-modules/*
else
        export MODULEPATH="/neurodesktop-storage/containers/modules"
        module use $MODULEPATH
        export CVMFS_DISABLE=true
fi

if [ -f '/usr/share/module.sh' ]; then
        echo 'Run "ml av" to see which tools are available - use "ml <tool>" to use them in this shell.'
        if [ -v "$CVMFS_DISABLE" ]; then
                if [ ! -d $MODULEPATH ]; then
                        echo 'Neurodesk tools not yet downloaded. Choose tools to install from the Application menu.'
                fi
        fi
fi
Restart the current shell or run
source ~/.bashrc
Use of containers in the module system
export SINGULARITY_BINDPATH='/cvmfs,/mnt,/home'
module use /cvmfs/neurodesk.ardc.edu.au/neurodesk-modules/*
ml fsl
fslmaths
Troubleshooting and diagnostics
# Check servers
sudo cvmfs_talk -i neurodesk.ardc.edu.au host probe
sudo cvmfs_talk -i neurodesk.ardc.edu.au host info

# Change settings
sudo touch /var/log/cvmfs_debug.log.cachemgr
sudo chown cvmfs /var/log/cvmfs_debug.log.cachemgr
sudo touch /var/log/cvmfs_debug.log
sudo chown cvmfs /var/log/cvmfs_debug.log

sudo vi /etc/cvmfs/config.d/neurodesk.ardc.edu.au.conf
echo -e "\nCVMFS_DEBUGLOG=/var/log/cvmfs_debug.log" | sudo tee -a /etc/cvmfs/default.local
cat /etc/cvmfs/default.local
sudo cvmfs_config umount
sudo service autofs stop
sudo mount -t cvmfs neurodesk.ardc.edu.au /cvmfs/neurodesk.ardc.edu.au
# check if new settings are applied correctly:
cvmfs_config showconfig neurodesk.ardc.edu.au

cat /var/log/cvmfs_debug.log
cat /var/log/cvmfs_debug.log.cachemgr
2.5.2 - DataLad
Using Neurodesk Containers with DataLad
This page explains how to use DataLad and the ReproNim containers with Neurodesk tools.
Install DataLad, datalad-container, and the ReproNim containers repository
conda install datalad
pip install datalad_container
datalad install https://github.com/ReproNim/containers.git
cd containers
List all default available containers
datalad containers-list
Download and run the latest container version
datalad containers-run -n neurodesk-romeo
Change version of container
You can change which version of a container is used in two ways:
Option 1: change version in .datalad/config
vi .datalad/config
# now change the version of the container you like
# all available containers can be seen via `ls images/neurodesk`
datalad save -m 'downgraded version of romeo to x.x.x'
datalad containers-run -n neurodesk-romeo
Option 2: change version using freeze_versions script
# all available containers can be seen via `ls images/neurodesk`
scripts/freeze_versions neurodesk-romeo=3.2.4
datalad save -m 'downgraded version of romeo to 3.2.4'
datalad containers-run -n neurodesk-romeo
2.5.3 - Docker
Our containers are automatically built in https://github.com/NeuroDesk/neurocontainers/ and hosted on dockerhub and on github
Pull Docker containers
e.g. for a julia container docker
docker pull vnmd/julia_1.6.1
You an also build singularity images from dockerhub
singularity build julia_1.6.1.simg docker://vnmd/julia_1.6.1
Replace julia_1.6.1 with your selected application. You can find the available containers here: https://www.neurodesk.org/applications/
2.5.4 - Open Recon
These instructions were tested on GitHub Codespaces, and we recommend this as a starting point.
For a local setup you need Docker (https://www.docker.com/), Python3 and you need to install neurodocker and add it to your path:
python -m pip install neurodocker
#the path depends on your local setup
export PATH=$PATH:~/.local/lib/python3.12/site-packages/bin
export PATH=$PATH:~/.local/bin
1) add the installation of the Python MRD server to any recipe in https://github.com/neurodesk/neurocontainers
Make sure to adjust invertcontrast.py to your pipeline needs (or replace/rename other files from the Python MRD server:
- include: macros/openrecon/neurodocker.yaml
here is an example: https://github.com/NeuroDesk/neurocontainers/tree/main/recipes/openreconexample
Then build the recipe:
sf-login openreconexample --architecture x86_64
2) test the tool inside the container on its own first and then test through MRD server
convert dicom data to mrd test data:
cd /opt/code/python-ismrmrd-server
python3 dicom2mrd.py -o input_data.h5 PATH_TO_YOUR_DICOM_FILES
start server and client and test application:
python3 /opt/code/python-ismrmrd-server/main.py -v -r -H=0.0.0.0 -p=9002 -s -S=/tmp/share/saved_data &
# wait until you see Serving ... and the press ENTER
python3 /opt/code/python-ismrmrd-server/client.py -G dataset -o openrecon_output.h5 input_data.h5
3) submit the container to the https://github.com/NeuroDesk/openrecon/ repository
here is an example: https://github.com/NeuroDesk/openrecon/tree/main/recipes/openreconexample
2.5.5 - Singularity
Our docker containers are converted to singularity containers and stored on Object storage.
Download Singularity Containers
First get an overview of which containers are available as Singularity containers: https://github.com/NeuroDesk/neurocommand/blob/main/cvmfs/log.txt
curl -s https://raw.githubusercontent.com/NeuroDesk/neurocommand/main/cvmfs/log.txt
assign the container name to a variable:
export container=itksnap_3.8.0_20201208
Then download the containers. One way is to use CURL:
curl -X GET https://neurocontainers.neurodesk.org/$container.simg -O
Singularity Containers and GPUs
Some of our containers contain GPU-accelerated applications. Here is an example that tests the GPU accelerated program eddy in FSL:
curl -X GET https://neurocontainers.neurodesk.org/fsl_6.0.5.1_20221016.simg -O
git clone https://github.com/neurolabusc/gpu_test.git
singularity shell --nv fsl_6.0.5.1_20221016.simg
cd gpu_test/etest/
bash runme_gpu.sh
Transparent Singularity
The singularity containers can be also be used in combination with our Transparent Singularity Tool, which wraps the executables inside a container to make them easily available for pipelines. More information can be found here:
one example to do this is:
curl -s https://raw.githubusercontent.com/NeuroDesk/neurocommand/main/cvmfs/log.txt
export container=itksnap_3.8.0_20201208
git clone https://github.com/NeuroDesk/transparent-singularity ${container}
cd ${container}
./run_transparent_singularity.sh ${container}
2.5.6 - Windows 11 and Windows Subsystem for Linux
1. Install WSL
Follow the instructions to enable Windows Subsystem for Linux 2 in Windows 11: https://docs.microsoft.com/en-us/windows/wsl/install
2. Configure CVMFS, Singularity and LMOD (only needs to be done once)
Install build tools
sudo apt update
sudo apt install make gcc
Install singularity
export SINGULARITY_VERSION=3.9.3 VERSION=1.17.2 OS=linux ARCH=amd64
wget -q https://dl.google.com/go/go$VERSION.$OS-$ARCH.tar.gz
sudo tar -C /usr/local -xzvf go$VERSION.$OS-$ARCH.tar.gz
rm go$VERSION.$OS-$ARCH.tar.gz
export GOPATH=${HOME}/go
export PATH=/usr/local/go/bin:${PATH}:${GOPATH}/bin
mkdir -p $GOPATH/src/github.com/sylabs
cd $GOPATH/src/github.com/sylabs
wget -q https://github.com/sylabs/singularity/releases/download/v${SINGULARITY_VERSION}/singularity-ce-${SINGULARITY_VERSION}.tar.gz
tar -xzvf singularity-ce-${SINGULARITY_VERSION}.tar.gz
cd singularity-ce-${SINGULARITY_VERSION}
./mconfig --prefix=/usr/local/singularity
make -C builddir
sudo make -C builddir install
cd ..
sudo rm -rf singularity-ce-${SINGULARITY_VERSION}
sudo rm -rf /usr/local/go $GOPATH
Setup Bindpaths for Singularity (e.g. in .bashrc)
export PATH="/usr/local/singularity/bin:${PATH}"
export SINGULARITY_BINDPATH='/cvmfs,/mnt,/home'
CVMFS
Follow the instructions here: https://www.neurodesk.org/docs/getting-started/neurocontainers/cvmfs/
LMOD
sudo apt install lmod
3. Use Neurodesk containers
When restarting WSL the cvmfs service has to be started manually:
sudo cvmfs_config wsl2_start
Initialize the neurodesk modules:
module use /cvmfs/neurodesk.ardc.edu.au/neurodesk-modules/*
Example usage of fsleyes:
ml fsl
fsleyes
List the available programs:
ml av