This is the multi-page printable view of this section. Click here to print.
Documentation
1 - Indexing with Algolia
1. Prerequisites
2. Create a crawler to index the documentation
- In the Algolia Overview page, click on “Go To Crawlers”.
- Click on “Add new crawler”.
- Name your crawler (e.g.,
neurodesk-docs). - Set the “Start URL” to your documentation URL (e.g.,
https://neurodesk.org/). - Click “Create”.
3. Configure the crawler
- In the crawler settings, go to the “Editor” section under “SETUP”.
- You can specify how the content should be indexed. It can override the default settings.Make sure to configure
startUrls,discoveryPatterns,pathsToMatchand other relevant settings to match the base URL for indexing. Redirect URLs would fail the crawler. - Run the crawler by clicking on “Run Test” in the top right corner.
- Once the test is successful, click on “Review and Publish” to start indexing the documentation.
4. Create a new Algolia index
- Log in to your Algolia account.
- Click on “Indices” in the left sidebar.
- Click on “Create index”.
- Name your index (e.g.,
neurodesk-docs). - Click “Create”.
5. Configure the Algolia index
- In the index settings, go to the “Searchable attributes” section.
- Add attributes you want to be searchable, eg.
title,content. - In the “Ranking” section, set the ranking criteria according to your needs.
- Save the settings.
2 - Running the Neurodesk Site Locally (Hugo + Docsy)
1. Prerequisites
- Git
- Go (required for Hugo modules)
- Hugo extended version (0.146.0 recommended). See https://github.com/gohugoio/hugo/releases for Hugo releases.
2. Cloning the repository
This step is the same for macOS, Windows, and Linux.
Using SSH
git clone --recurse-submodules git@github.com:neurodesk/neurodesk.github.io.gitor
Using HTTPS
git clone --recurse-submodules https://github.com/neurodesk/neurodesk.github.io.gitIf you cloned without –recurse-submodules
Run the following command to pull submodules
git submodule update --init --recursive --remote3. Start local hugo server
On Windows:
- Extract the hugo.exe binary from the ZIP file into the root of your neurodesk.github.io directory.
- Open PowerShell or Git Bash, then run:
.\hugo.exe server --disableFastRender- Once started, your dev website will be accessible via http://localhost:1313
On Mac:
- Extract, move, and authorize the Hugo binary:
cd ~/Downloads  #edit according to location of file
tar -xvzf hugo_extended_0.115.4_darwin-universal.tar.gz #unzip the file
chmod +x hugo #Make the hugo file executable
sudo mv hugo /usr/local/bin/hugo-extended #move file to bin folder- Verify your Hugo installation
hugo-extended version #if it is your first time running this on a Mac, you will see a security warningYou should expect something like this (look for the mention of extended to be sure it worked)
hugo v0.146.0-5d1b9d39858bb0b2e505af9f649bfb55295ecca1+extended darwin/arm64 BuildDate=2025-04-10T14:57:56Z VendorInfo=gohugoioOnce installed, you can run the server for Mac using:
hugo-extended server --disableFastRenderOnce started, your dev website will be accessible via http://localhost:1313
4. Update docsy theme submodule (optional)
git submodule update --remote
git add themes/
git commit -m "Updating theme submodule"
git push origin main
3 - Contribute to Neurodesk.org
This applies if you with to submit a new tutorial or amend content on a page. Our website is mostly written in Markdown (.md files). We include the basics of writing in Markdown on this page.
Table of contents
- Create your own copy of neurodesk/neurodesk.github.io repository
- Create your content or make your modifications
- Contribute your new content to the official documentation
- Formatting guidelines
- Code blocks
- Images
- Alerts and warnings
- Tables
- Lists
Create your own copy of neurodesk/neurodesk.github.io repository where you will be able to make modifications
Begin by creating a copy of our documentation that you can edit:
- Visit the GitHub repository for the Neurodesk documentation.
- Fork the repository.
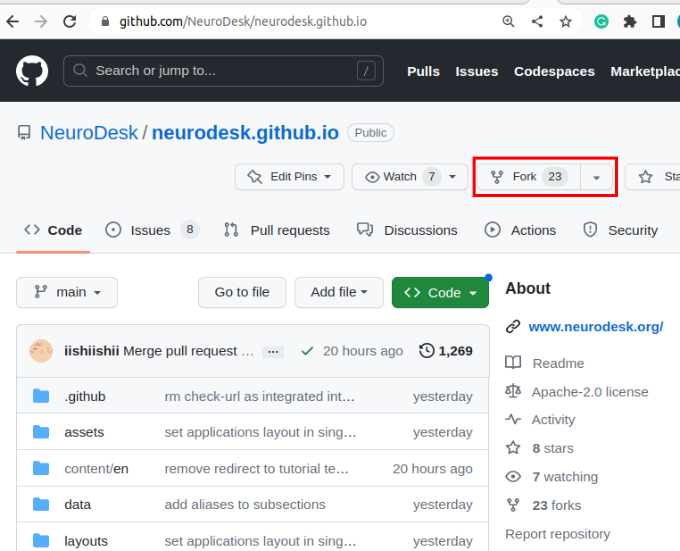
Why fork the repository?
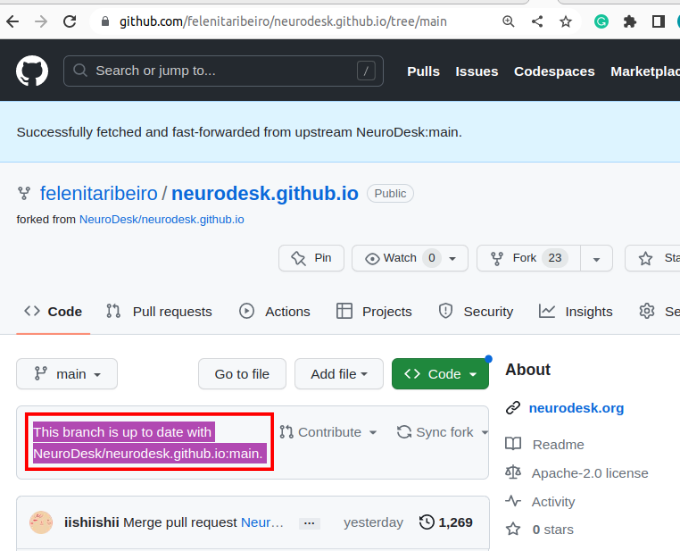
You will now have your own copy of the documentation that you can alter without affecting our official documentation. You will see a panel stating “This branch is up to date with Neurodesk:main.” If someone else makes a change to the official documentation, the statement will change to reflect this. You can bring your repository up to date by clicking “Sync fork”.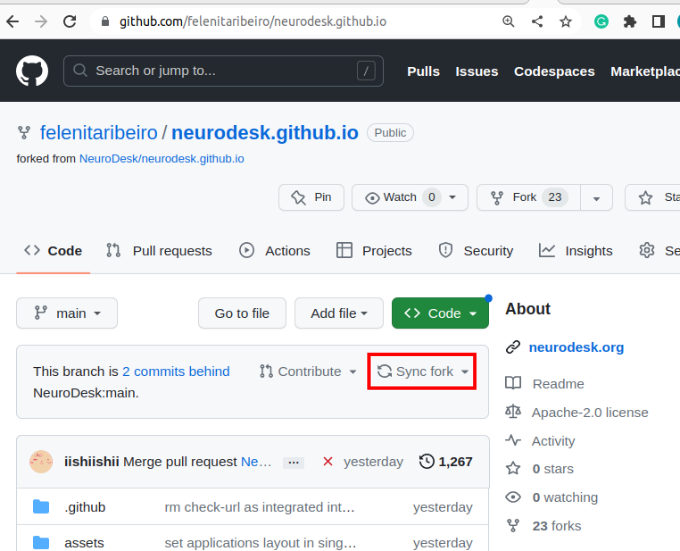
Create your content or make your modifications
- Clone your forked version of our documentation to a location of your choice on your computer.
This step is the same for macOS, Windows, and Linux.
Using SSH
git clone --recurse-submodules git@github.com:neurodesk/neurodesk.github.io.gitor
Using HTTPS
git clone --recurse-submodules https://github.com/neurodesk/neurodesk.github.io.gitIf you cloned without –recurse-submodules
Run the following command to pull submodules
git submodule update --init --recursive --remoteThe URL for the repository can be copied by clicking on the button highlighted below:
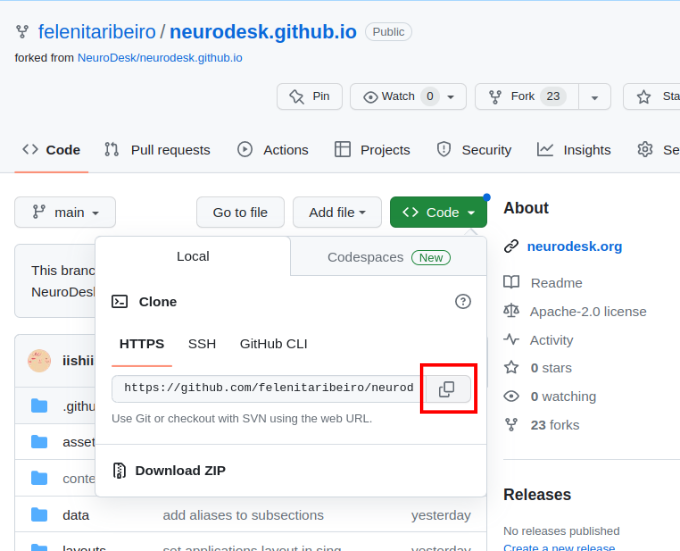
- Now, you can open your copy of
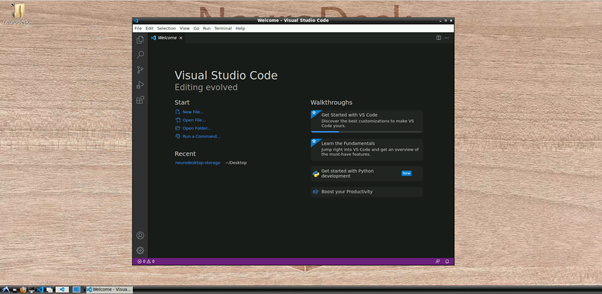
neurodesk.github.iousing the editor of your choice (we recommend vscode). Before making changes to the current repository, the best practice is to create a new branch for avoiding version conflicts.
- Create a branch:
git branch tutorial-template- Checkout the branch you want to use for the addition or changes you’d like to make
git checkout tutorial-template- Confirm you are in the right branch:
git branch
- Within your cloned environment, navigate to where you’d like to make your changes.
For example, if you’d like to create new tutorial content, go in neurodesk.github.io/content/en/tutorials-examples/tutorials/ and then navigate to the subfolder you believe your tutorial belongs in (e.g. “/functional_imaging”)
Create a new, appropriately named markdown file to house your content (e.g. for a tutorial about physiology, you might call it “physio.md”). Images need to be stored in the
/staticdirectory - please mirror the same directory structure as for your markdown files.Open this file and populate it with your content! You’re also welcome to look at other tutorials already documented on our website for inspiration.
Contribute your new content to the official documentation
- Once you are happy with your content, to avoid merge conflicts, rebase your branch with the main branch, which should be synced with neurodesk/neurodesk.github.io:main (on GitHub check if your repo is synced and locally checkout the main branch and run git pull).
git rebase mainYou might have to correct some merge conflicts, but vscode makes it easy.
Commit all your changes and push these local commits to GitHub.
Navigate to your forked version of the repository on GitHub and switch branches for the one with your additions.
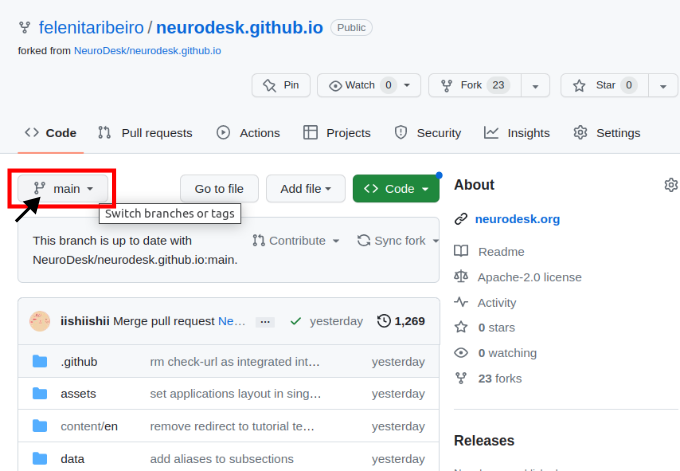
- Now, you can preview the changes before contributing them upstream. For this, if this is your first time to run the Action build, click on the “Actions” tab and enable the Actions (“I understand my tutorials…”). You can run the workflow by clicking on each of them in the left sidebar.

Then you need to open the settings of the repository and check that Pages points to gh-pages, and when clicking on the link, the site should be there.
To contribute your changes, click “Compare & pull request” and then “Create pull request”.
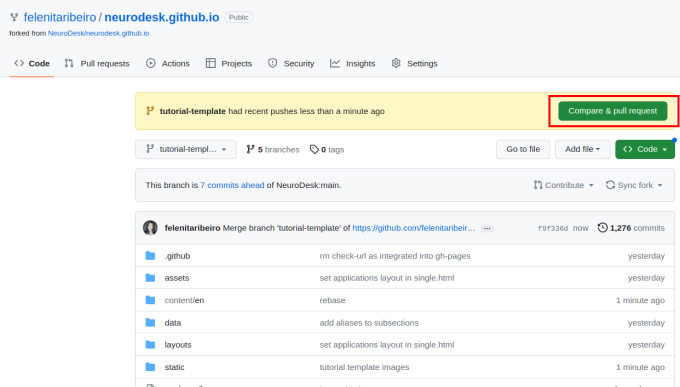
Give your pull request a title (e.g. “Document PhysIO tutorial”), leave a comment briefly describing what you have done, and then create the pull request.
Someone from the Neurodesk team will review and accept your changes, which will appear on our website soon!
Thanks so much for taking the time to contribute content to the Neurodesk community! If you have any feedback on the process, please let us know on github discussions.
Formatting guidelines
As seen throughout this tutorial, you can embellish your text using markdown conventions; text can be bold, italic, or strikethrough. You can also add Links, and you can organise your content with headers, starting at level 2 (the page title is a level 1 header):
Level 2 heading
You can also include progressively smaller subheadings:
Level 3 heading
Some more detailed information.
Level 4 heading
Even more detailed information.
Code blocks
You can add codeblocks to your content as follows:
# Some example code
import numpy as np
a = np.array([1, 2])
b = np.array([3, 4])
print(a+b)
Or add syntax highlighting to your codeblocks:
# Some example code
import numpy as np
a = np.array([1, 2])
b = np.array([3, 4])
print(a+b)
Advanced code or command line formatting using this html snippet:
# Some example code
import numpy as np
a = np.array([1, 2])
b = np.array([3, 4])
print(a+b)
[4 6]
You can also add code snippets, e.g. var foo = "bar";, which will be shown inline.
Images
To add screenshots and images to your content, create a subfolder in /static with the same file structure as in your content markdown file. Add your screenshot to this folder, keeping in mind that you may want to adjust your screenshot to a reasonable size before uploading. You can then embed these images in your tutorial using the following convention:
For a filename.png in a /content/en/tutorials-examples/subject/tutorial1/markdownfile.md use
For example: EEGtut1.png in /content/en/tutorials-examples/tutorials/electrophysiology/eeg_mne-python.md would be
Alerts and warnings
You can grab the reader’s attention to particularly important information with quoteblocks, alerts, and warnings:
This is a quoteblock
Note
This is an alert with a title.Warning
This is a warning with a title.You can also segment information as follows:
There’s a horizontal rule above and below this.
Or add page information:
This is a placeholder. Replace it with your own content.
Tables
You may want to order information in a table as follows:
| Neuroscientist | Notable work | Lifetime |
|---|---|---|
| Santiago Ramón y Cajal | Investigations on microscopic structure of the brain | 1852–1934 |
| Rita Levi-Montalcini | Discovery of nerve growth factor (NGF) | 1909–2012 |
| Anne Treisman | Feature integration theory of attention | 1935–2018 |
Lists
You may want to organise information in a list as follows:
Here is an unordered list:
- Rstudio
- JASP
- SPSS
And an ordered list:
- Collect data
- Try to install analysis software
- Cry a little
And an unordered task list:
- Install Neurodesktop
- Analyse data
- Take a vacation
And a “mixed” task list:
- writing
- ?
- more writing probably
And a nested list:
- EEG file extensions
- .eeg, .vhdr, .vmrk
- .edf
- .bdf
- .set, .fdt
- .smr
- MEG file extensions
- .ds
- .fif
- .sqd
- .raw
- .kdf
Need Help?
If you have questions or would like feedback before submitting:
- Open a discussion
We appreciate your contribution to the Neurodesk community and reproducible science.