Video tutorial
See below for a 57 minute tutorial video from ReproNim 2023
This is the multi-page printable view of this section. Click here to print.
See below for a 57 minute tutorial video from ReproNim 2023

Please consult this page for the contributor’s template. Simply copy the code and insert your information.
We try to update this page based on the git commit history:
Core team: Steffen, Aswin, Ashley, Josh, Xincheng, Thuy, Moni, Michèle, Marshall
Neurodesk is built with a modular architecture that combines several key components to provide a flexible and powerful neuroimaging analysis environment. The diagram below illustrates how these components work together:
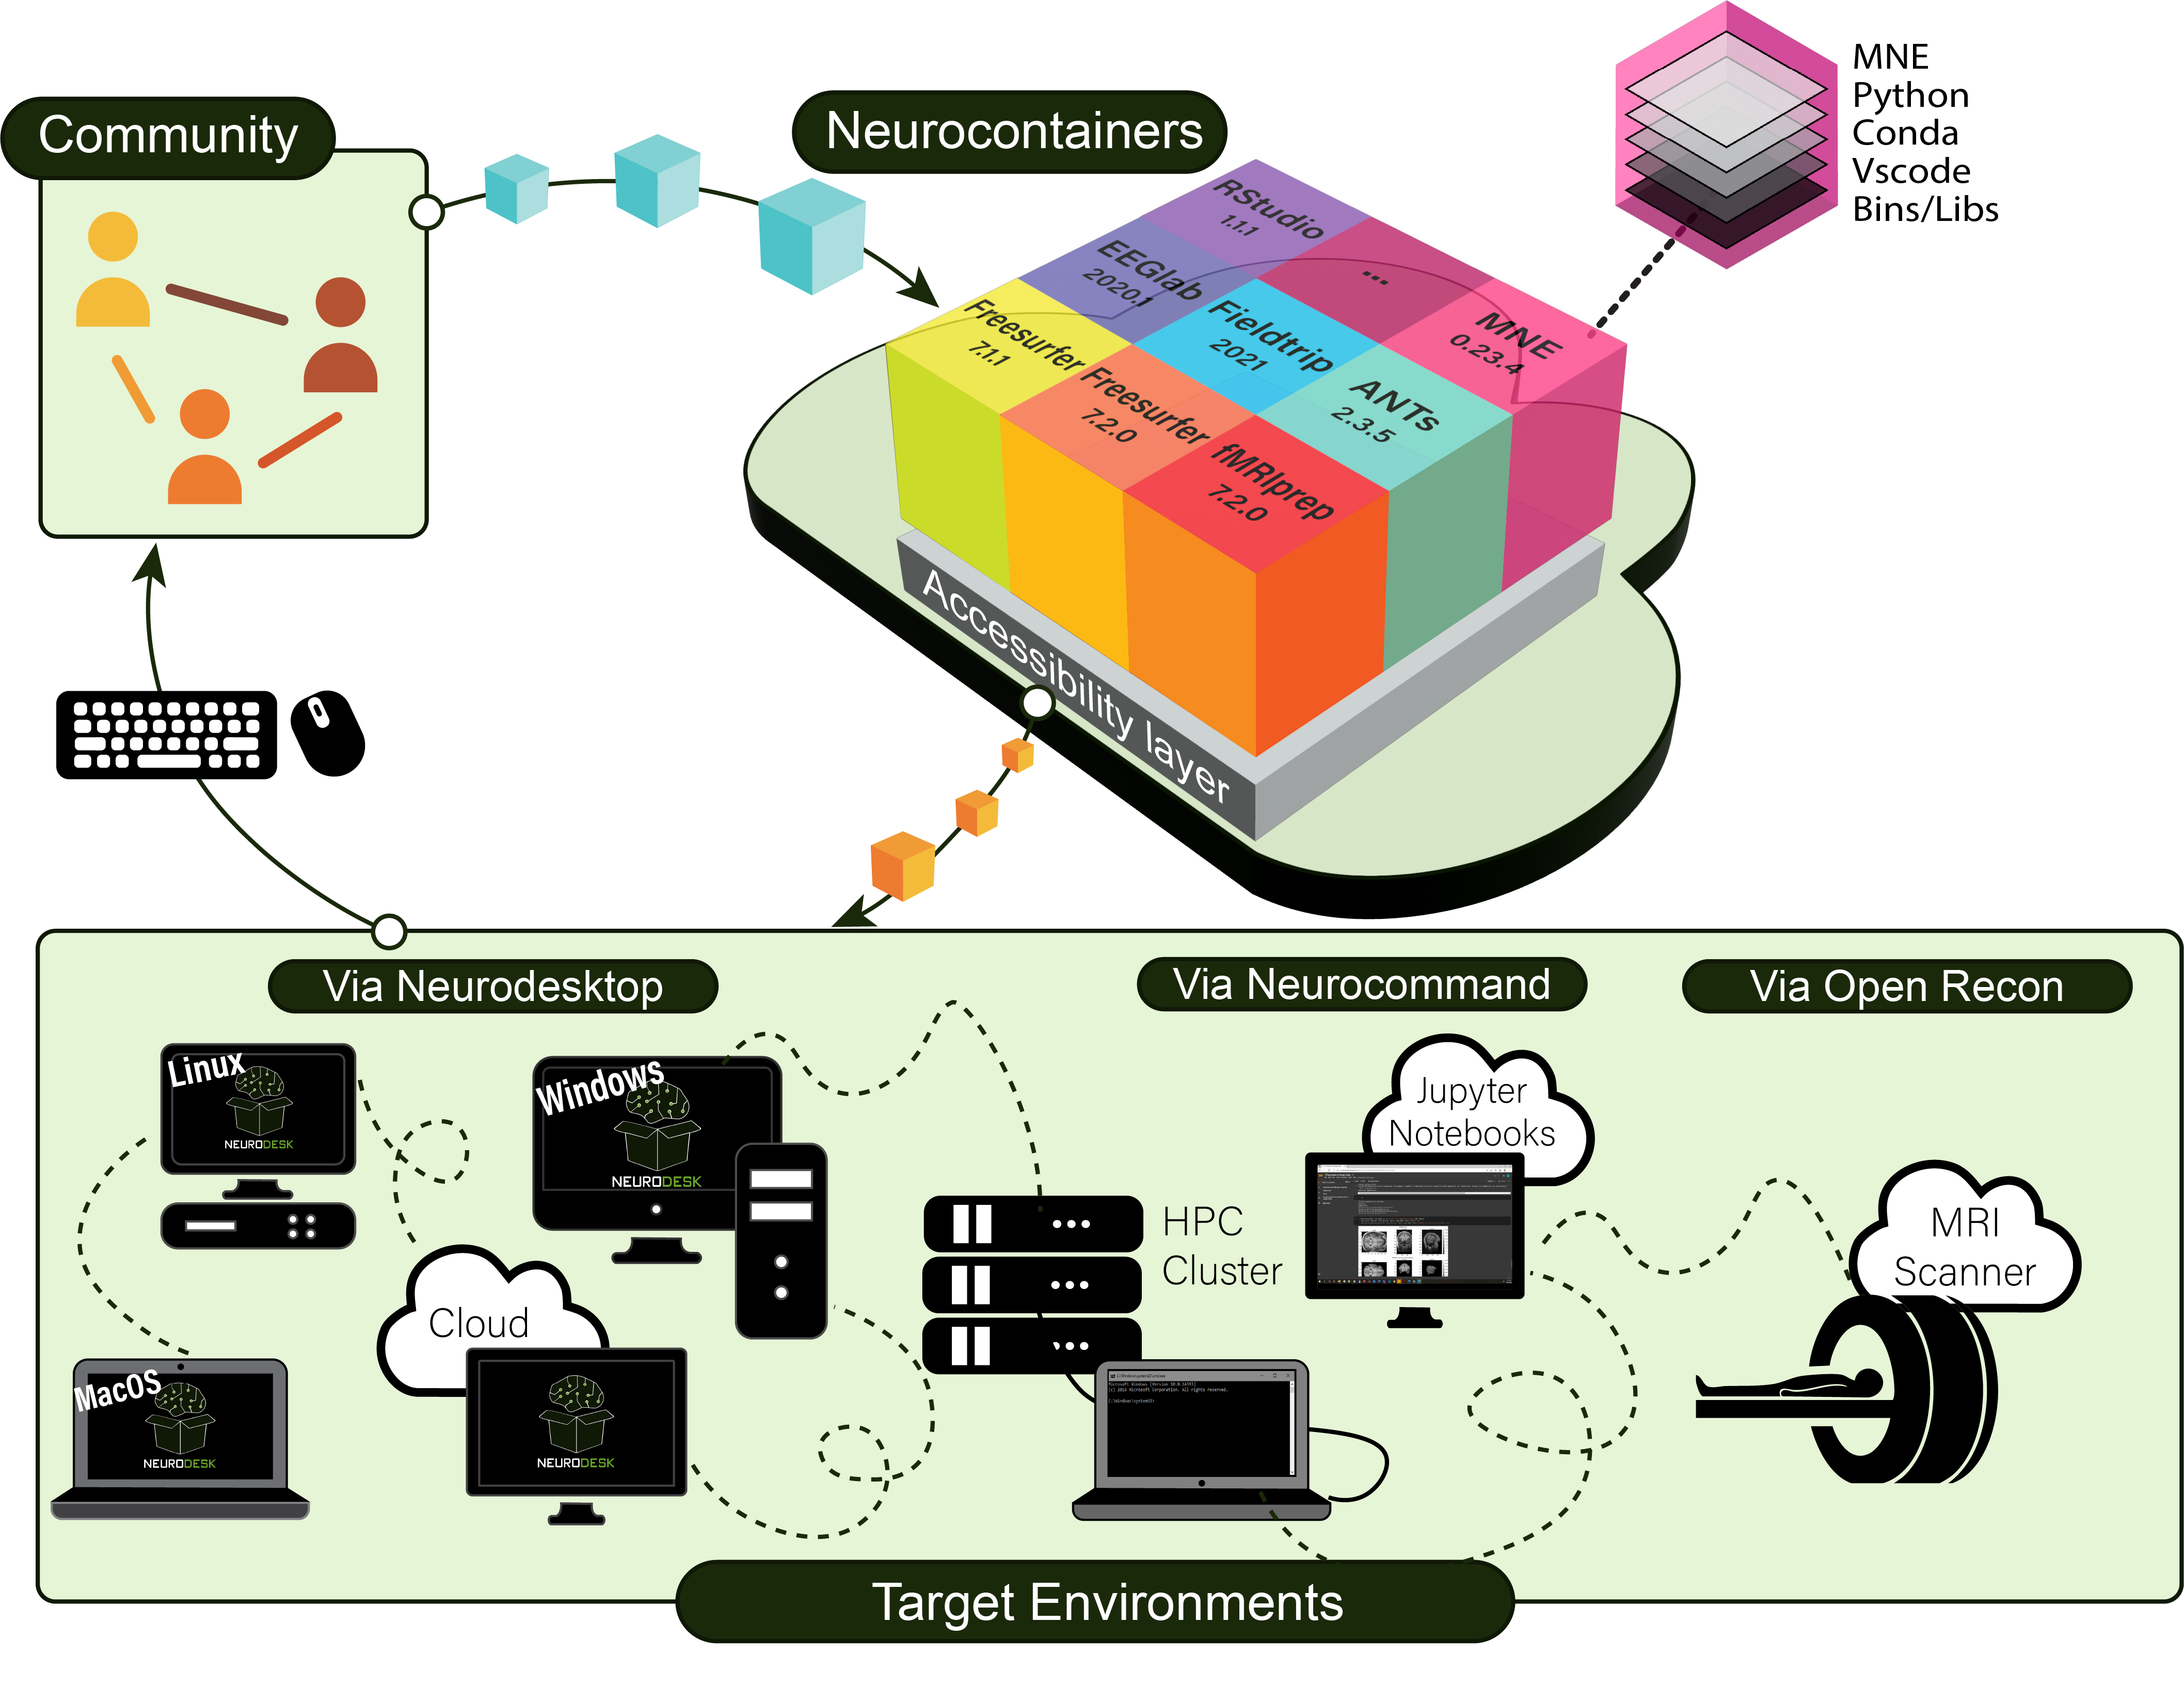
Neurodesk ecosystem architecture showing the main components and their interactions

Neurodesktop is a compact Docker container with a browser-accessible virtual desktop that allows you develop and implement data analysis, pre-equipped with basic fMRI and EEG analysis tools. To get started, see: Neurodesktop (Github)
Neurocommand offers the option to install and manage multiple distinct containers for more advanced users who prefer a command-line interface. Neurocommand is the recommended interface for users seeking to use Neurodesk in high performance computing (HPC) environments.
To get started, see: Neurocommand (Github)
transparent-singularity offers seamless access to applications installed in neurodesktop and neurocommand, treating containerised software as native installations.
More info: transparent-singularity (Github)
To ensure accessibility for users without privileged system access (root/admin permissions), Neurodesk has integrated TinyRange, a lightweight container runtime that operates without requiring root privileges. This integration represents a significant advancement in making neuroimaging tools accessible to all users, regardless of their system permissions.

TinyRange provides:
This solution is particularly valuable in environments where users don’t have administrative privileges, such as shared computing facilities or institutional workstations.
neurocontainers contains scripts for building sub-containers for neuroimaging data-analysis software. These containers can be used alongside neurocommand or transparent-singularity.
To get started, see: Neurocontainers (Github)
Neurodocker is a command-line program that generates custom Dockerfiles and Singularity recipes for neuroimaging and minifies existing containers.
More info: Github
Follow these steps to create a new release of the Neurodesk App.
If there’s new version of Neurodesktop image, Github Action will PR with updated jupyter_neurodesk_version in neurodesktop.toml file. Double-check and merge this PR.
Create a new release on GitHub as pre-release. Set the release tag to the value of target application version and prefix it with v (for example v1.0.0 for Neurodesk App version 1.0.0). Enter release title and release notes. Release needs to stay as pre-release for GitHub Actions to be able to attach installers to the release.
Make sure that application is building, installing and running properly.
In the main branch, create a branch preferably with the name release-v<new-version>. Add a commit with the version changes in package.json file. This is necessary for GitHub Actions to be able to attach installers to the release. (for example "version": "1.0.0").
GitHub Actions will automatically create installers for each platform (Linux, macOS, Windows) and upload them as release assets. Assets will be uploaded only if a release of type pre-release with tag matching the Neurodesk App’s version with a v prefix is found. For example, if the Neurodesk App version in the PR is 1.0.0, the installers will be uploaded to a release that is flagged as pre-release and has a tag v1.0.0. New commits to this branch will overwrite the installer assets of the release.
Once all the changes are complete, and installers are uploaded to the release then publish the release.
Follow these step-by-step instructions to generate and export the required Macos certificate for Neurodesk App release.
openssl base64 -in neurodesk_certificate.p12⚠️ Security Note: These values contain highly sensitive credentials. Never commit them to version control or share them publicly. Always store them as GitHub repository secrets.
To set these secrets, go to your repository Settings → Secrets and variables → Actions → Repository secrets:
APPLEID: Email address associated with your Apple Developer account
APPLEIDPASS: App-Specific Password for your Apple account
APPLE_TEAM_ID: Your Apple Developer Team ID
CSC_KEY_PASSWORD: The password you set when converting the certificate in the “Update MacOS certificate” section above
CSC_LINK: Base64-encoded content of the .p12 certificate file
openssl base64 -in neurodesk_certificate.p12 command in step 7 aboveDev builds can be triggered by Neurodesk admins from https://github.com/neurodesk/neurodesktop/actions/workflows/build-neurodesktop-dev.yml
docker pull vnmd/neurodesktop-dev:latest
sudo docker run \
  --shm-size=1gb -it --cap-add SYS_ADMIN \
  --security-opt apparmor:unconfined --device=/dev/fuse \
  --name neurodesktop-dev \
  -v ~/neurodesktop-storage:/neurodesktop-storage \
  -e NB_UID="$(id -u)" -e NB_GID="$(id -g)" \
  -p 8888:8888 -e NEURODESKTOP_VERSION=dev \
vnmd/neurodesktop-dev:latestdocker pull vnmd/neurodesktop-dev:latest
docker run --shm-size=1gb -it --cap-add SYS_ADMIN --security-opt apparmor:unconfined --device=/dev/fuse --name neurodesktop -v C:/neurodesktop-storage:/neurodesktop-storage -p 8888:8888 -e NEURODESKTOP_VERSION=dev vnmd/neurodesktop-dev:latestTransparent singularity is here https://github.com/neurodesk/transparent-singularity/
This project allows to use singularity containers transparently on HPCs, so that an application inside the container can be used without adjusting any scripts or pipelines (e.g. nipype).
This script expects that you have adjusted the Singularity Bindpoints in your .bashrc, e.g.:
export SINGULARITY_BINDPATH="/gpfs1/,/QRISdata,/data"https://github.com/neurodesk/neurocommand/blob/main/cvmfs/log.txt
curl -s https://raw.githubusercontent.com/neurodesk/neurocommand/main/cvmfs/log.txtgit clone https://github.com/neurodesk/transparent-singularity convert3d_1.0.0_20210104This will create scripts for every binary in the container located in the $DEPLOY_PATH inside the container. It will also create activate and deactivate scripts and module files for lmod (https://lmod.readthedocs.io/en/latest)
cd convert3d_1.0.0_20210104
./run_transparent_singularity.sh convert3d_1.0.0_20210104--storage - this option can be used to force a download from docker, e.g.: --storage docker--container - this option can be used to explicitly define the container name to be downloaded--unpack - this will unpack the singularity container so it can be used on systems that do not allow to open simg / sif files for security reasons, e.g.: --unpack true--singularity-opts - this will be passed on to the singularity call, e.g.: --singularity-opts '--bind /cvmfs'Add the module folder path to $MODULEPATH
source activate_convert3d_1.0.0_20210104.shsource deactivate_convert3d_1.0.0_20210104.sif.sh./ts_uninstall.shIf you want more speed in a region one way could be to setup another Stratum 1 server or a proxy. We currently don’t run any proxy servers but it would be important for using it on a cluster.
sudo yum install -y squidOpen the squid.confand use the following configuration
sudo vi /etc/squid/squid.conf# List of local IP addresses (separate IPs and/or CIDR notation) allowed to access your local proxy
#acl local_nodes src YOUR_CLIENT_IPS
# Destination domains that are allowed
acl stratum_ones dstdomain .neurodesk.org .openhtc.io .cern.ch .gridpp.rl.ac.uk .opensciencegrid.org
# Squid port
http_port 3128
# Deny access to anything which is not part of our stratum_ones ACL.
http_access allow stratum_ones
# Only allow access from our local machines
#http_access allow local_nodes
http_access allow localhost
# Finally, deny all other access to this proxy
http_access deny all
minimum_expiry_time 0
maximum_object_size 1024 MB
cache_mem 128 MB
maximum_object_size_in_memory 128 KB
# 5 GB disk cache
cache_dir ufs /var/spool/squid 5000 16 256sudo squid -k parse
sudo systemctl start squid
sudo systemctl enable squid
sudo systemctl status squid
sudo systemctl restart squidThen add the proxy to the cvmfs config:
CVMFS_HTTP_PROXY="http://proxy-address:3128"We store our singularity containers unpacked on CVMFS. We tried the DUCC tool in the beginning, but it was causing too many issues with dockerhub and we were rate limited. The script to unpack our singularity containers is here: https://github.com/neurodesk/neurocommand/blob/main/cvmfs/sync_containers_to_cvmfs.sh
It gets called by a cronjob on the CVMFS Stratum 0 server and relies on the log.txt file being updated via an action in the neurocommand repository (https://github.com/neurodesk/neurocommand/blob/main/.github/workflows/upload_containers_simg.sh)
The Stratum 1 servers then pull this repo from Stratum 0 and our desktops mount these repos (configured here: https://github.com/neurodesk/neurodesktop/blob/main/Dockerfile)
The startup script (https://github.com/neurodesk/neurodesktop/blob/main/config/jupyter/before_notebook.sh) sets up CVMFS and tests which server is fastest during the container startup.
This can also be done manually:
sudo cvmfs_talk -i neurodesk.ardc.edu.au host info
sudo cvmfs_talk -i neurodesk.ardc.edu.au host probe
cvmfs_config stat -v neurodesk.ardc.edu.au(would object storage be better? -> see comment below under next iteration ideas)
lsblk -l
sudo mkfs.ext4 /dev/vdb
sudo mkdir /storage
sudo mount /dev/vdb /storage/ -t auto
sudo chown ec2-user /storage/
sudo chmod a+rwx /storage/
sudo vi /etc/fstab
/dev/vdb /storage auto defaults,nofail 0 2sudo yum install vim htop gcc git screen
sudo timedatectl set-timezone Australia/Brisbane
sudo yum install -y https://ecsft.cern.ch/dist/cvmfs/cvmfs-release/cvmfs-release-latest.noarch.rpm
sudo yum install -y cvmfs cvmfs-server
sudo systemctl enable httpd
sudo systemctl restart httpd
# sudo systemctl stop firewalld
# restore keys:
sudo mkdir /etc/cvmfs/keys/incoming
sudo chmod a+rwx /etc/cvmfs/keys/incoming
cd connections/cvmfs_keys/
scp neuro* ec2-user@203.101.226.164:/etc/cvmfs/keys/incoming
sudo mv /etc/cvmfs/keys/incoming/* /etc/cvmfs/keys/
#backup keys:
#mkdir cvmfs_keys
#scp opc@158.101.127.61:/etc/cvmfs/keys/neuro* .
sudo cvmfs_server mkfs -o $USER neurodesk.ardc.edu.au
cd /storage
sudo mkdir -p cvmfs-storage/srv/
cd /srv/
sudo mv cvmfs/ /storage/cvmfs-storage/srv/
sudo ln -s /storage/cvmfs-storage/srv/cvmfs/
cd /var/spool
sudo mkdir /storage/spool
sudo mv cvmfs/ /storage/spool/
sudo ln -s /storage/spool/cvmfs .
cvmfs_server transaction neurodesk.ardc.edu.au
cvmfs_server publish neurodesk.ardc.edu.ausudo vi /etc/cron.d/cvmfs_resign0 11 * * 1 root /usr/bin/cvmfs_server resign neurodesk.ardc.edu.aucat /etc/cvmfs/keys/neurodesk.ardc.edu.au.pubMIIBIjANBgkqhkiG9w0BAQEFAAOCAQ8AMIIBCgKCAQEAuV9JBs9uXBR83qUs7AiE
nSQfvh6VCdNigVzOfRMol5cXsYq3cFy/Vn1Nt+7SGpDTQArQieZo4eWC9ww2oLq0
vY1pWyAms3Y4i+IUmMbwNifDU4GQ1KN9u4zl9Peun2YQCLE7mjC0ZLQtLM7Q0Z8h
NwP8jRJTN+u8mRKzkyxfSMLscVMKhm2pAwnT1zB9i3bzVV+FSnidXq8rnnzNHMgv
tfqx1h0gVyTeodToeFeGG5vq69wGZlwEwBJWVRGzzr+a8dWNBFMJ1HxamrBEBW4P
AxOKGHmQHTGbo+tdV/K6ZxZ2Ry+PVedNmbON/EPaGlI8Vd0fascACfByqqeUEhAB
dQIDAQAB
-----END PUBLIC KEY-----from the CVMFS documentation: Repositories containing Linux container image contents (that is: container root file systems) should use overlayfs as a union file system and have the following configuration:
CVMFS_INCLUDE_XATTRS=true
CVMFS_VIRTUAL_DIR=true
Extended attributes of files, such as file capabilities and SElinux attributes, are recorded. And previous file system revisions can be accessed from the clients.
We tested the DUCC tool in the beginning, but it was leading to too many docker pulls and we therefore replaced it with our own script: https://github.com/neurodesk/neurocommand/blob/main/cvmfs/sync_containers_to_cvmfs.sh
This is the old DUCC setup
sudo yum install cvmfs-ducc.x86_64
sudo -i
dnf install -y yum-utils
yum-config-manager --add-repo https://download.docker.com/linux/centos/docker-ce.repo
dnf install docker-ce docker-ce-cli containerd.io
systemctl enable docker
systemctl start docker
docker version
docker info

# leave root mode

sudo groupadd docker
sudo usermod -aG docker $USER
sudo chown root:docker /var/run/docker.sock
newgrp docker


vi convert_appsjson_to_wishlist.sh
export DUCC_DOCKER_REGISTRY_PASS=configure_secret_password_here_and_dont_push_to_github
cd neurodesk
git pull
./gen_cvmfs_wishlist.sh
cvmfs_ducc convert recipe_neurodesk_auto.yaml
cd ..


chmod +x convert_appsjson_to_wishlist.sh

git clone https://github.com/neurodesk/neurodesk/

# setup cron job
sudo vi /etc/cron.d/cvmfs_dockerpull
*/5 * * * * opc cd ~ && bash /home/opc/convert_appsjson_to_wishlist.sh


#vi recipe.yaml

##version: 1
#user: vnmd
#cvmfs_repo: neurodesk.ardc.edu.au
#output_format: '$(scheme)://$(registry)/vnmd/thin_$(image)'
#input:
#- 'https://registry.hub.docker.com/vnmd/tgvqsm_1.0.0:20210119'
#- 'https://registry.hub.docker.com/vnmd/itksnap_3.8.0:20201208'


#cvmfs_ducc convert recipe_neurodesk.yaml
#cvmfs_ducc convert recipe_unpacked.yamlThe stratum 1 servers for the desktop are configured here: https://github.com/neurodesk/neurodesktop/blob/main/Dockerfile
If you want more speed in a region one way could be to setup another Stratum 1 server or a proxy.
sudo yum install -y https://ecsft.cern.ch/dist/cvmfs/cvmfs-release/cvmfs-release-latest.noarch.rpm
sudo yum install -y cvmfs-server squid tmux
sudo yum install -y python3-mod_wsgi

sudo dnf install dnf-automatic -y
sudo systemctl enable dnf-automatic-install.timer
sudo systemctl status dnf-automatic-install
sudo systemctl cat dnf-automatic-install.timer
sudo vi /etc/dnf/automatic.conf
# check if automatic updates are downloaded and applied

tmux new -s cvmfs
# return to session: tmux a -t cvmfs


sudo sed -i 's/Listen 80/Listen 127.0.0.1:8080/' /etc/httpd/conf/httpd.conf

set +H
echo "http_port 80 accel" | sudo tee /etc/squid/squid.conf
echo "http_port 8000 accel" | sudo tee -a /etc/squid/squid.conf
echo "http_access allow all" | sudo tee -a /etc/squid/squid.conf
echo "cache_peer 127.0.0.1 parent 8080 0 no-query originserver" | sudo tee -a /etc/squid/squid.conf
echo "acl CVMFSAPI urlpath_regex ^/cvmfs/[^/]*/api/" | sudo tee -a /etc/squid/squid.conf
echo "cache deny !CVMFSAPI" | sudo tee -a /etc/squid/squid.conf
echo "cache_mem 128 MB" | sudo tee -a /etc/squid/squid.conf

sudo systemctl start httpd
sudo systemctl start squid
sudo systemctl enable httpd
sudo systemctl enable squid

#YOU NEED TO ADD YOUR GEO IP data here!
echo 'CVMFS_GEO_ACCOUNT_ID=APPLY_FOR_ONE_THIS_IS_a_SIX_DIGIT_NUMBER' | sudo tee -a /etc/cvmfs/server.local
echo 'CVMFS_GEO_LICENSE_KEY=APPLY_FOR_ONE_THIS_IS_a_password' | sudo tee -a /etc/cvmfs/server.local
sudo chmod 600 /etc/cvmfs/server.local

sudo mkdir -p /etc/cvmfs/keys/ardc.edu.au/

echo "-----BEGIN PUBLIC KEY-----
MIIBIjANBgkqhkiG9w0BAQEFAAOCAQ8AMIIBCgKCAQEAwUPEmxDp217SAtZxaBep
Bi2TQcLoh5AJ//HSIz68ypjOGFjwExGlHb95Frhu1SpcH5OASbV+jJ60oEBLi3sD
qA6rGYt9kVi90lWvEjQnhBkPb0uWcp1gNqQAUocybCzHvoiG3fUzAe259CrK09qR
pX8sZhgK3eHlfx4ycyMiIQeg66AHlgVCJ2fKa6fl1vnh6adJEPULmn6vZnevvUke
I6U1VcYTKm5dPMrOlY/fGimKlyWvivzVv1laa5TAR2Dt4CfdQncOz+rkXmWjLjkD
87WMiTgtKybsmMLb2yCGSgLSArlSWhbMA0MaZSzAwE9PJKCCMvTANo5644zc8jBe
NQIDAQAB
-----END PUBLIC KEY-----" | sudo tee /etc/cvmfs/keys/ardc.edu.au/neurodesk.ardc.edu.au.pub


sudo cvmfs_server add-replica -o $USER http://stratum0.neurodesk.cloud.edu.au/cvmfs/neurodesk.ardc.edu.au /etc/cvmfs/keys/ardc.edu.au

# CVMFS will store everything in /srv/cvmfs so make sure there is enough space or create a symlink to a bigger storage volume
# e.g.:
#cd /storage
#sudo mkdir -p cvmfs-storage/srv/
#cd /srv/
#sudo mv cvmfs/ /storage/cvmfs-storage/srv/
#sudo ln -s /storage/cvmfs-storage/srv/cvmfs/ -->


sudo cvmfs_server snapshot neurodesk.ardc.edu.au

#If this keeps failing with errors like "Processing chunks [21605 registered chunks]: failed to download #http://stratum0.neurodesk.cloud.edu.au/cvmfs/neurodesk.ardc.edu.au/data/03/99e1faa88d0d66a8707cdecdc9b063cc527e50 (17 - host data transfer cut short)
#couldn't reach Stratum 0 - please check the network connection
#terminate called after throwing an instance of 'ECvmfsException'
#  what():  PANIC: /home/sftnight/jenkins/workspace/CvmfsFullBuildDocker/CVMFS_BUILD_ARCH/docker-x86_64/CVMFS_BUILD_PLATFORM/cc9/build/BUILD/cvmfs-2.13.0/cvmfs/swissknife_pull.cc : 286
#Download error
#Aborted (core dumped)"

#Then this is a deep packet inspection issue on the side of the stratum 1. To get around this, create an SSH tunnel to the stratum 0 server and transfer via that tunnel:

#ssh -L 8081:localhost:80 ec2-user@stratum0.neurodesk.cloud.edu.au
#sudo vi /etc/cvmfs/repositories.d/neurodesk.ardc.edu.au/server.conf
# change this:
#CVMFS_STRATUM0=http://stratum0.neurodesk.cloud.edu.au/cvmfs/neurodesk.ardc.edu.au
# to this:
#CVMFS_STRATUM0=http://localhost:8081/cvmfs/neurodesk.ardc.edu.au

# Then run the sync again

echo "/var/log/cvmfs/*.log {
    weekly
    missingok
    notifempty
}" | sudo tee /etc/logrotate.d/cvmfs


echo '*/5 * * * * root output=$(/usr/bin/cvmfs_server snapshot -a -i 2>&1) || echo "$output" ' | sudo tee /etc/cron.d/cvmfs_stratum1_snapshot

sudo yum install iptables
sudo iptables -t nat -A PREROUTING -p tcp -m tcp --dport 80 -j REDIRECT --to-ports 8000

sudo systemctl disable firewalld
sudo systemctl stop firewalld
# make sure that port 80 is open in the real firewall

sudo cvmfs_server update-geodb

#test
curl --head http://YOUR_IP_OR_DNS/cvmfs/neurodesk.ardc.edu.au/.cvmfspublished


sudo crontab -e

# Run CVMFS Stratum 1 Garbage Collection every Sunday at 3:00 AM
0 3 * * 0 /usr/bin/cvmfs_server gc -a >> /var/log/cvmfs_gc.log 2>&1Our detailed task tracking lives on the Neurodesk Project Board. Below is a summary of the larger themes guiding development.
We have built a container builder UI that lets contributors define new applications interactively. We continue to improve this workflow and the underlying GitHub Actions pipelines to make it even easier to add, test, and publish containers.
Container deployment currently relies on a chain of custom scripts spread across several repositories. We want to adopt community-standard tools like SHPC to reduce duplication and maintenance burden.
Related issues:
There is currently no good way to describe and cite individual software containers. We want to increase the reusability and citability of Neurodesk containers through better metadata and tooling.
Related issues:
The education platform hosts both static tutorials and interactive notebooks, with an integrated review system to help maintain tutorial quality. We want to continue expanding coverage of neuroimaging workflows and improve automated testing of tutorial content.
Neurodesk is a great fit for teaching neuroimaging methods, but it’s not yet easy to run a custom instance for a larger group. We want to make it simpler to deploy Neurodesk for classes and workshops with shared data storage, autoscaling, ARM processor support, and multi-cloud compatibility (Google Cloud, AWS, Azure, OpenStack, OpenShift).
We are actively working on expanding the container ecosystem, including logging, labelling, and porting existing containers to ARM architecture.
Current work in progress:
We are migrating to Jupyter Book v2, along with UI improvements for the learning experience.
Current work in progress:
We are working on improving the desktop environment and the Neurodesk application experience.
Current work in progress:
Check the project board for the full list of open tasks, or see our contribution guide to get started.
While Neurodesk significantly reduces the friction associated with portability and reproducibility, incorporating new neuroimaging tools remains challenging. Incorporating new neuroimaging tools into Neurodesk is challenging due setting the correct environment variables, finding specific versions of the software dependencies, version requirements or specific build steps. However, writing accurate and efficient container recipes requires expertise in containerization technologies and knowledge of software dependencies. Neurocontainer Copilot can help identify these details from provided documentation (README or installation documentation) and code samples. The development involves the following steps: 1) We use existing neurocontainer recipes to generate the recipes for new tools using LLM agents. 2) We use Google Jules agent to automate the process of generating Neurocontainer recipes. 3) We use the generated recipes to create pull requests in the Neurocontainers repository, which can be reviewed and merged by the Neurocontainers team or user can use it to test the recipe locally.
In this example, we use Google Jules agent, to automate Neurocontainer recipe generation in Neurodesk ecosystem.
After logging in wth google, you can access Jules agent dashboard. You can create an environment and use the neurocontainers GitHub repository as the base. Make sure to enable internet access so that the agent can search for relevant information online to assist with building accurate container recipes.
You can then start a new task, where you can provide the name of the tool you want to containerize, and the agent will generate a recipe for you. For example, if you want to containerize hcp-asl, you can provide following prompt:
I want you to act as Neurodesk recipe generator, compile the dependency lists required for the Github repository and install them in the neurodocker container format. Please follow the notation in https://github.com/Neurodesk/neurocontainers/blob/main/builder/README.md carefully. Now create a docker build.yaml for recipes/hcp-asl/build.yaml based on the hcp-asl https://github.com/physimals/hcp-asl/blob/master/README.md repository README.md file, use neurocontainers GitHub repository it contains examples such as recipes/dsistudio/build.yaml. Note than if there are conda and pip install use appropriately. Please follow the notation in https://github.com/Neurodesk/neurocontainers/blob/main/builder/README.md properly. Run recipes/hcp-asl/build.yaml file and recursively modify the neurocontainers/recipes/hcp-asl/build.yaml file.
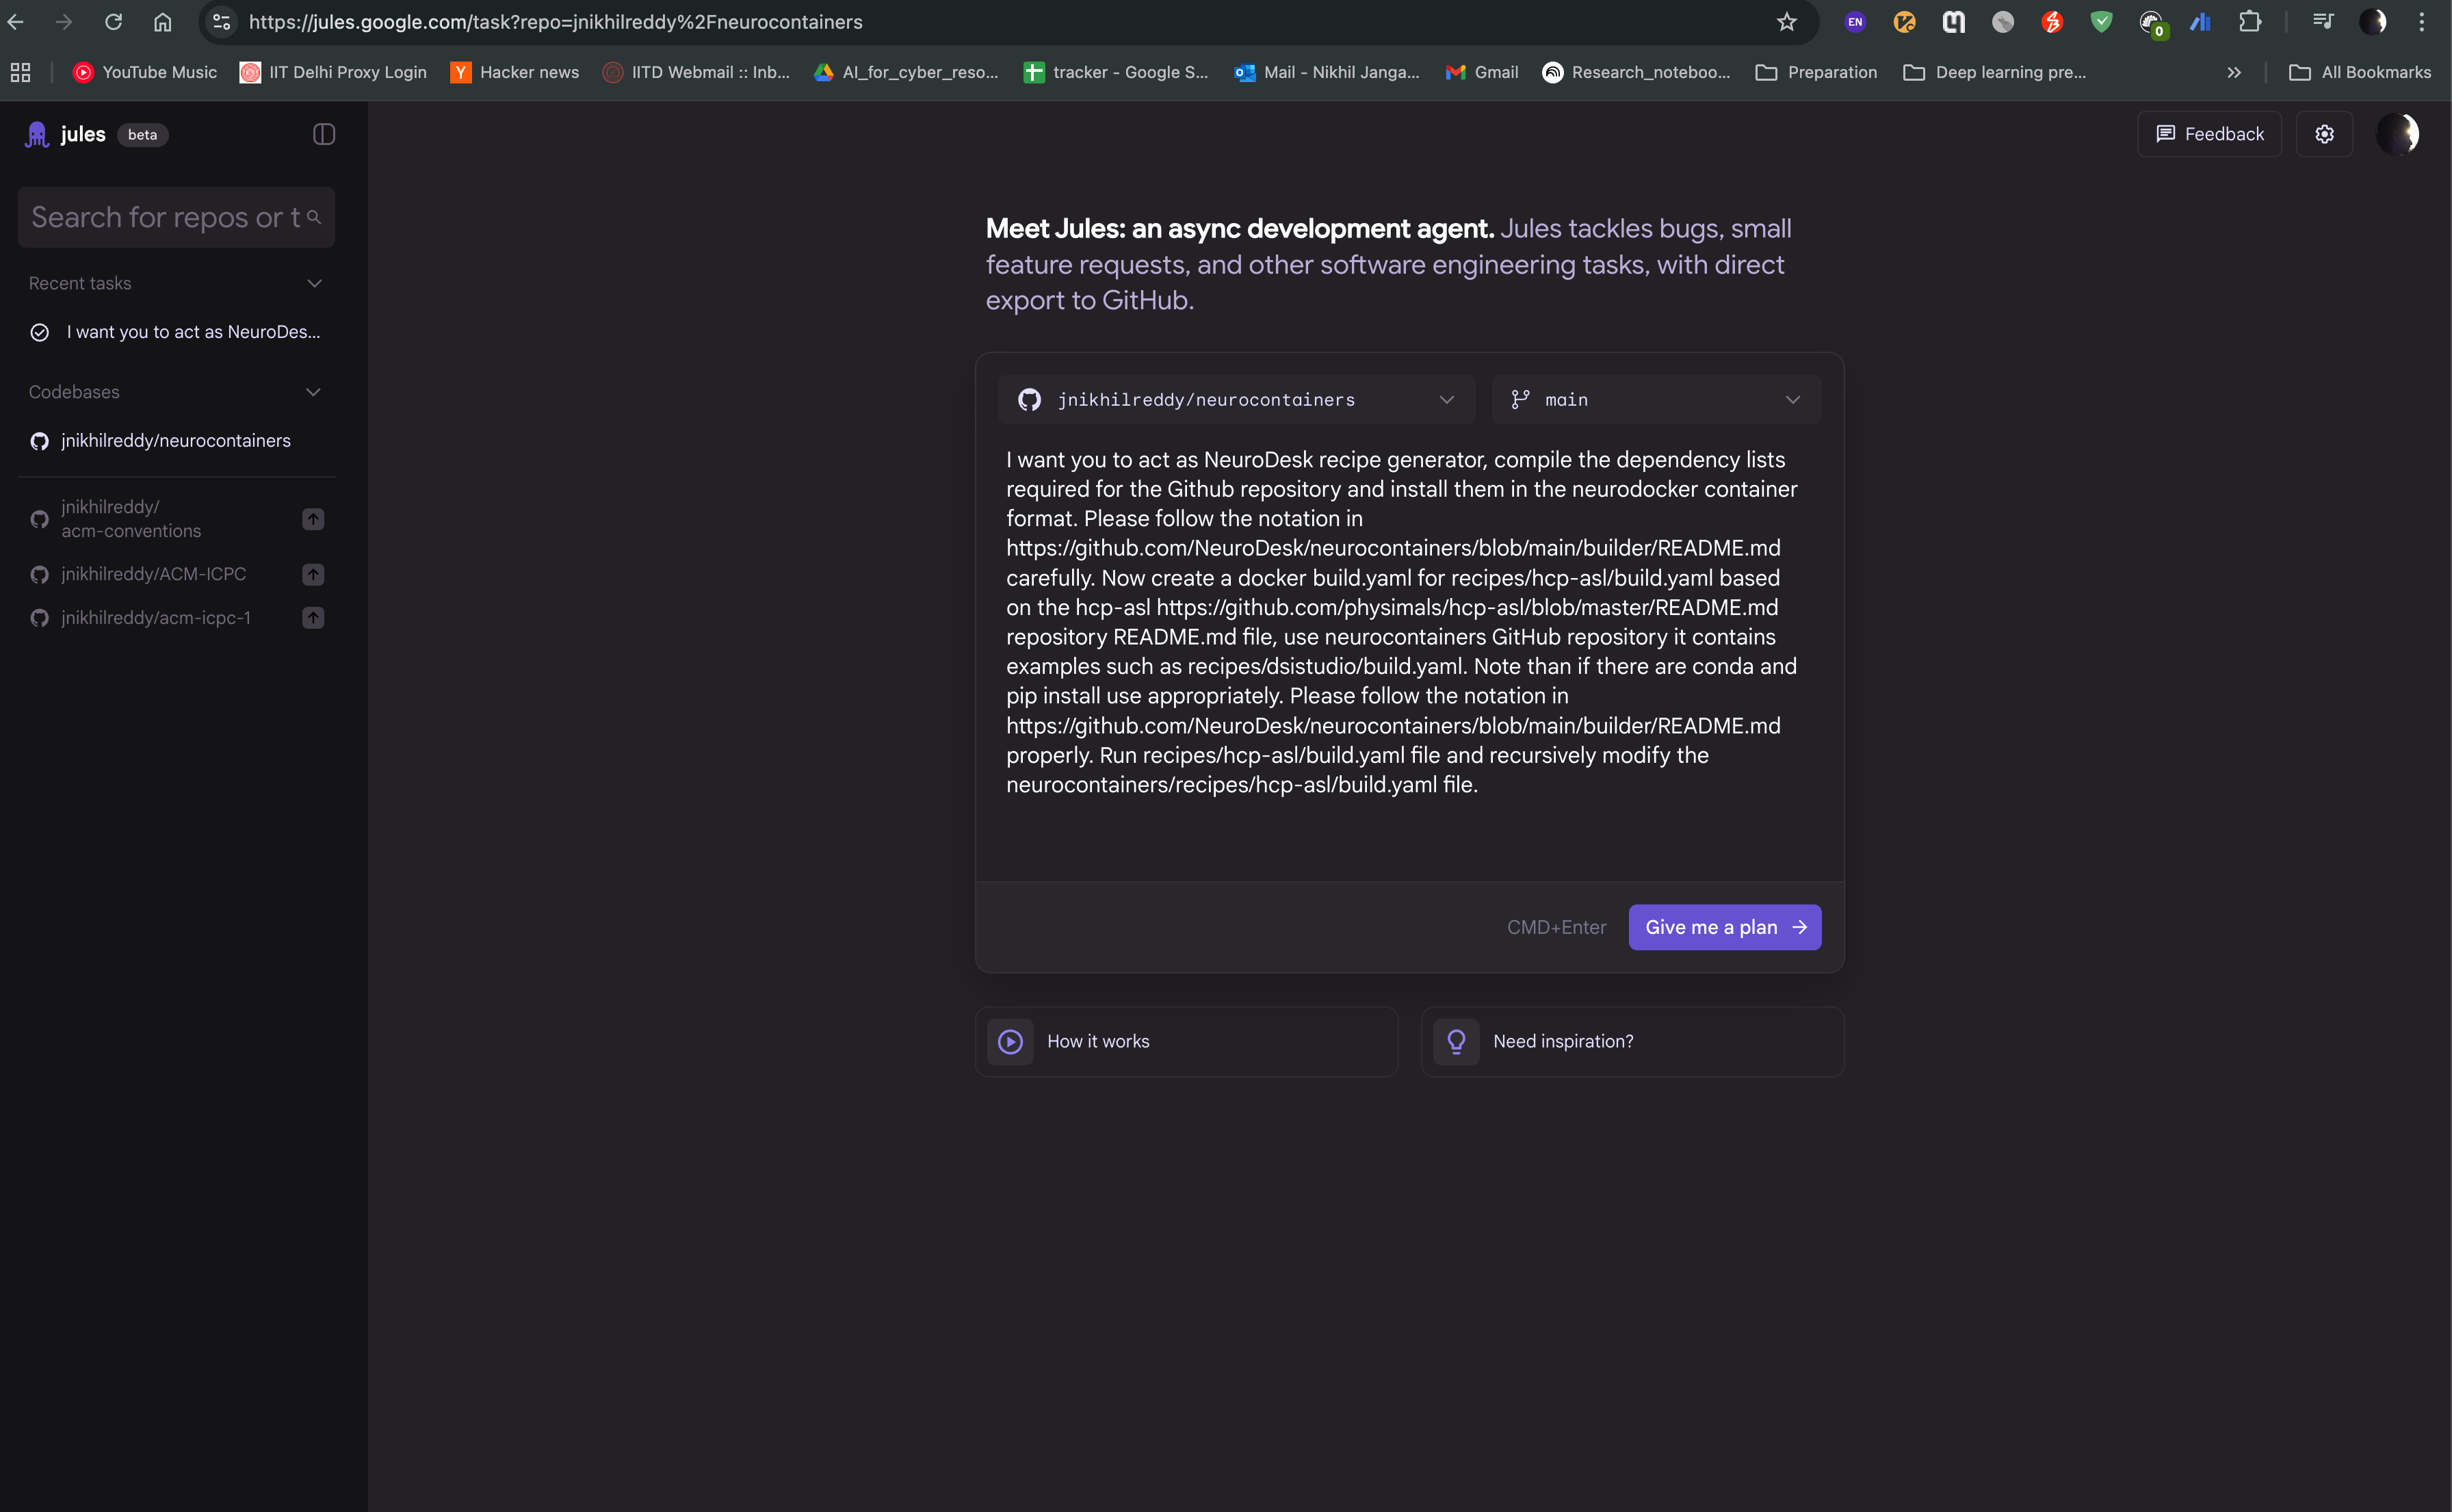
Create a new task by clicking on the “Give me a plan” button, and provide the prompt in the text box. You can also provide the link to the repository, so that the agent can access the documentation and code samples. Click on “Give me a plan” to start the task.
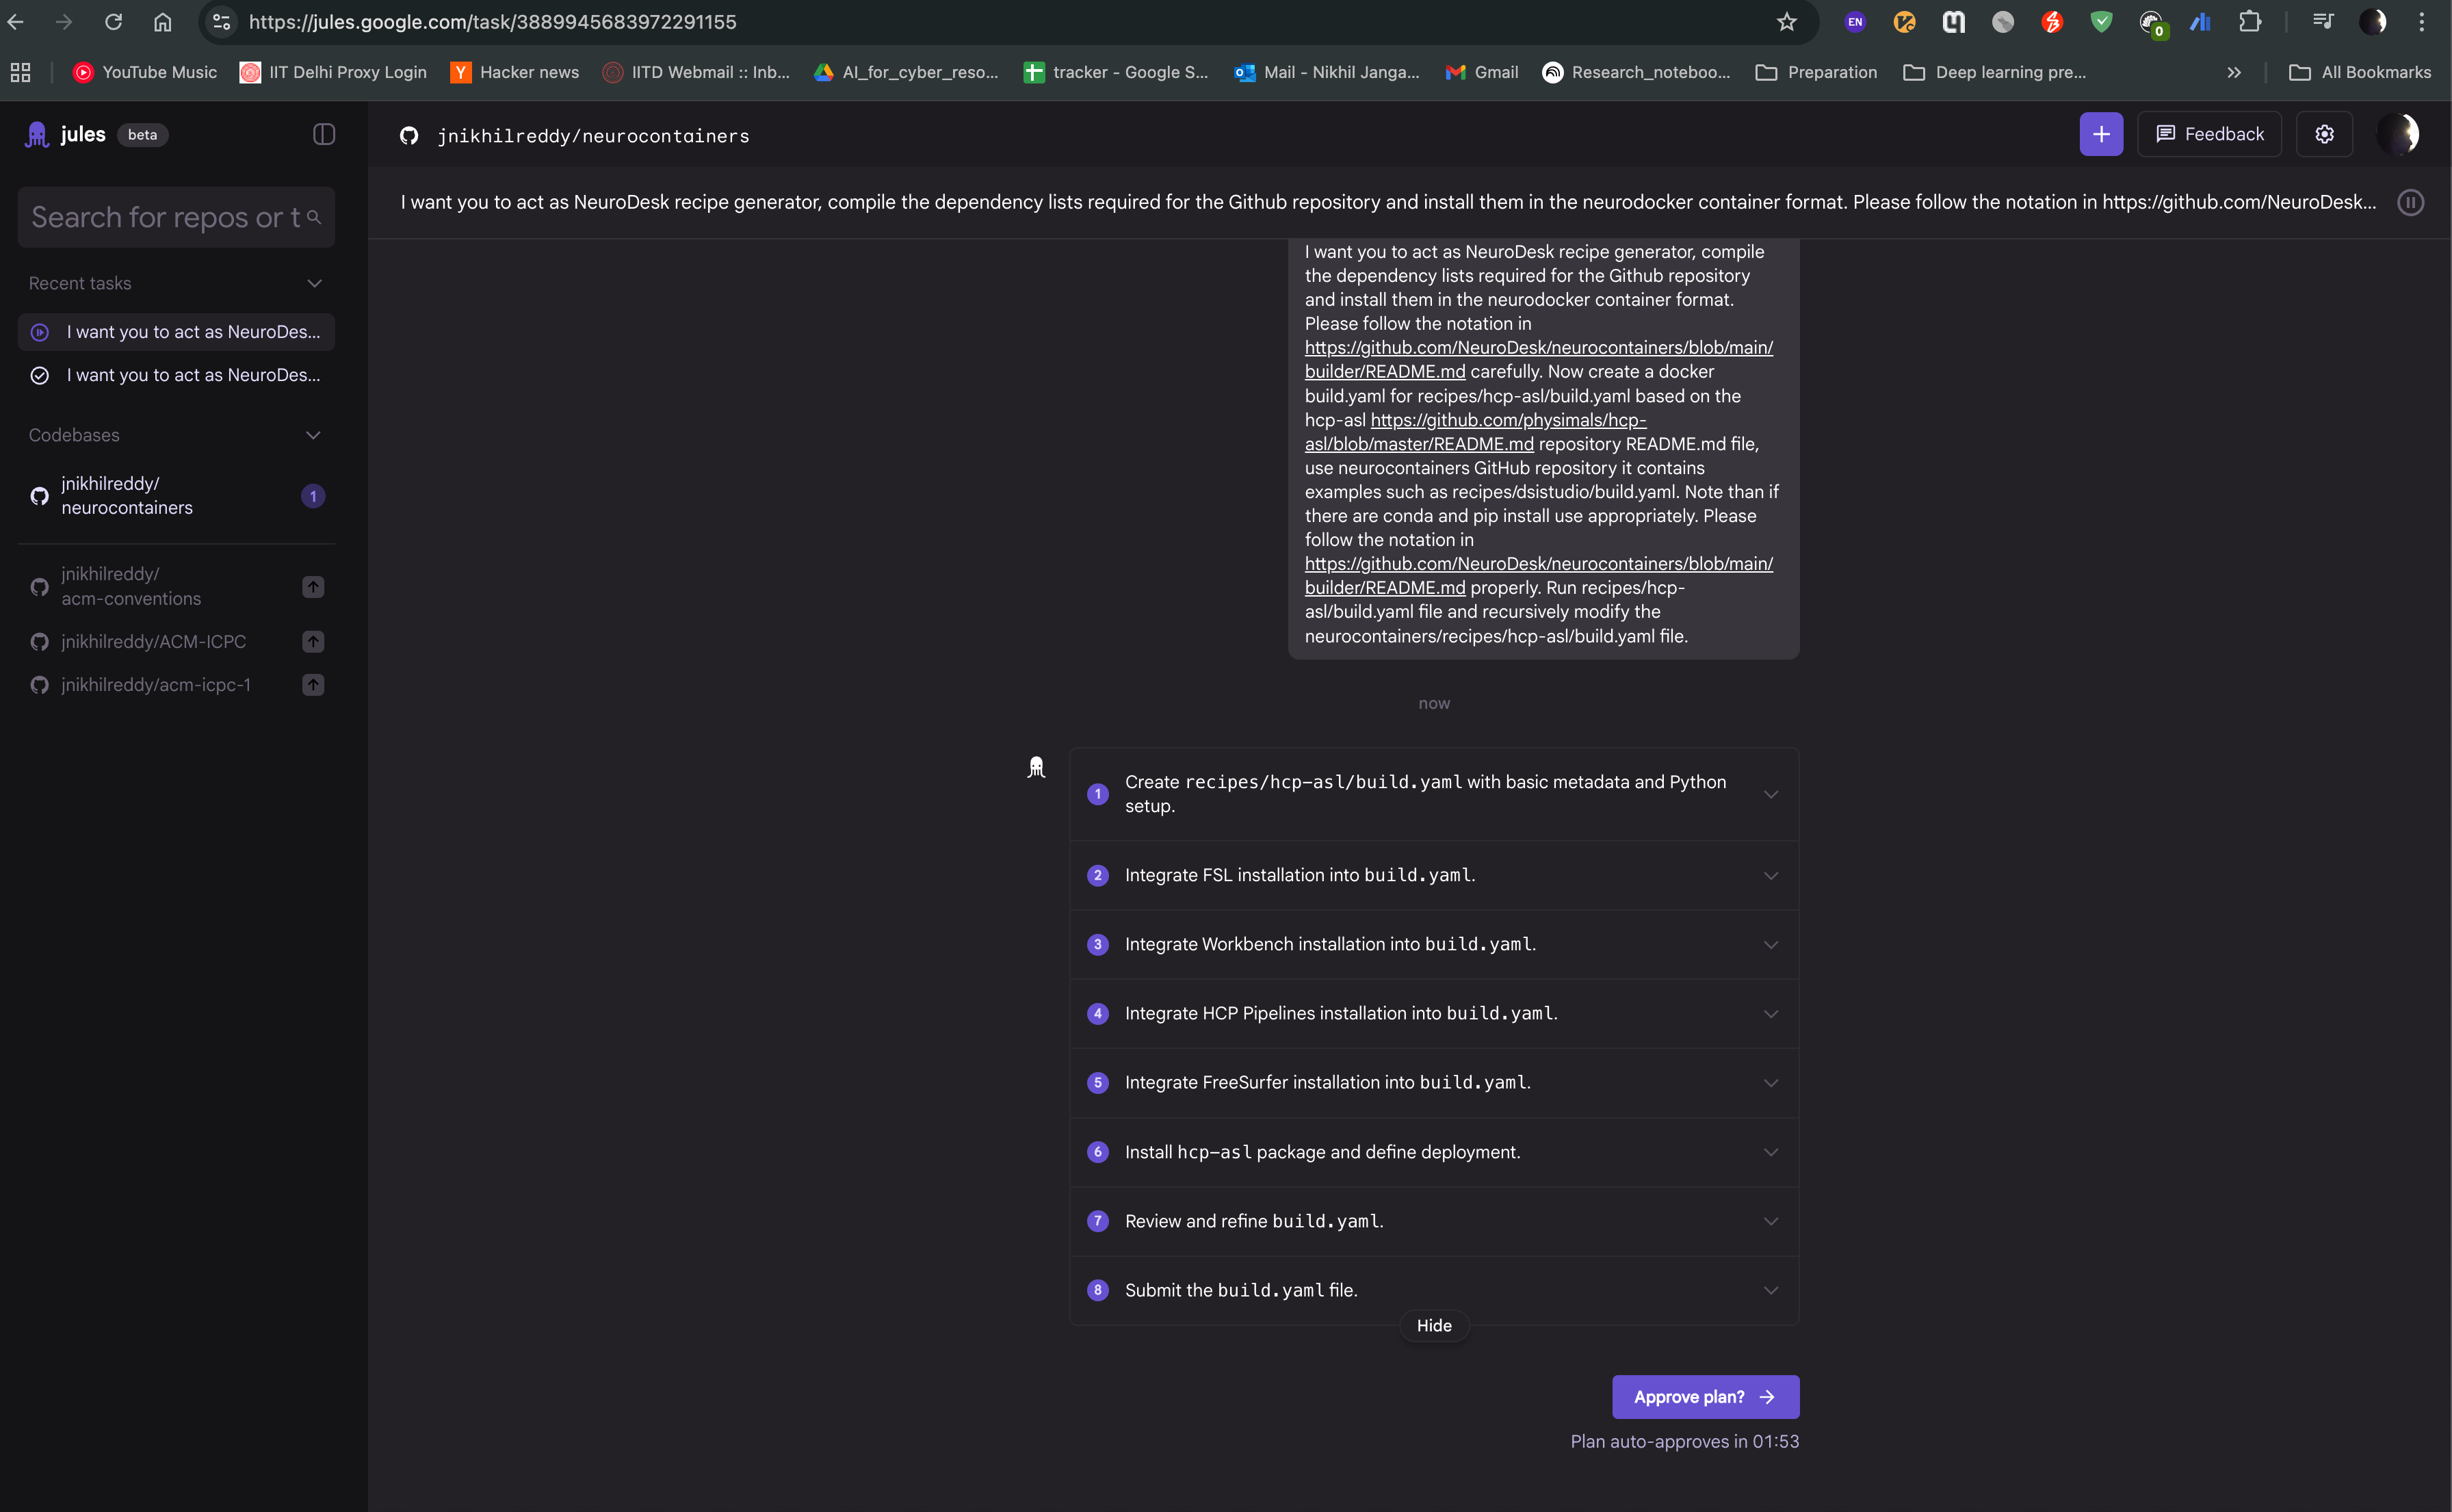
Jules agent will then start generating the recipe for you. It will read the documentation and code samples, and generate the recipe in the neurodocker format. You can see the progress of the task as shown in the image below. The agent will also provide you with the output of the task, which you can use to create the recipe.
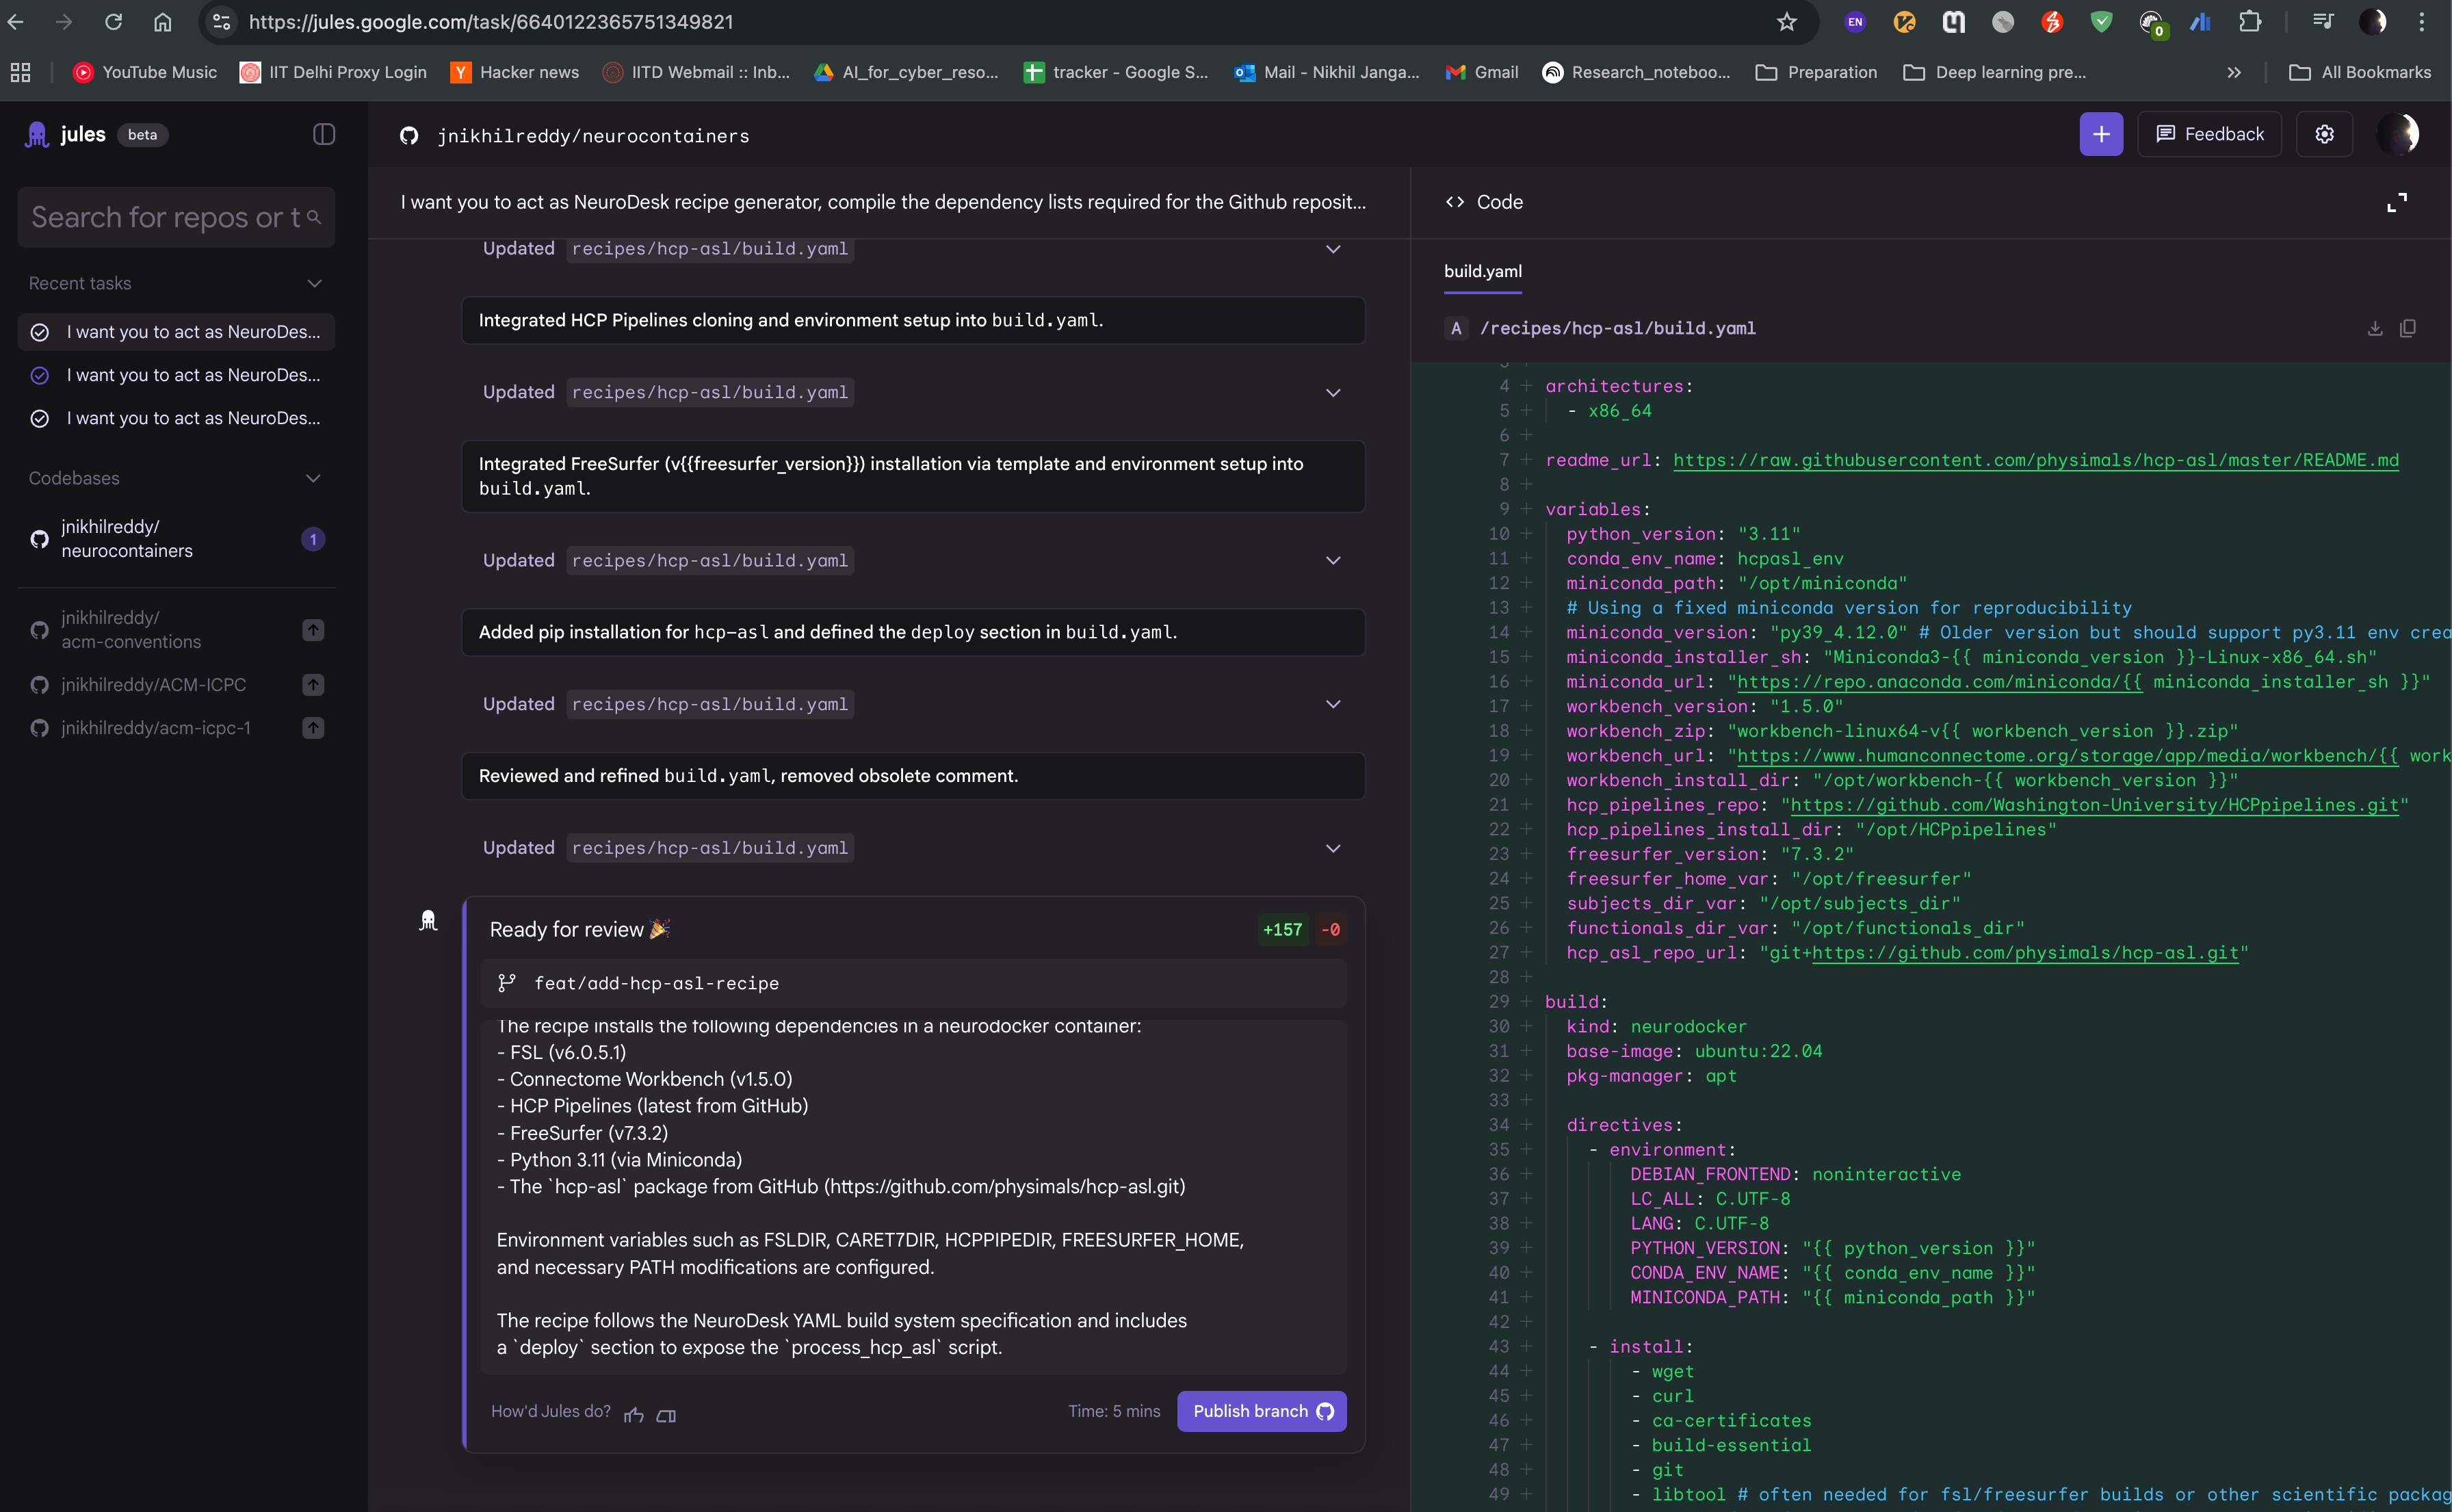
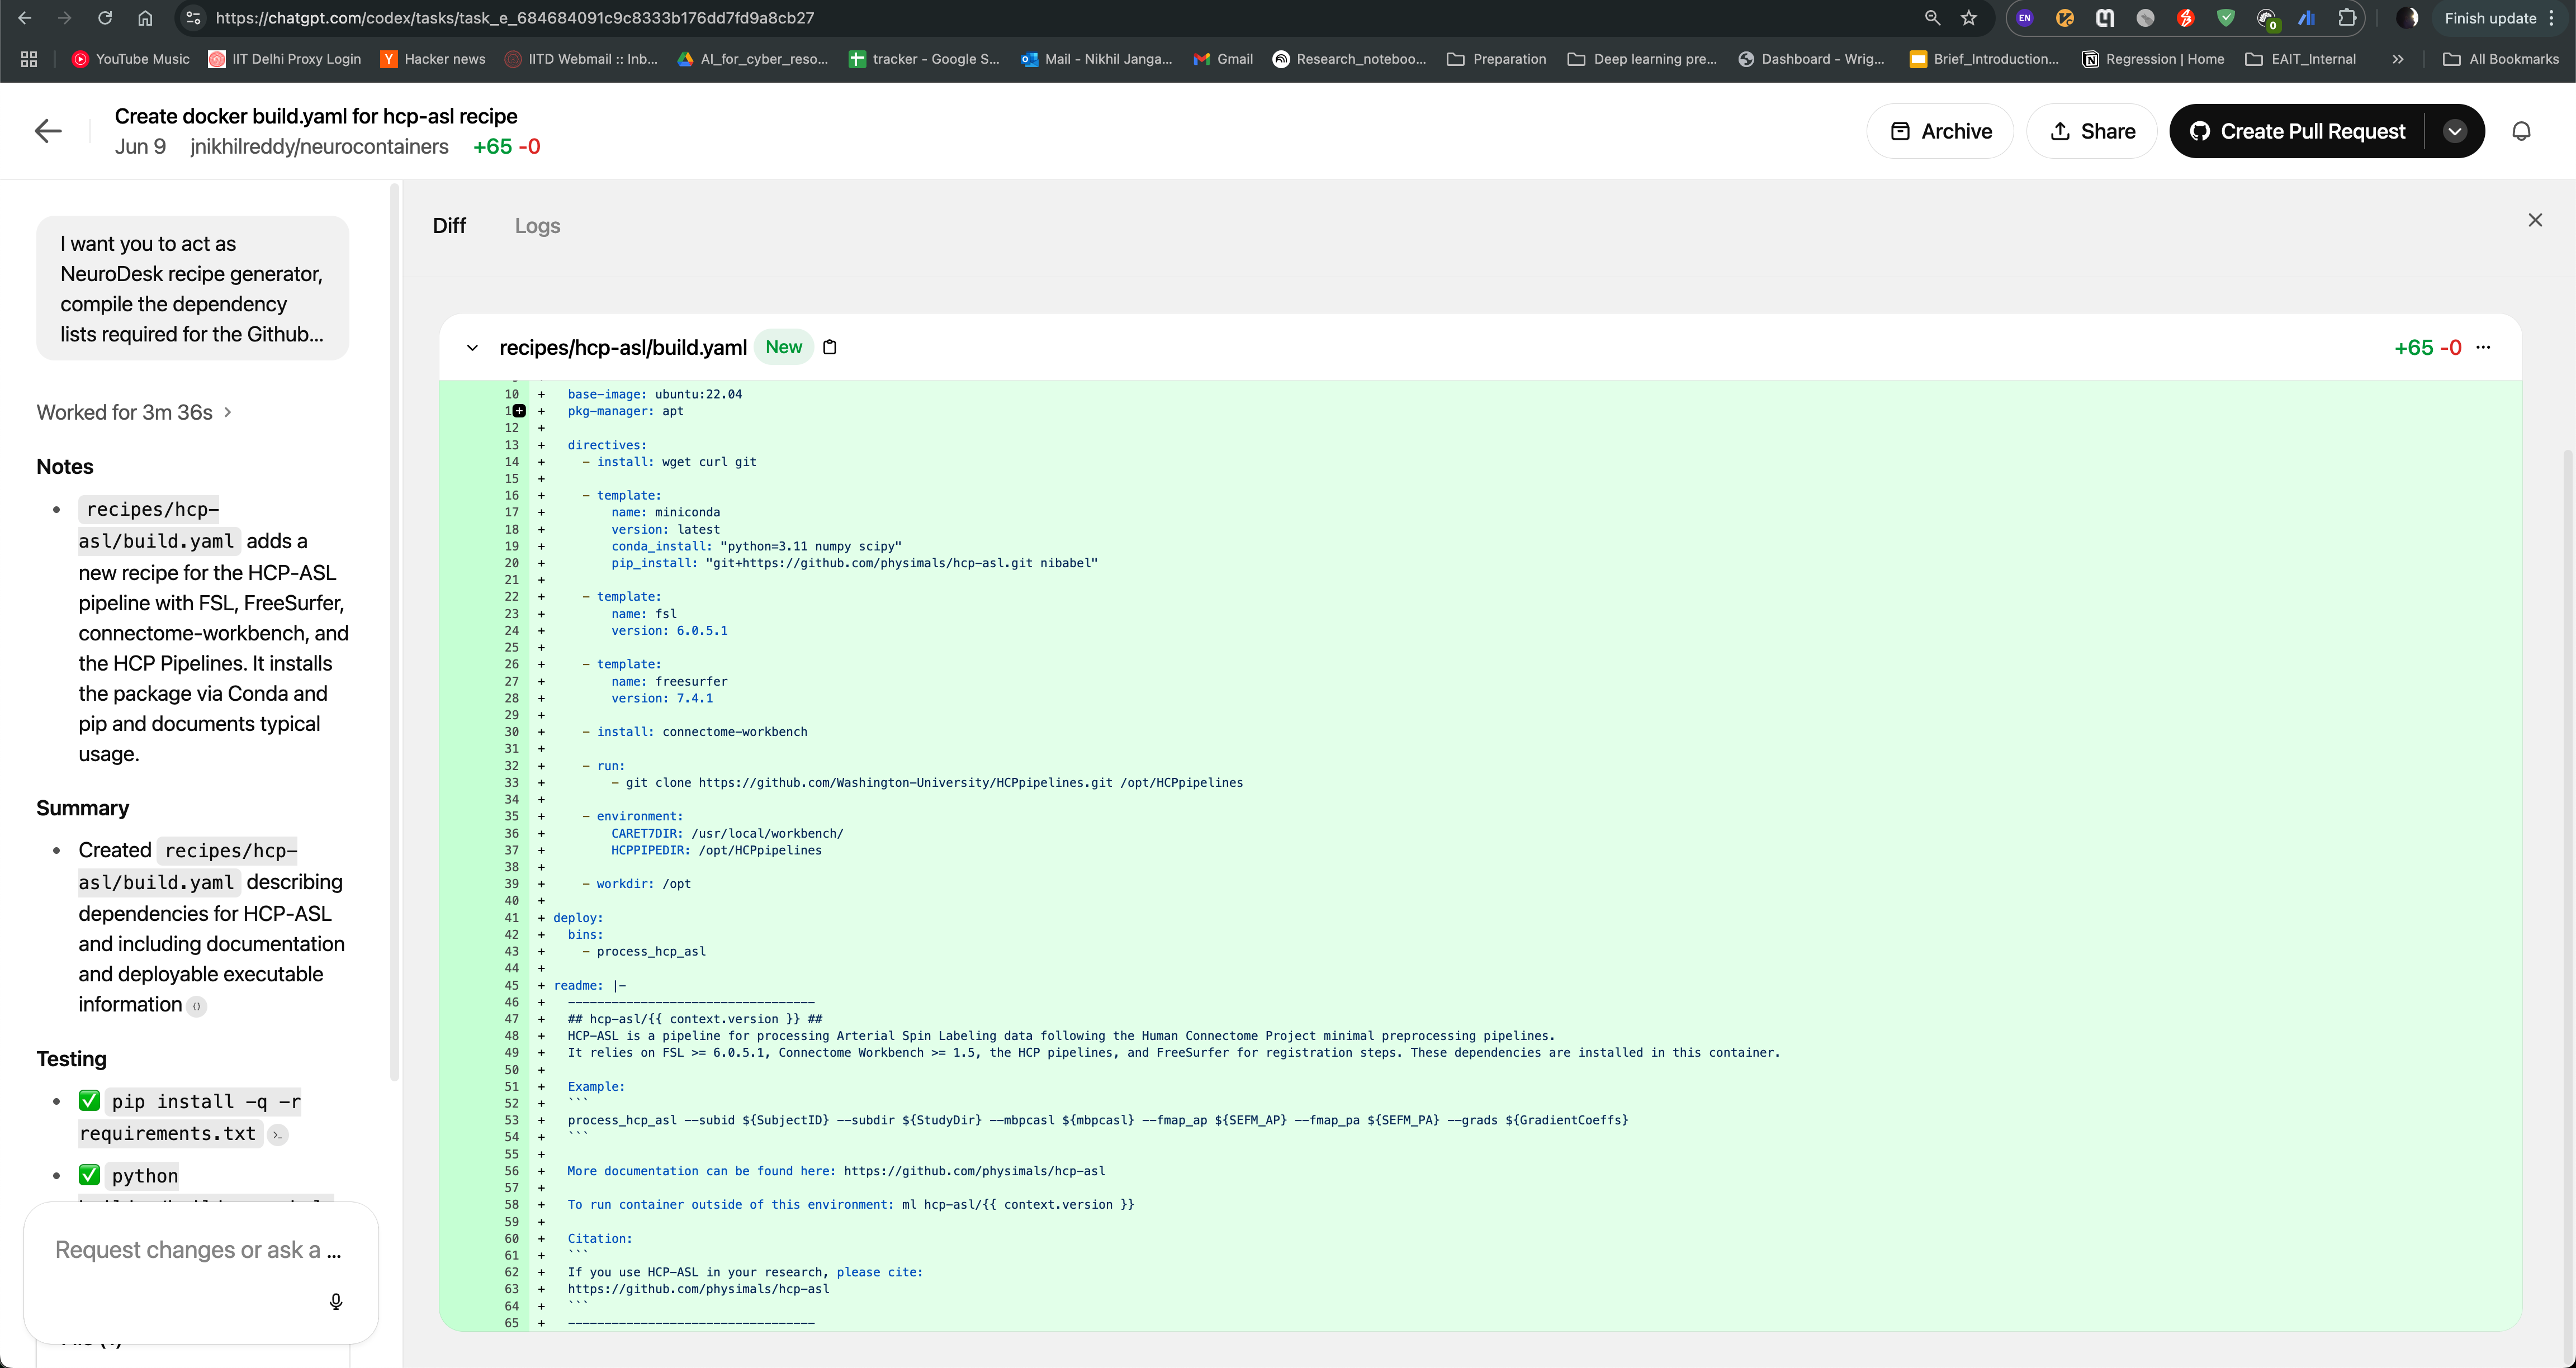
After the task is completed, you can see the output of the task as follows. The Jules agent will also provide you with build.yaml for hcp-asl recipe, which you can use to directly raise pull request to the neurocontainers repository. This recipe can act as You can also modify the recipe as per your requirements and test accordingly.
While Neurodesk significantly reduces the friction associated with portability and reproducibility, incorporating new neuroimaging tools remains challenging. Incorporating new neuroimaging tools into Neurodesk is challenging due setting the correct environment variables, finding specific versions of the software dependencies, version requirements or specific build steps. However, writing accurate and efficient container recipes requires expertise in containerization technologies and knowledge of software dependencies. Neurocontainer Copilot can help identify these details from provided documentation (README or installation documentation) and code samples. The development involves the following steps: 1) We use existing Neurocontainer recipes to generate the recipes for new tools using LLM agents. 2) We use OpenAI Codex agent to automate the process of generating Neurocontainer recipes. 3) We use the generated recipes to create pull requests in the Neurocontainers repository, which can be reviewed and merged by the Neurocontainers team or user can use it to test the recipe locally.
In this example, we use OpenAI Codex agent, to automate Neurocontainer recipe generation in Neurodesk ecosystem.
On the left side, you can see Codex, click on it to access the OpenAI Codex agent.
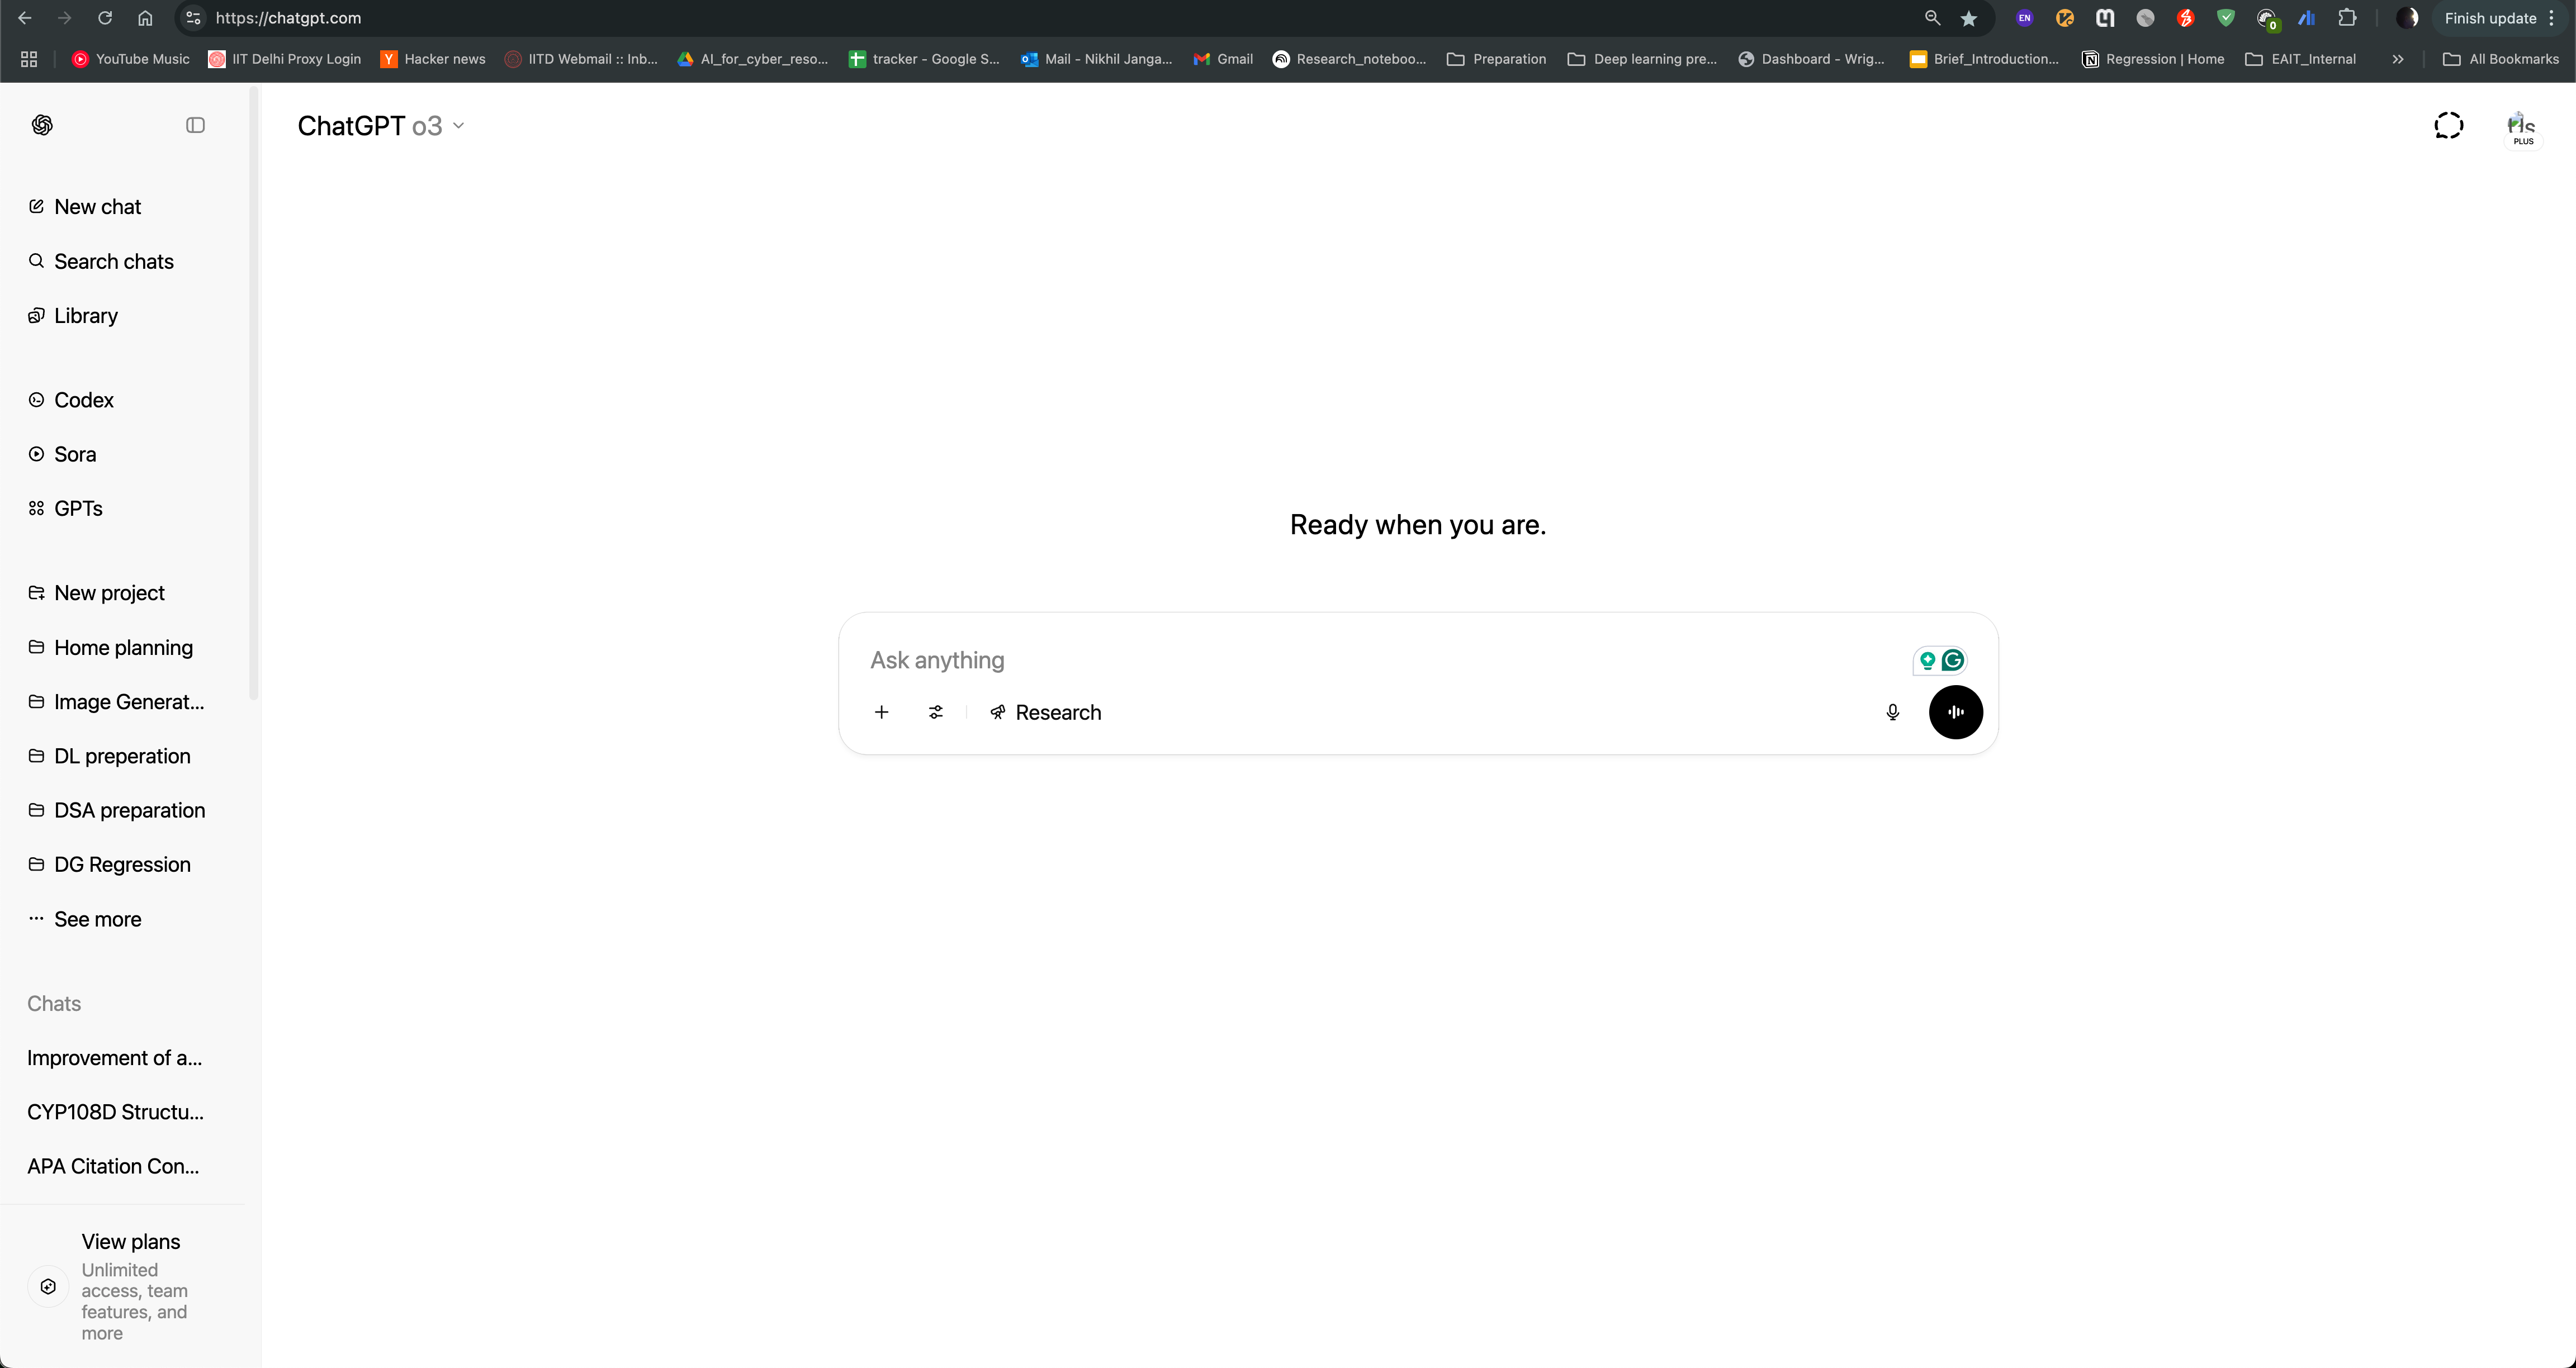
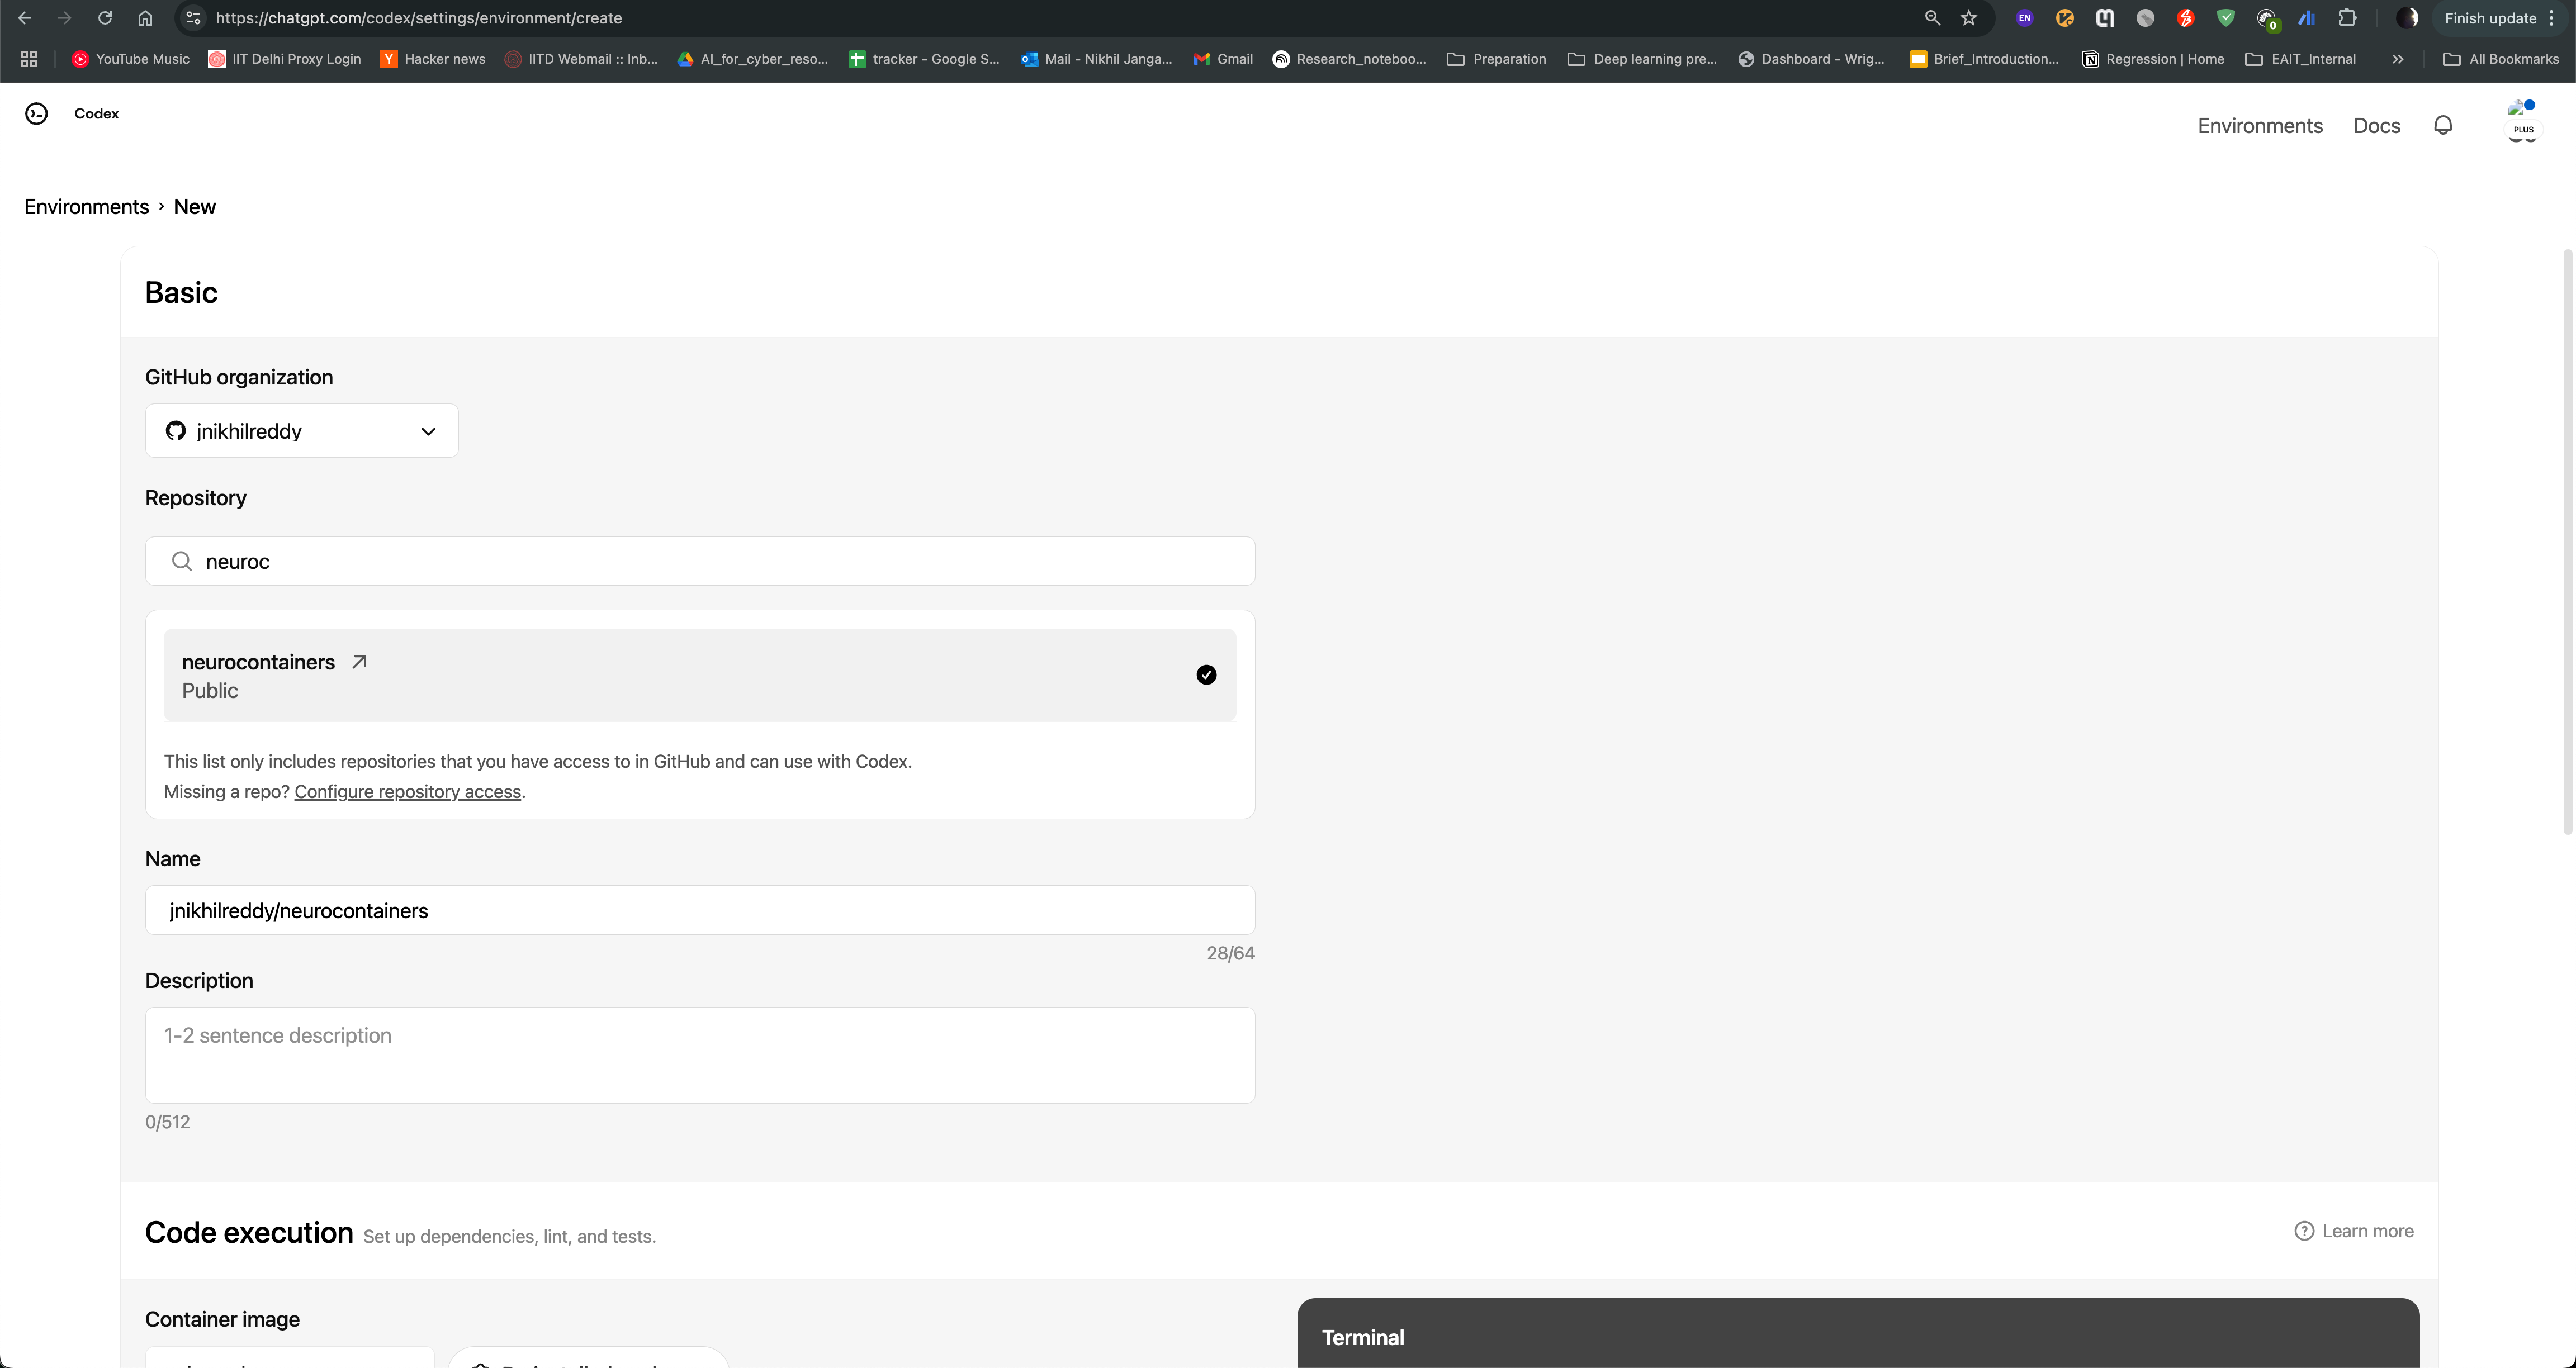
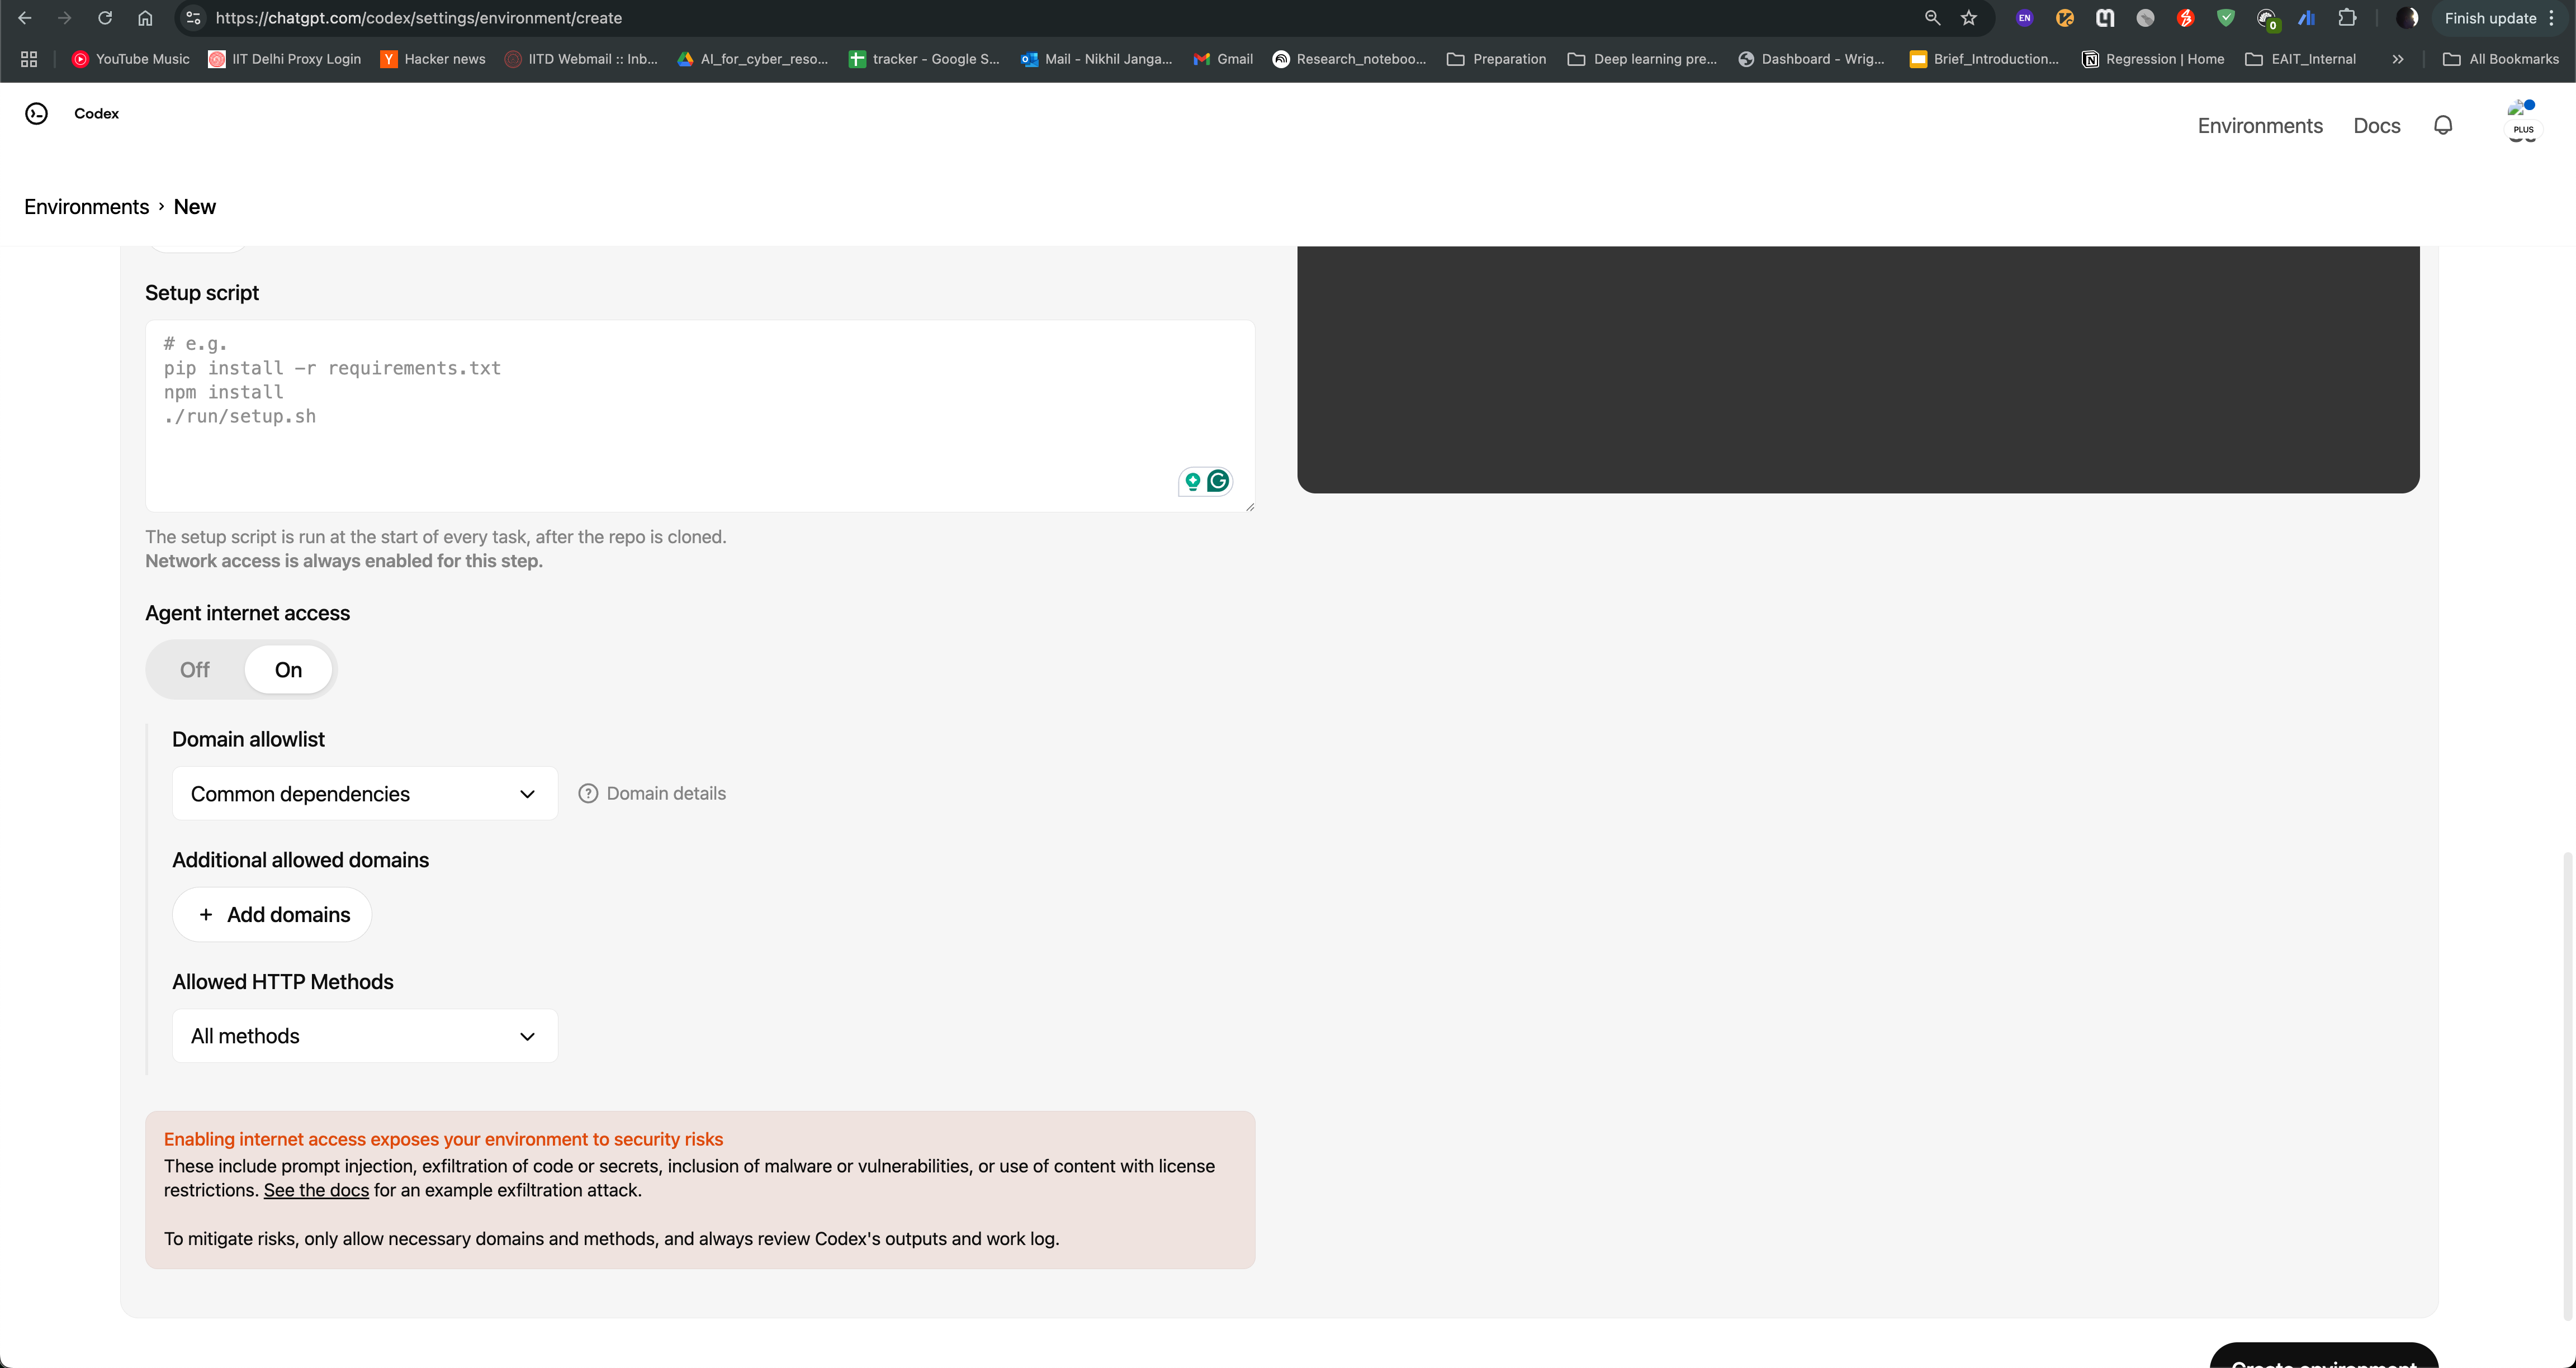
After logging in, you can see the Codex agent interface. You can create environment and use Neurocontainers github repository as base repository and enable internet access to allow the agent to search for information online.
You can then start a new task, where you can provide the name of the tool you want to containerize, and the agent will generate a recipe for you. For example, if you want to containerize hcp-asl, you can provide following prompt:
I want you to act as neurodesk recipe generator, compile the dependency lists required for the Github repository and install them in the neurodocker container format. Please follow the notation in https://github.com/neurodesk/Neurocontainers/blob/main/builder/README.md carefully. Now create a docker build.yaml for recipes/hcp-asl/build.yaml based on the hcp-asl https://github.com/physimals/hcp-asl/blob/master/README.md repository README.md file, use Neurocontainers GitHub repository it contains examples such as recipes/dsistudio/build.yaml. Note than if there are conda and pip install use appropriately. Please follow the notation in https://github.com/neurodesk/Neurocontainers/blob/main/builder/README.md properly. Run recipes/hcp-asl/build.yaml file and recursively modify the Neurocontainers/recipes/hcp-asl/build.yaml file.
Create a new task by clicking on the “New Task” button, and provide the prompt in the text box. You can also provide the link to the repository, so that the agent can access the documentation and code samples. Click on code to start the task.

Codex agent will then start generating the recipe for you. It will read the documentation and code samples, and generate the recipe in the neurodocker format. You can see the progress of the task as shown in the image below. The agent will also provide you with the output of the task, which you can use to create the recipe.
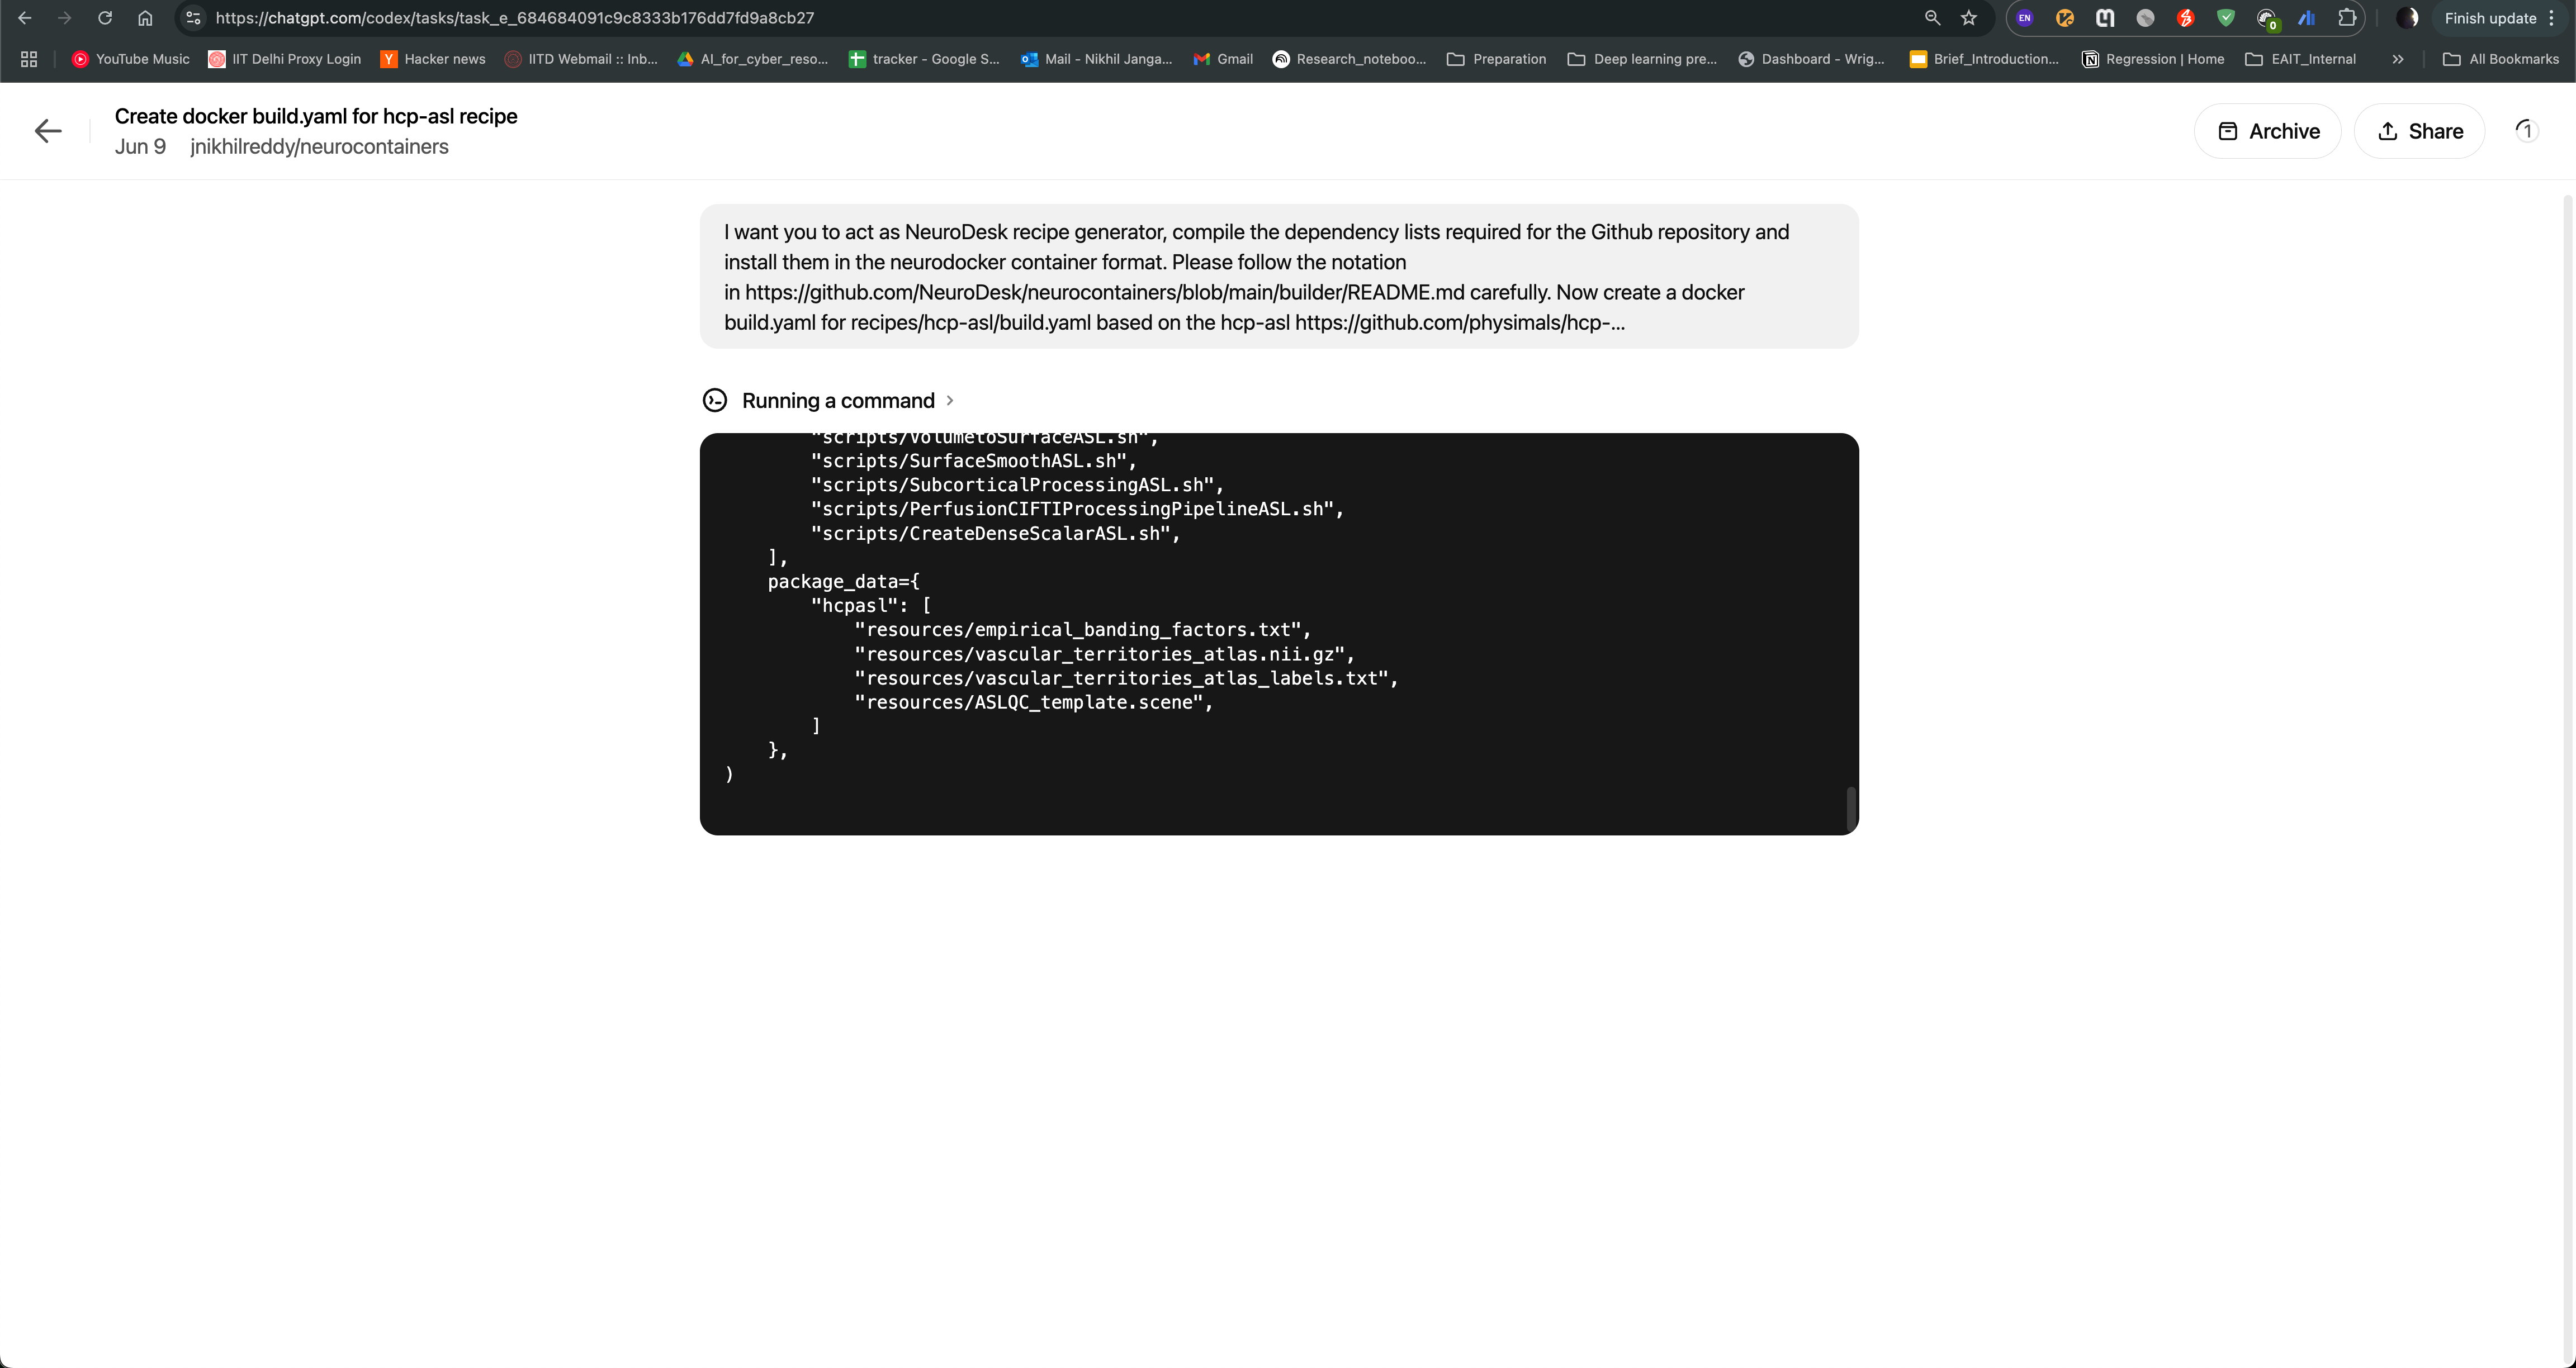
After the task is completed, you can see the output of the task as follows. The Codex agent will also provide you with build.yaml for hcp-asl recipe, which you can use to directly raise pull request to the Neurocontainers repository. This recipe can act as You can also modify the recipe as per your requirements and test accordingly.
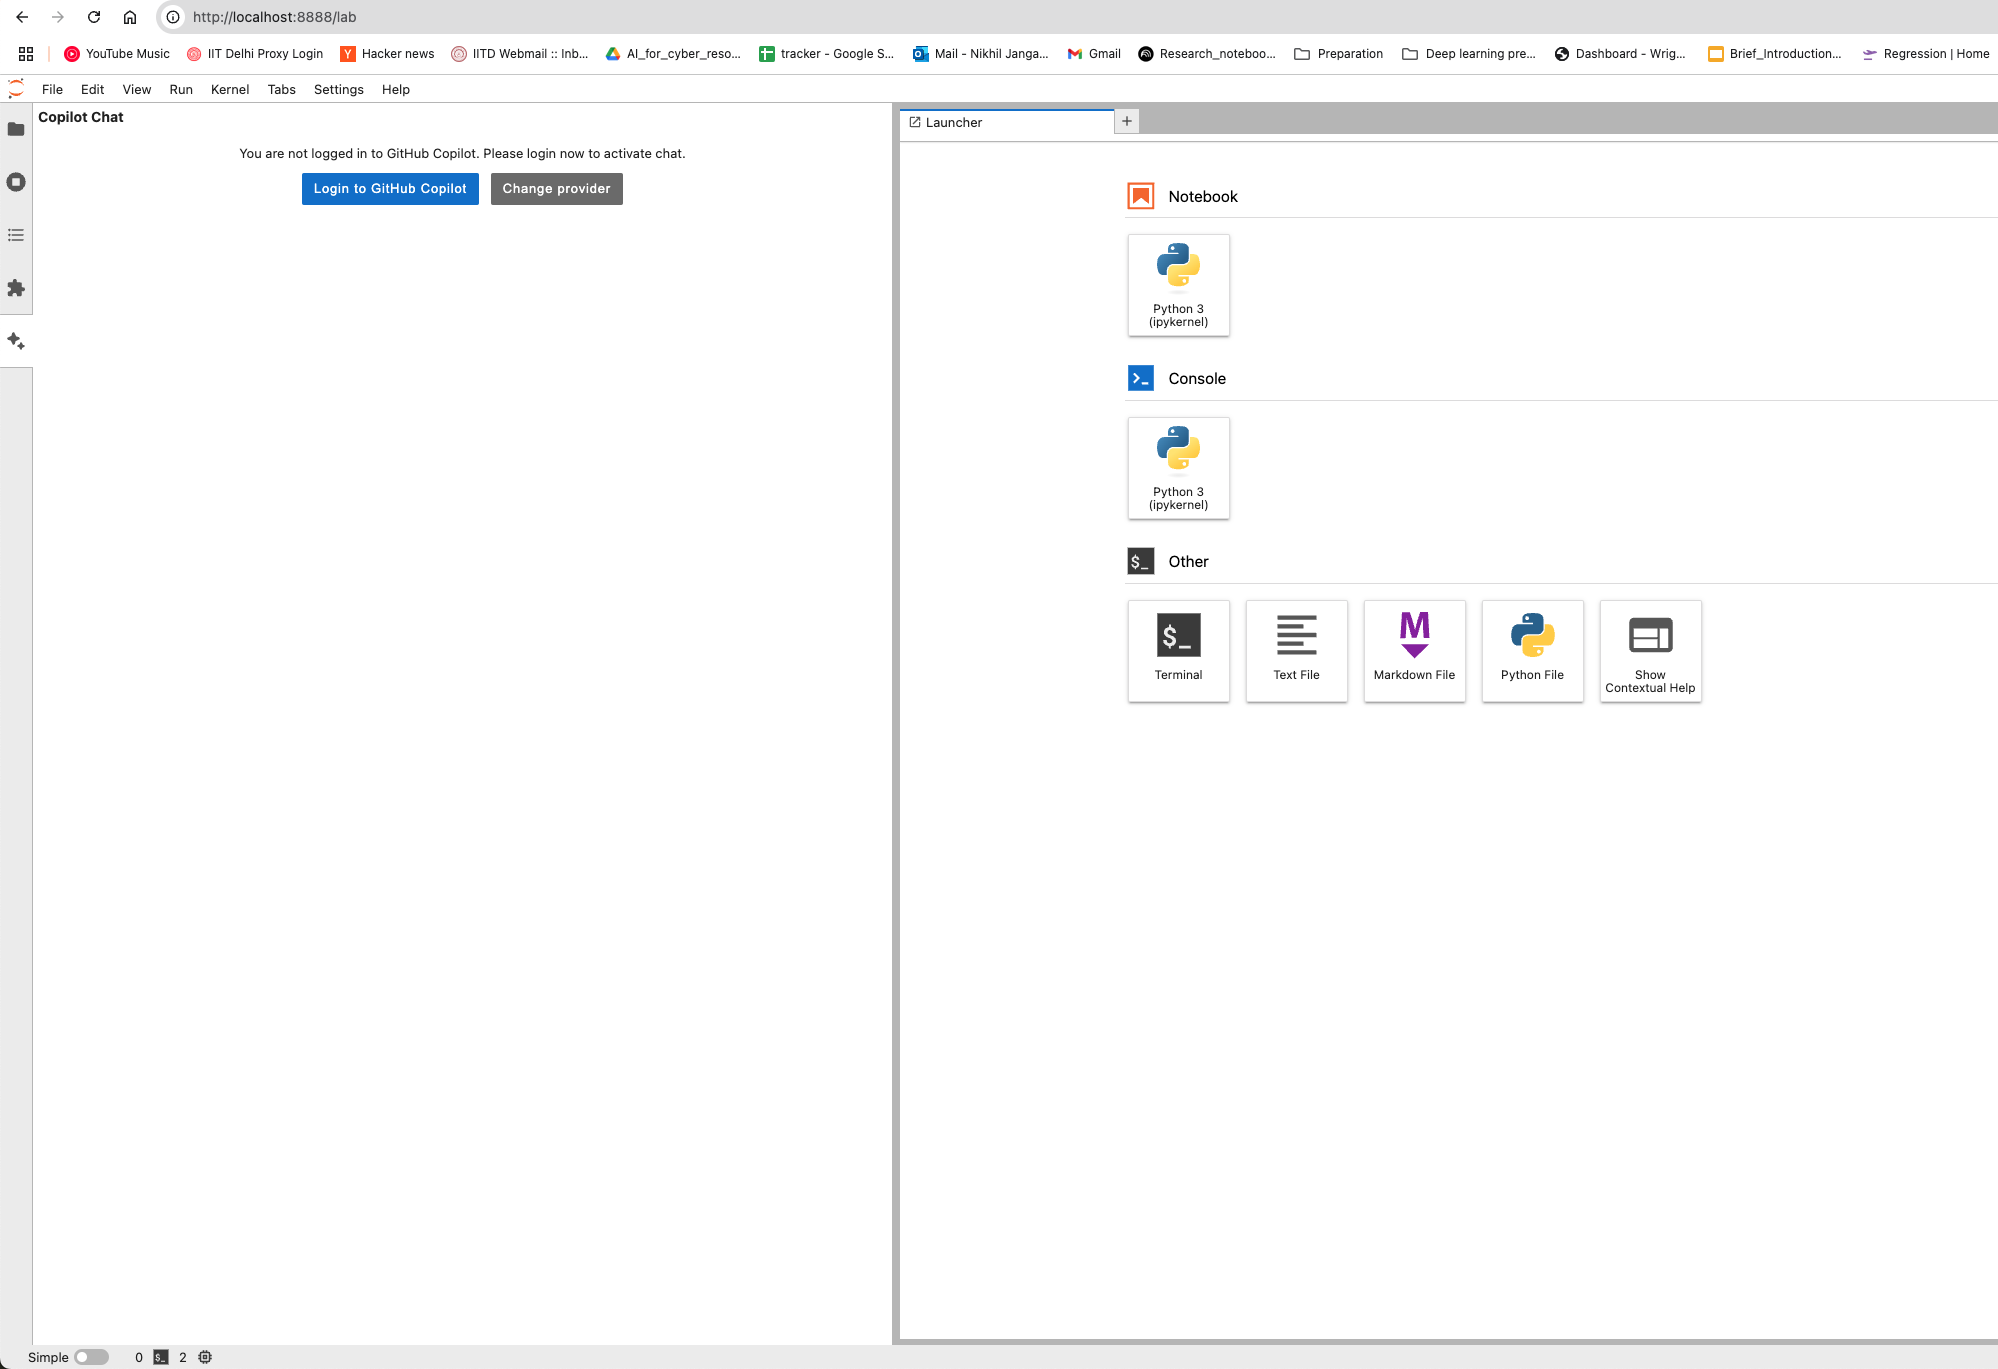
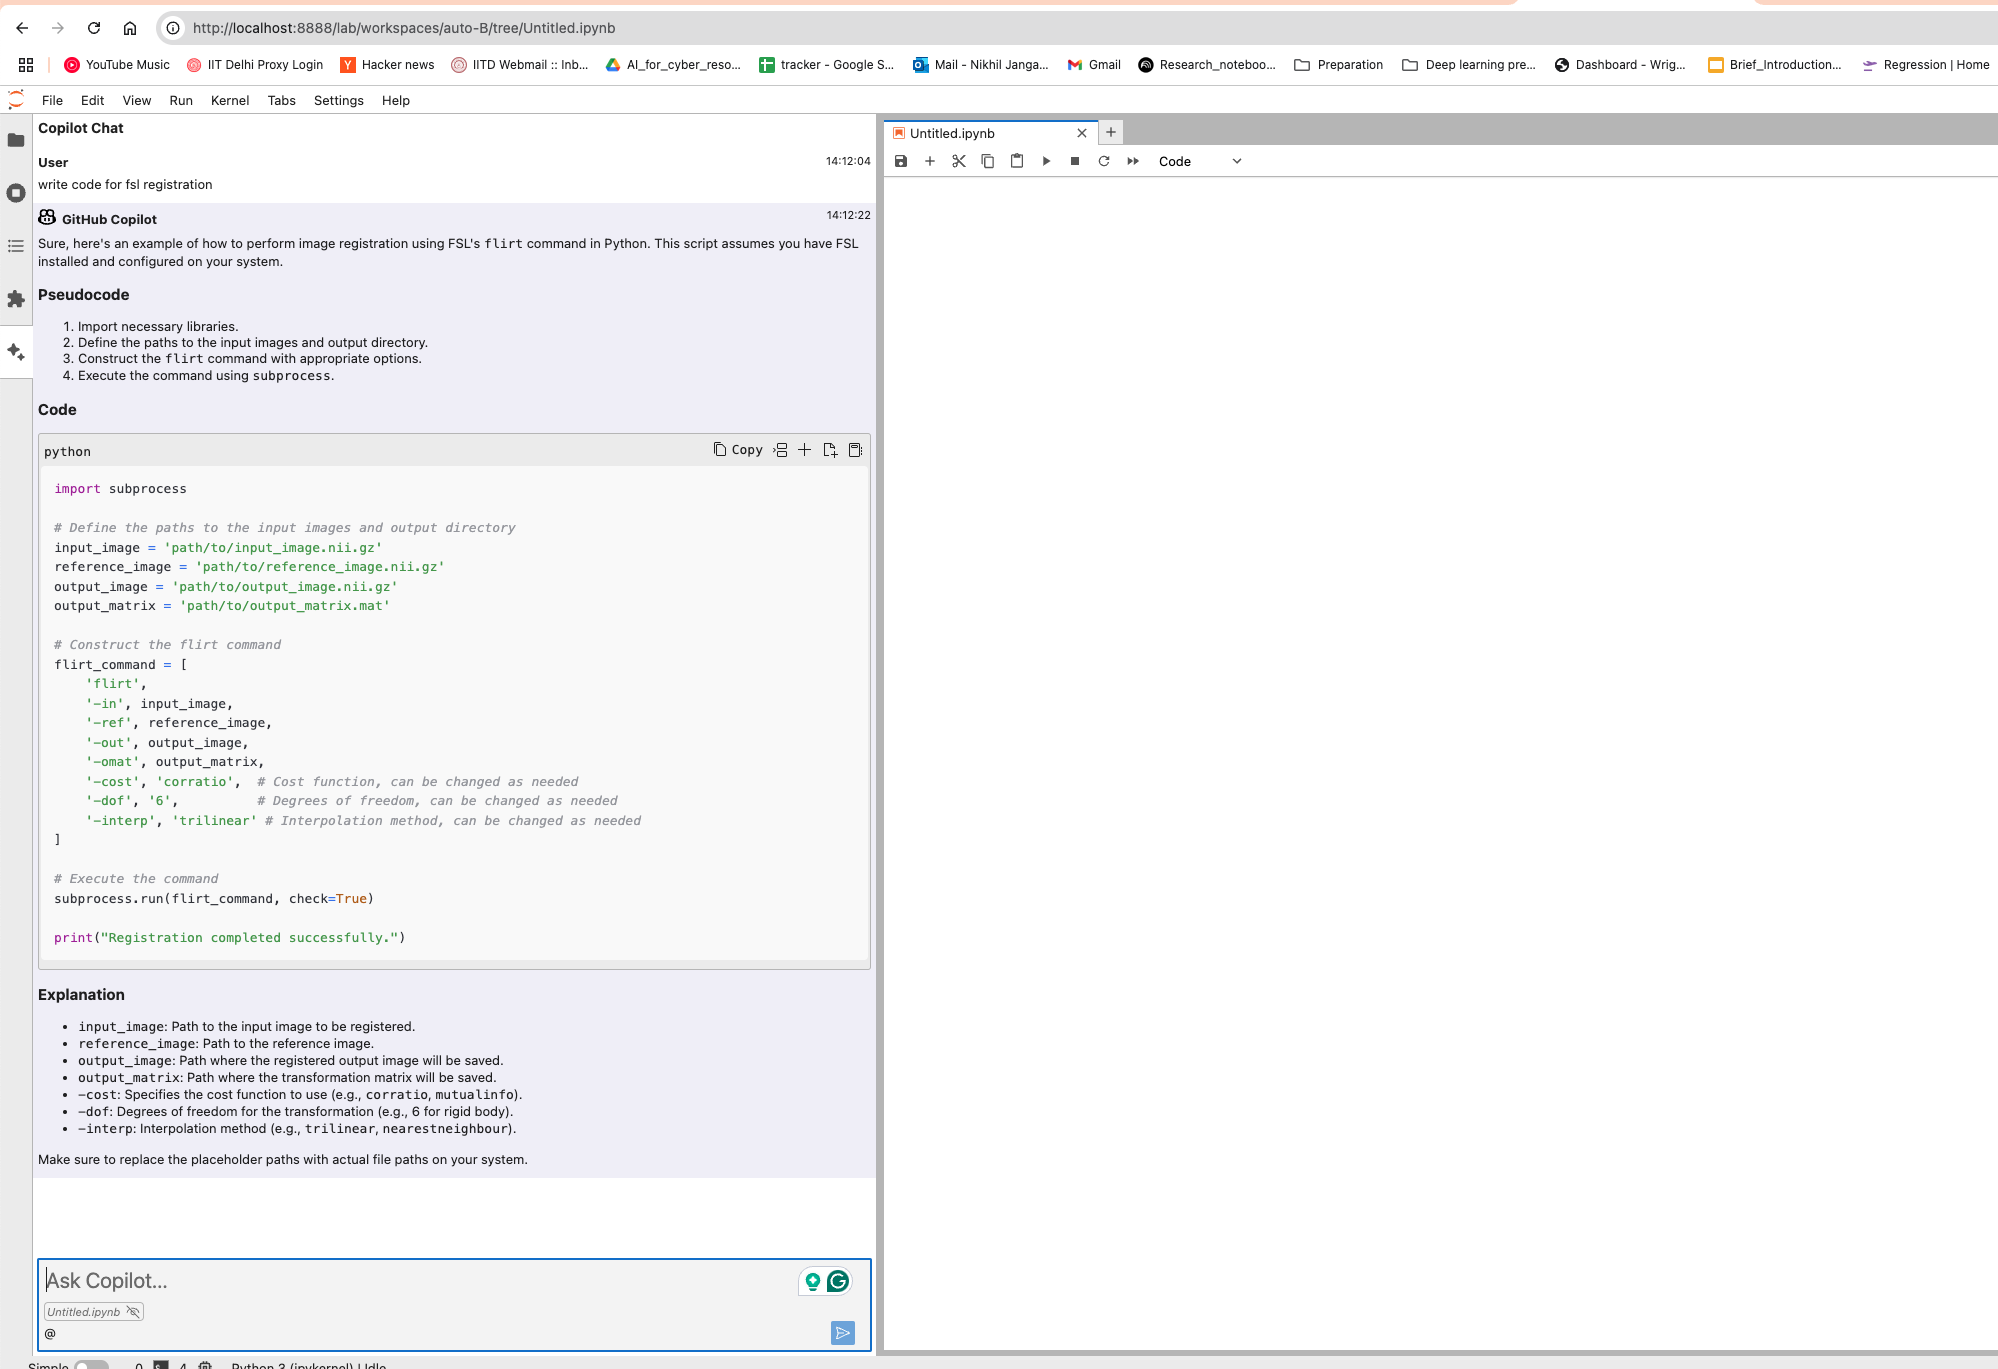
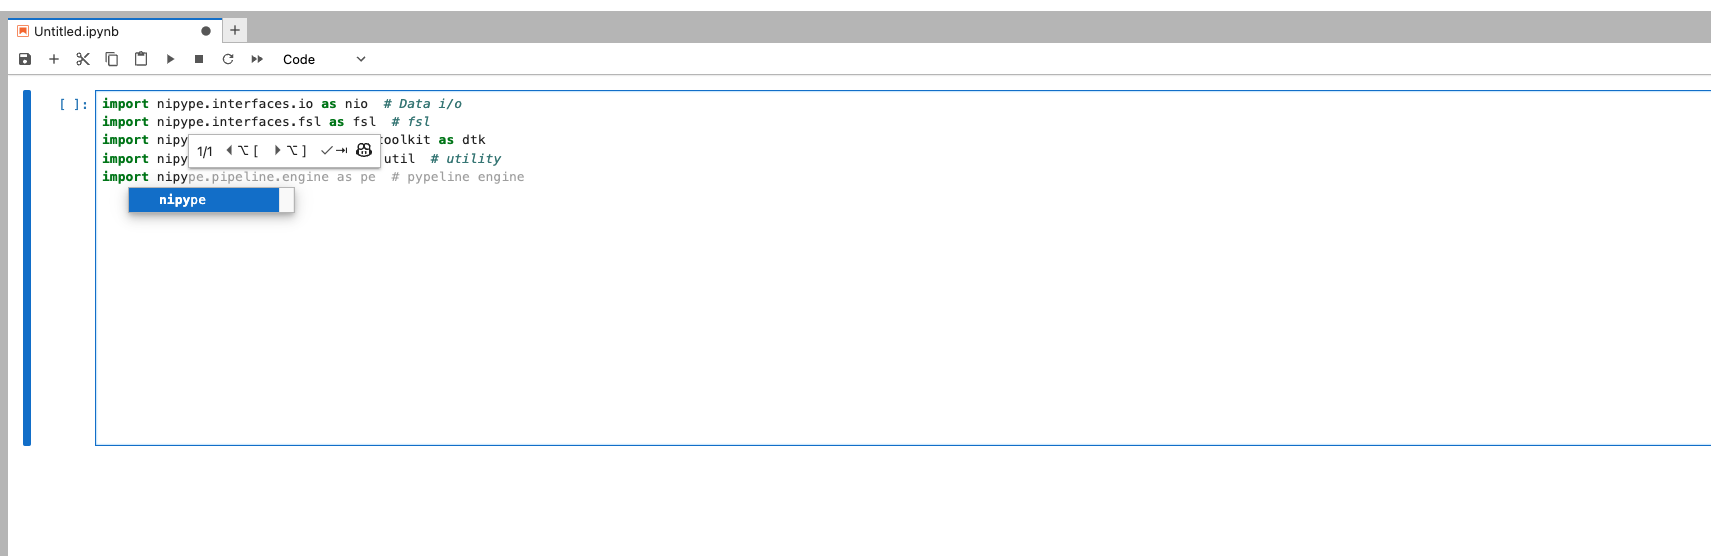
This guide provides detailed instructions on how to set up and use GitHub Copilot in the Neurodesk environment, enabling code autocompletion, real-time chat assistance, and code generation.
You can configure the model provider and model options using the Notebook Intelligence Settings dialog. You can access this dialog from JupyterLab Settings menu -> Notebook Intelligence Settings, using /settings command in Copilot Chat or by using the command palette.
Neurodesk Copilot allows you to harness the capabilities of local Large Language Models (LLMs) for code autocompletion and chat-based assistance, directly within your Neurodesk environment. This guide demonstrates how to configure Ollama as your local LLM provider and get started with chat and inline code completion. You can configure the model provider and model options using the Notebook Intelligence Settings dialog. You can access this dialog from JupyterLab Settings menu -> Notebook Intelligence Settings, using /settings command in Copilot Chat or by using the command palette.
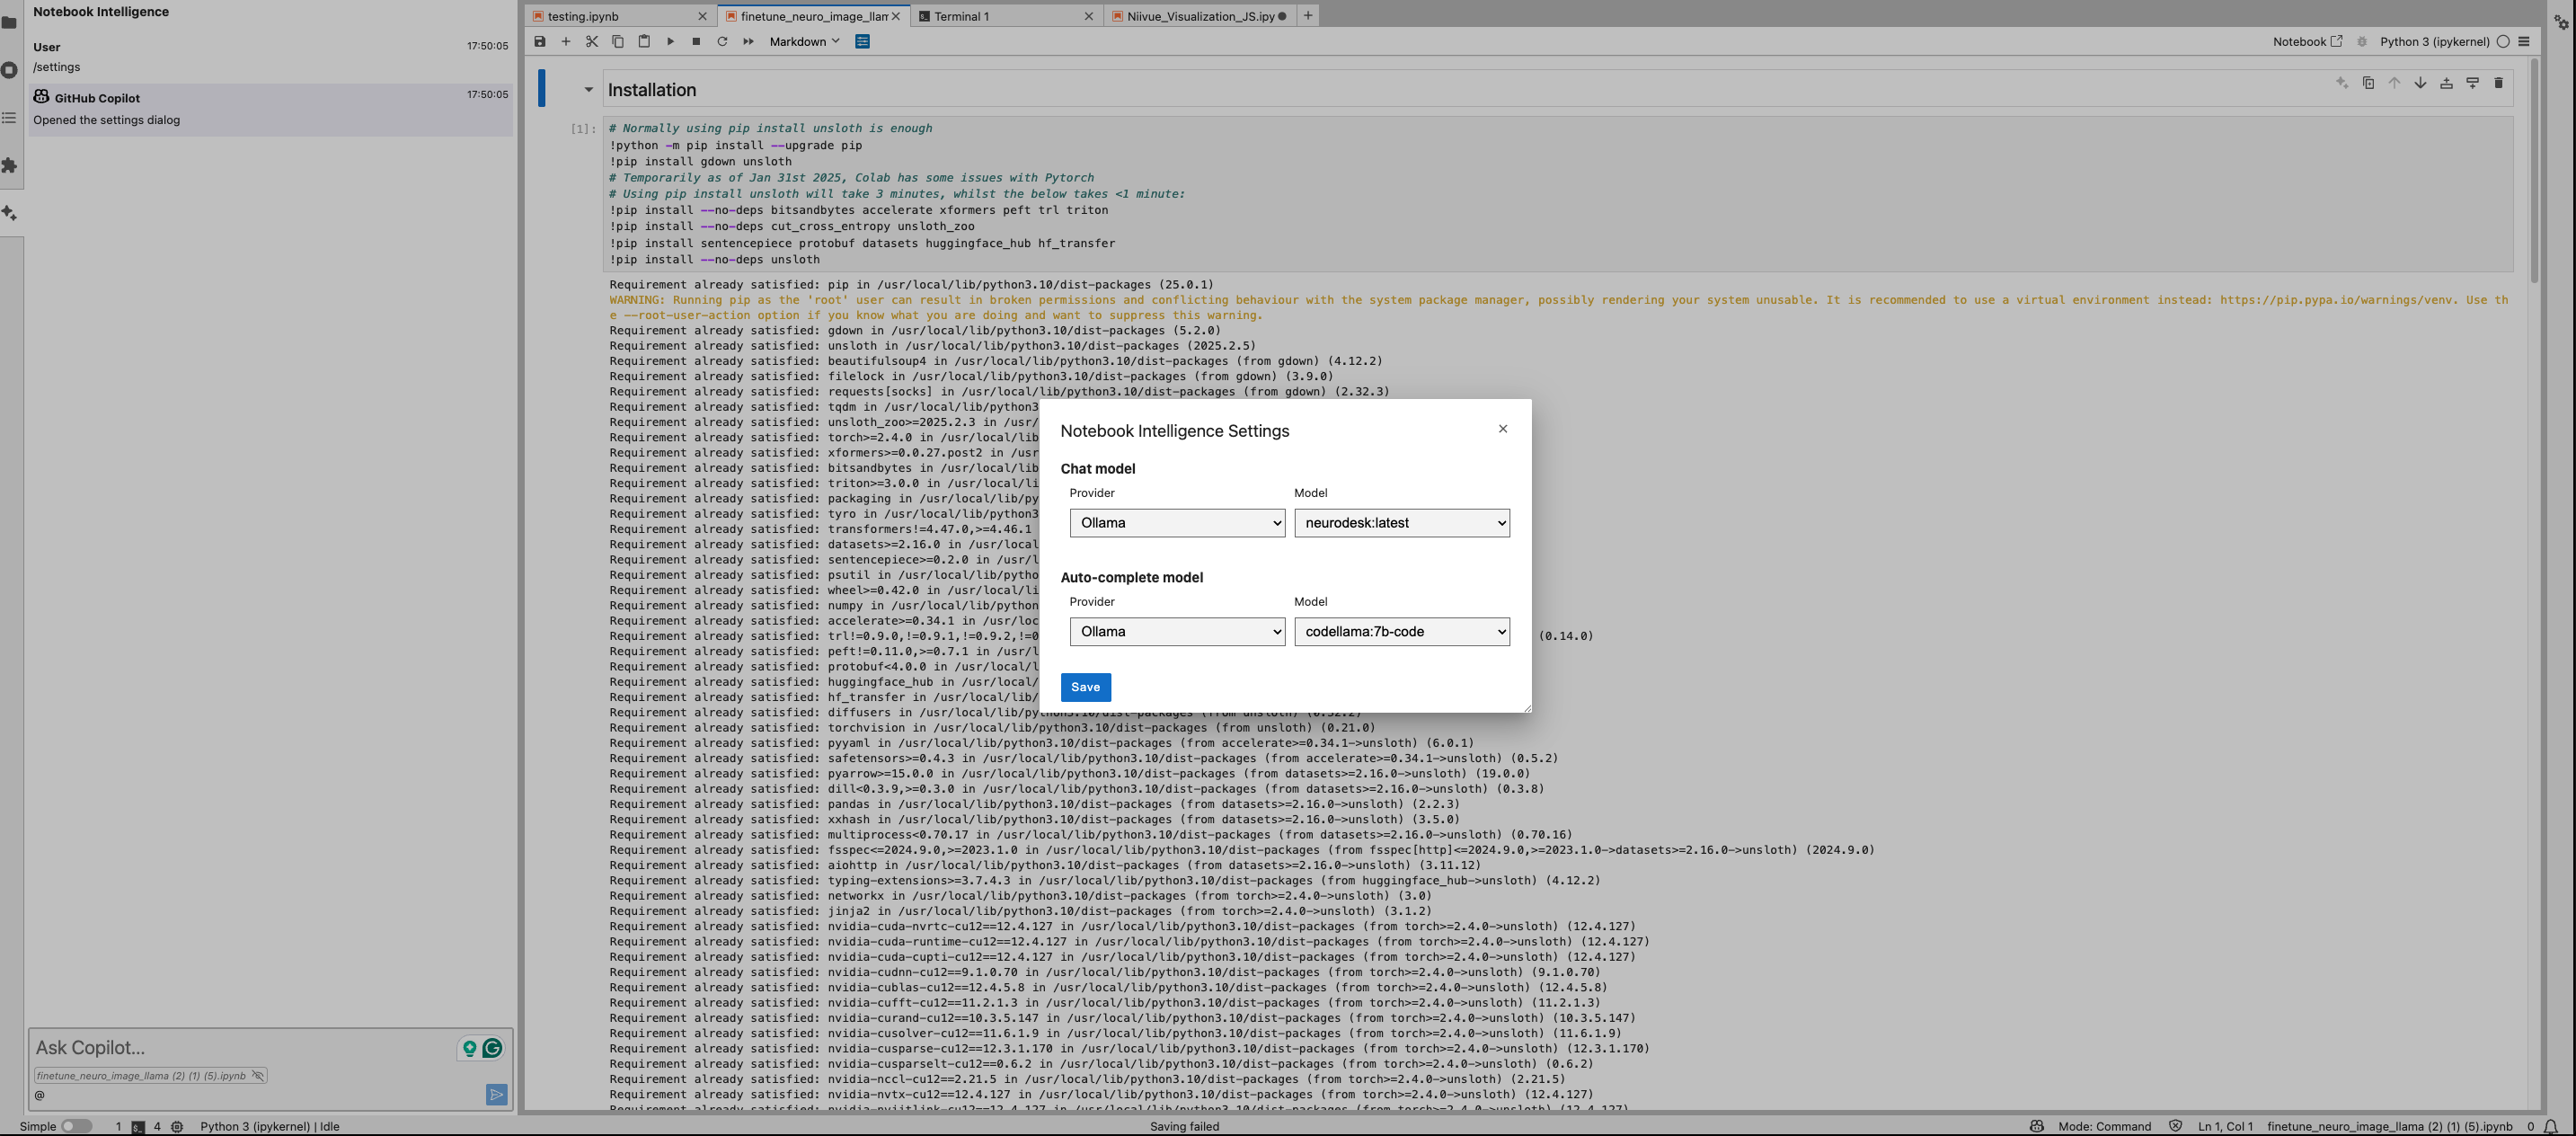
Feel free to update the settings to disable auto completer to manual invocation in Settings -> Settings Editor -> Inline Completer
neurodesk-docs).https://neurodesk.org/).startUrls, discoveryPatterns, pathsToMatch and other relevant settings to match the base URL for indexing. Redirect URLs would fail the crawler.neurodesk-docs).title, content.This step is the same for macOS, Windows, and Linux.
git clone --recurse-submodules git@github.com:neurodesk/neurodesk.github.io.gitor
git clone --recurse-submodules https://github.com/neurodesk/neurodesk.github.io.gitRun the following command to pull submodules
git submodule update --init --recursive --remoteOn Windows:
.\hugo.exe server --disableFastRenderOn Mac:
cd ~/Downloads  #edit according to location of file
tar -xvzf hugo_extended_0.115.4_darwin-universal.tar.gz #unzip the file
chmod +x hugo #Make the hugo file executable
sudo mv hugo /usr/local/bin/hugo-extended #move file to bin folderhugo-extended version #if it is your first time running this on a Mac, you will see a security warningYou should expect something like this (look for the mention of extended to be sure it worked)
hugo v0.146.0-5d1b9d39858bb0b2e505af9f649bfb55295ecca1+extended darwin/arm64 BuildDate=2025-04-10T14:57:56Z VendorInfo=gohugoioOnce installed, you can run the server for Mac using:
hugo-extended server --disableFastRenderOnce started, your dev website will be accessible via http://localhost:1313
git submodule update --remote
git add themes/
git commit -m "Updating theme submodule"
git push origin mainThis applies if you with to submit a new tutorial or amend content on a page. Our website is mostly written in Markdown (.md files). We include the basics of writing in Markdown on this page.
Begin by creating a copy of our documentation that you can edit:


This step is the same for macOS, Windows, and Linux.
git clone --recurse-submodules git@github.com:neurodesk/neurodesk.github.io.gitor
git clone --recurse-submodules https://github.com/neurodesk/neurodesk.github.io.gitRun the following command to pull submodules
git submodule update --init --recursive --remoteThe URL for the repository can be copied by clicking on the button highlighted below:

neurodesk.github.io using the editor of your choice (we recommend vscode). Before making changes to the current repository, the best practice is to create a new branch for avoiding version conflicts.git branch tutorial-templategit checkout tutorial-templategit branch
For example, if you’d like to create new tutorial content, go in neurodesk.github.io/content/en/tutorials-examples/tutorials/ and then navigate to the subfolder you believe your tutorial belongs in (e.g. “/functional_imaging”)
Create a new, appropriately named markdown file to house your content (e.g. for a tutorial about physiology, you might call it “physio.md”). Images need to be stored in the /static directory - please mirror the same directory structure as for your markdown files.
Open this file and populate it with your content! You’re also welcome to look at other tutorials already documented on our website for inspiration.
git rebase mainYou might have to correct some merge conflicts, but vscode makes it easy.
Commit all your changes and push these local commits to GitHub.
Navigate to your forked version of the repository on GitHub and switch branches for the one with your additions.


Then you need to open the settings of the repository and check that Pages points to gh-pages, and when clicking on the link, the site should be there.
To contribute your changes, click “Compare & pull request” and then “Create pull request”.

Give your pull request a title (e.g. “Document PhysIO tutorial”), leave a comment briefly describing what you have done, and then create the pull request.
Someone from the Neurodesk team will review and accept your changes, which will appear on our website soon!
Thanks so much for taking the time to contribute content to the Neurodesk community! If you have any feedback on the process, please let us know on github discussions.
As seen throughout this tutorial, you can embellish your text using markdown conventions; text can be bold, italic, or strikethrough. You can also add Links, and you can organise your content with headers, starting at level 2 (the page title is a level 1 header):
You can also include progressively smaller subheadings:
Some more detailed information.
Even more detailed information.
You can add codeblocks to your content as follows:
# Some example code
import numpy as np
a = np.array([1, 2])
b = np.array([3, 4])
print(a+b)
Or add syntax highlighting to your codeblocks:
# Some example code
import numpy as np
a = np.array([1, 2])
b = np.array([3, 4])
print(a+b)
Advanced code or command line formatting using this html snippet:
# Some example code
import numpy as np
a = np.array([1, 2])
b = np.array([3, 4])
print(a+b)
[4 6]
You can also add code snippets, e.g. var foo = "bar";, which will be shown inline.
To add screenshots and images to your content, create a subfolder in /static with the same file structure as in your content markdown file. Add your screenshot to this folder, keeping in mind that you may want to adjust your screenshot to a reasonable size before uploading. You can then embed these images in your tutorial using the following convention:
For a filename.png in a /content/en/tutorials-examples/subject/tutorial1/markdownfile.md use
For example: EEGtut1.png in /content/en/tutorials-examples/tutorials/electrophysiology/eeg_mne-python.md would be

You can grab the reader’s attention to particularly important information with quoteblocks, alerts, and warnings:
This is a quoteblock
You can also segment information as follows:
There’s a horizontal rule above and below this.
Or add page information:
This is a placeholder. Replace it with your own content.
You may want to order information in a table as follows:
| Neuroscientist | Notable work | Lifetime |
|---|---|---|
| Santiago Ramón y Cajal | Investigations on microscopic structure of the brain | 1852–1934 |
| Rita Levi-Montalcini | Discovery of nerve growth factor (NGF) | 1909–2012 |
| Anne Treisman | Feature integration theory of attention | 1935–2018 |
You may want to organise information in a list as follows:
Here is an unordered list:
And an ordered list:
And an unordered task list:
And a “mixed” task list:
And a nested list:
If you have questions or would like feedback before submitting:
We appreciate your contribution to the Neurodesk community and reproducible science.
To decide if a tool should be packaged in a Neurocontainers or be installed in the Neurodesktop container, we are currently following these guiding principles:
1) Neurodesk is a Platform, Not a Package Manager: We don’t distribute tools that can be easily installed via standard package managers.
2) Multiple versions of tools: Neurodesk supports the use of multiple versions of a tool in parallel via lmod. If a tool doesn’t support this, follow this instruction to package it in Neurocontainers.
3) Inter-Container Tool Linking: Neurodesk is designed to facilitate the linking of tools from different containers, such as workflow managers like nipype or nextflow. Therefore, if a tool is needed to coordinate various container-tools, create an issue to have it installed directly in the Neurodesktop container.
Examples:
| easy install | coordinates containers | small in size | latest version is ok | useful to most users | Conclusion | |
|---|---|---|---|---|---|---|
| git | yes | yes | yes | yes | yes | neurodesktop |
| lmod | no | yes | yes | yes | yes | neurodesktop |
| itksnap | yes | no | yes | yes | yes | neurocontainer |
| convert3D | yes | no | yes | no | no | neurocontainer |
| fsl | no | no | no | no | no | neurocontainer |
Follow these instructions to add new tools: https://neurodesk.org/developers/new_tools/manual_build
We have launched our new container build system. Some documentation can already be found here: https://github.com/neurodesk/neurocontainers/tree/main/builder
We have also released a web browser UI to create your own Neurocontainer: https://neurodesk.org/neurocontainers-ui/
We are currently building the detailed documentation for this, but documenttaion is also embedded in the UI. If you have any issues, please
If you have questions or would like feedback before submitting:
We appreciate your contribution to the Neurodesk community and reproducible science.
Updating an existing container is quite easy with this new build system.
Here is a step-by-step on how to procede by modifying the .yaml file. It is also possible to edit the containers by using our newly released web browser UI : https://neurodesk.org/neurocontainers-ui/
There’s a detailled version below including screenshots and an example.
Each tool has its own folder inside the recipes/ directory, and inside that folder, you will find the corresponding build.yaml file.
Editing the build.yaml
Open the build.yaml file. Make the necessary updates to:
Make sure your changes are valid. In the terminal, run:
./builder/build.py generate <toolname>

#This second step can take some time
./builder/build.py generate <toolname> --recreate --build --test Navigate to the Neurocontainers repository:

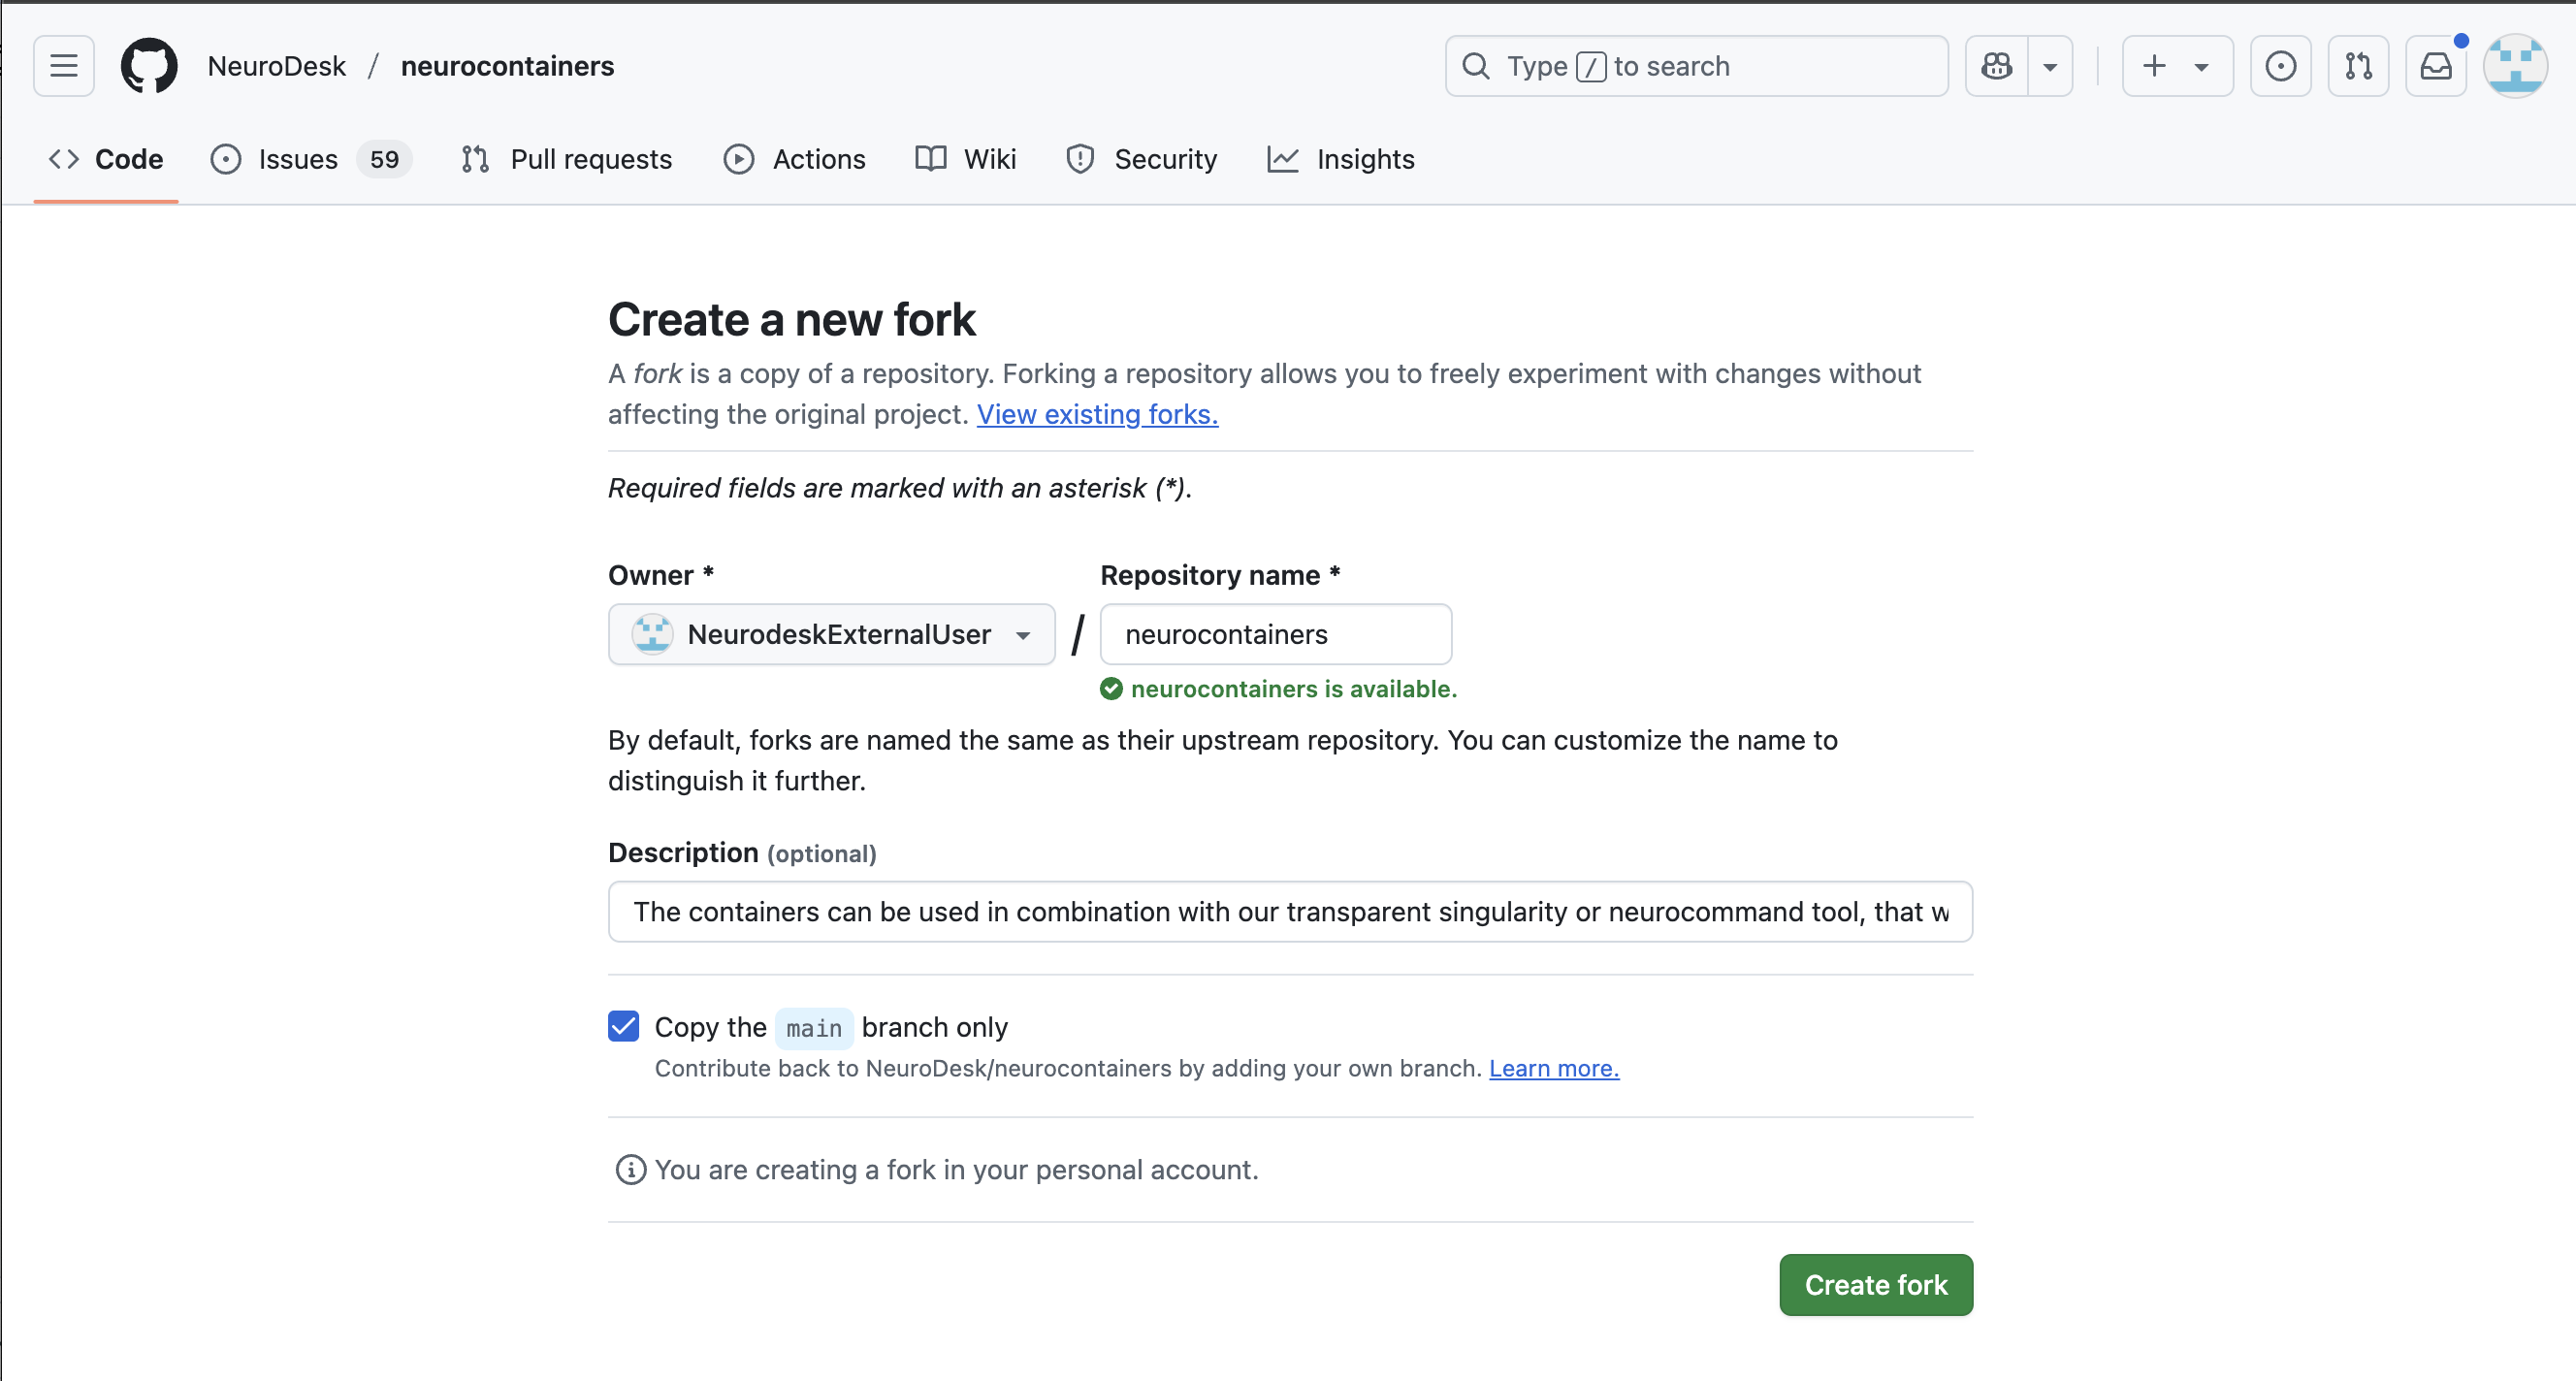
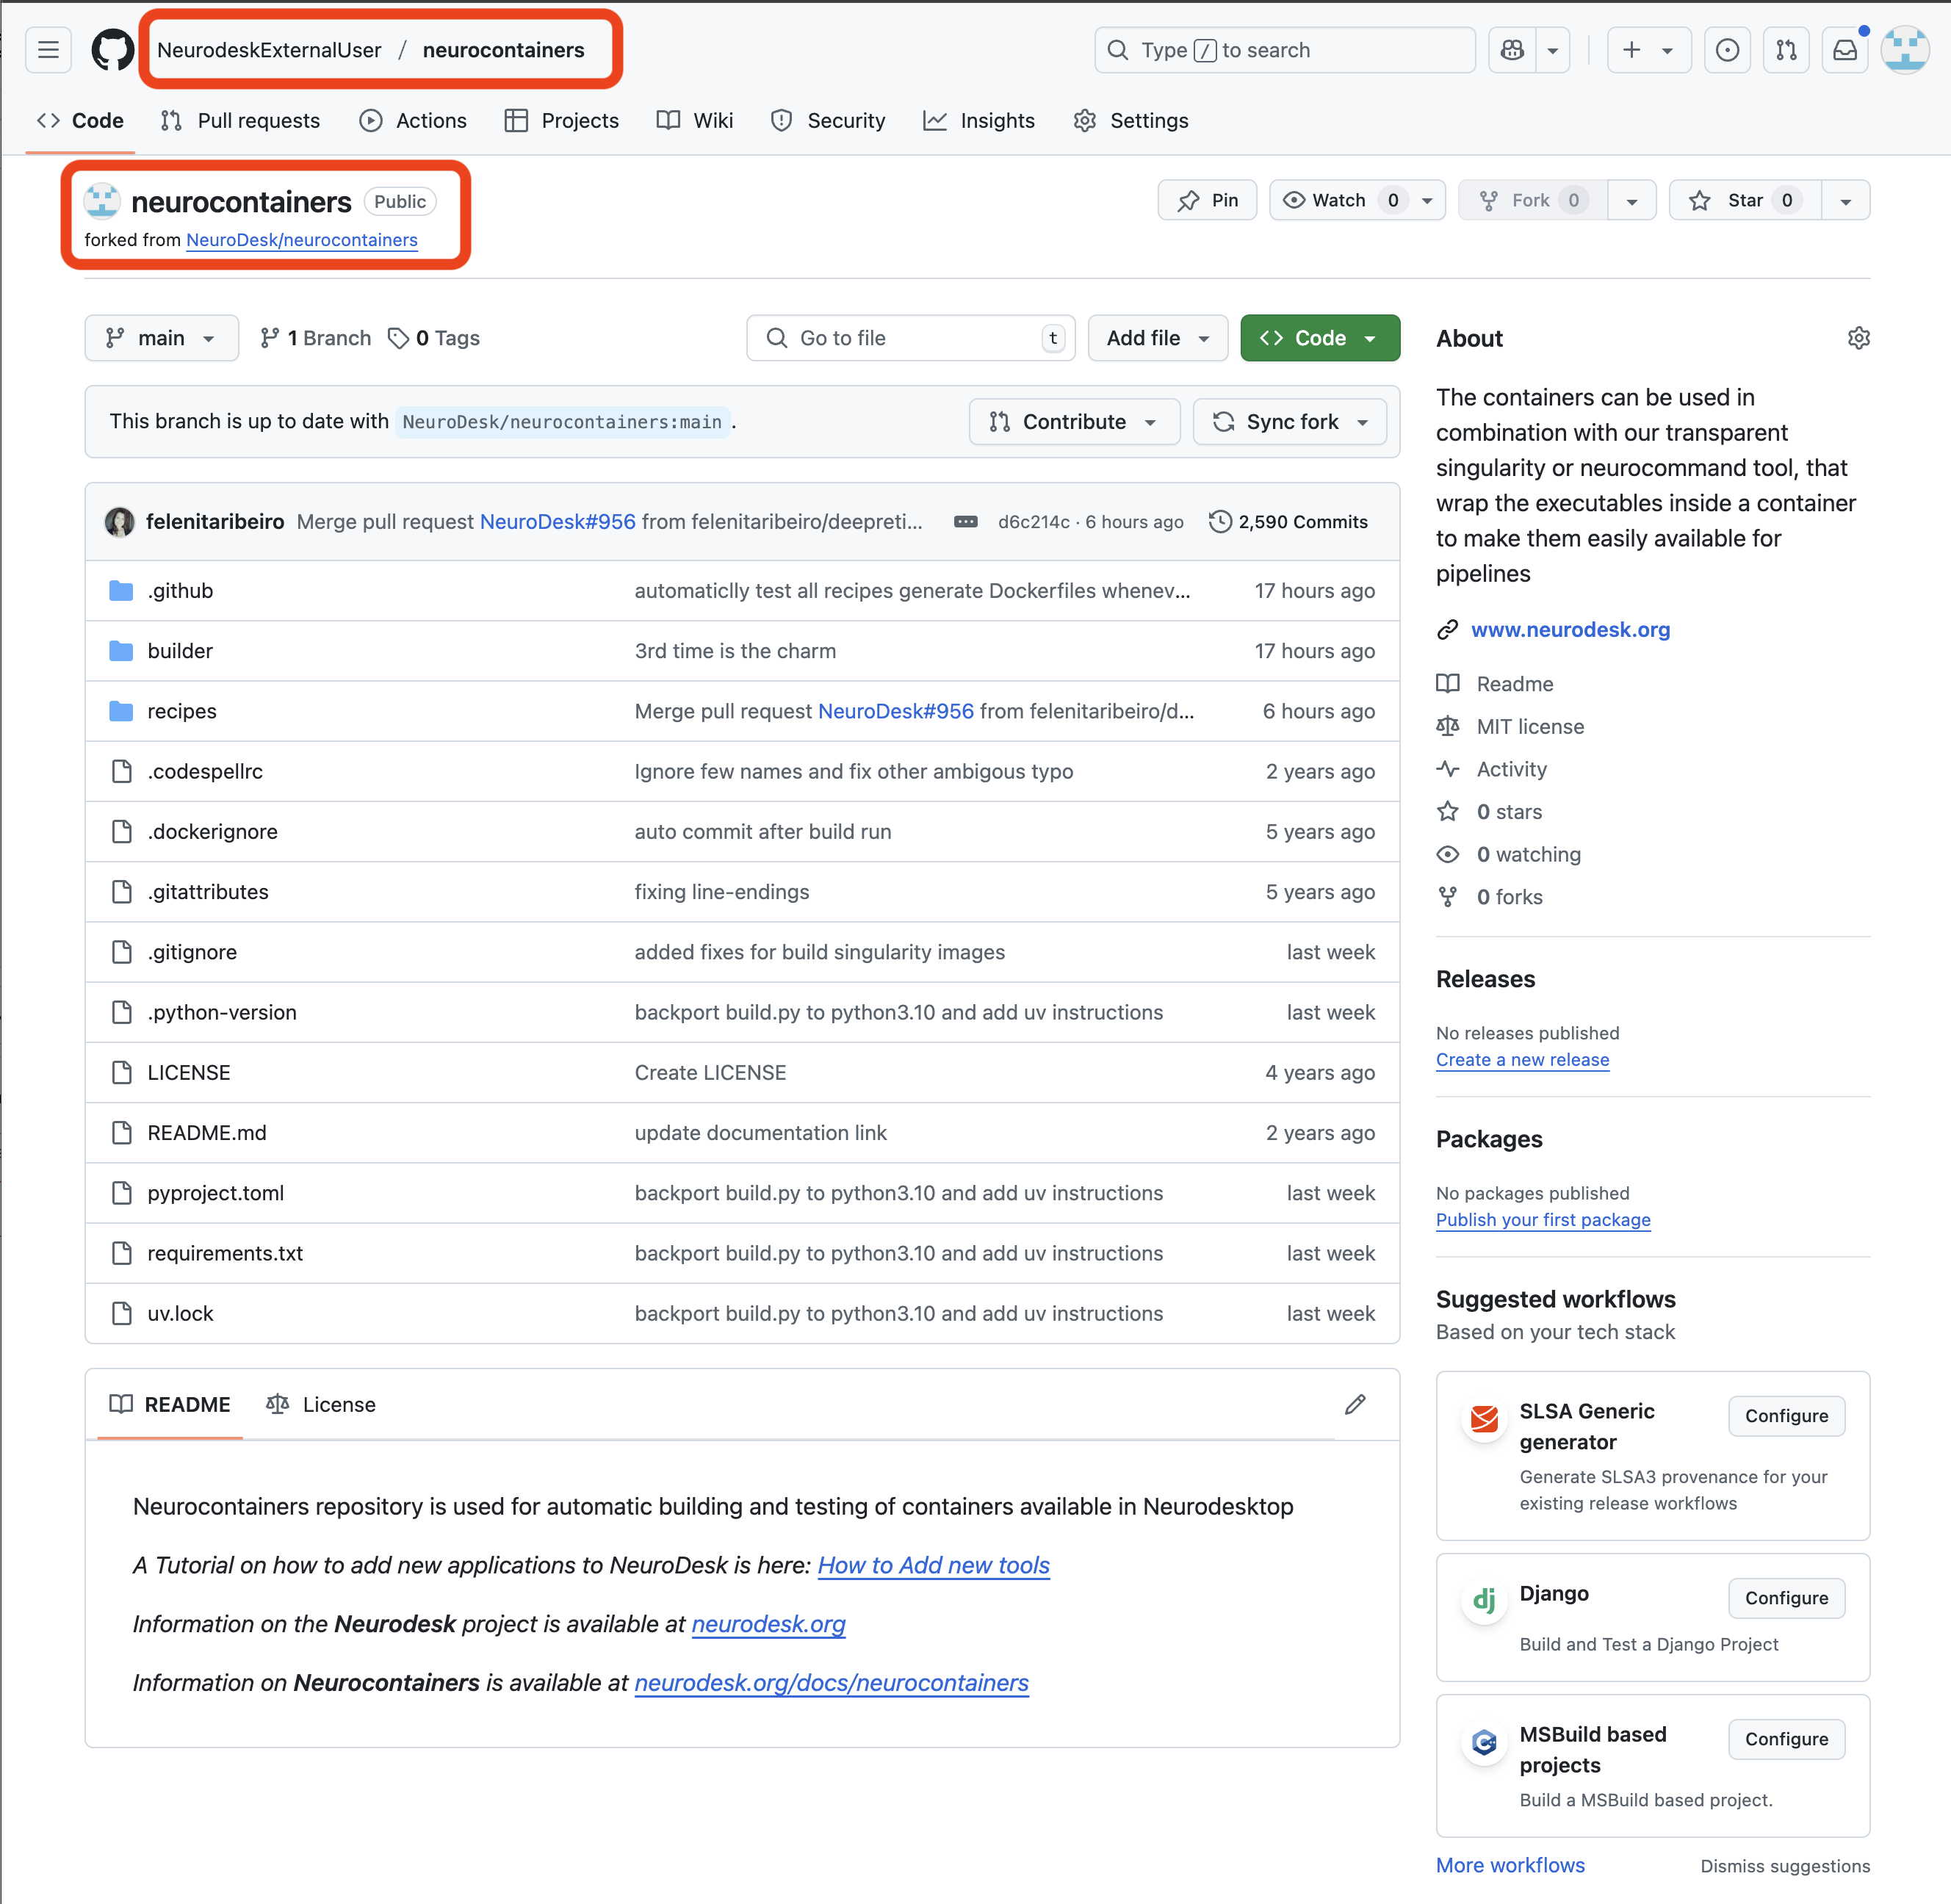
You will then need to fork the Neurodesk repository to your own repositories. This allows you to make changes independently and propose updates.
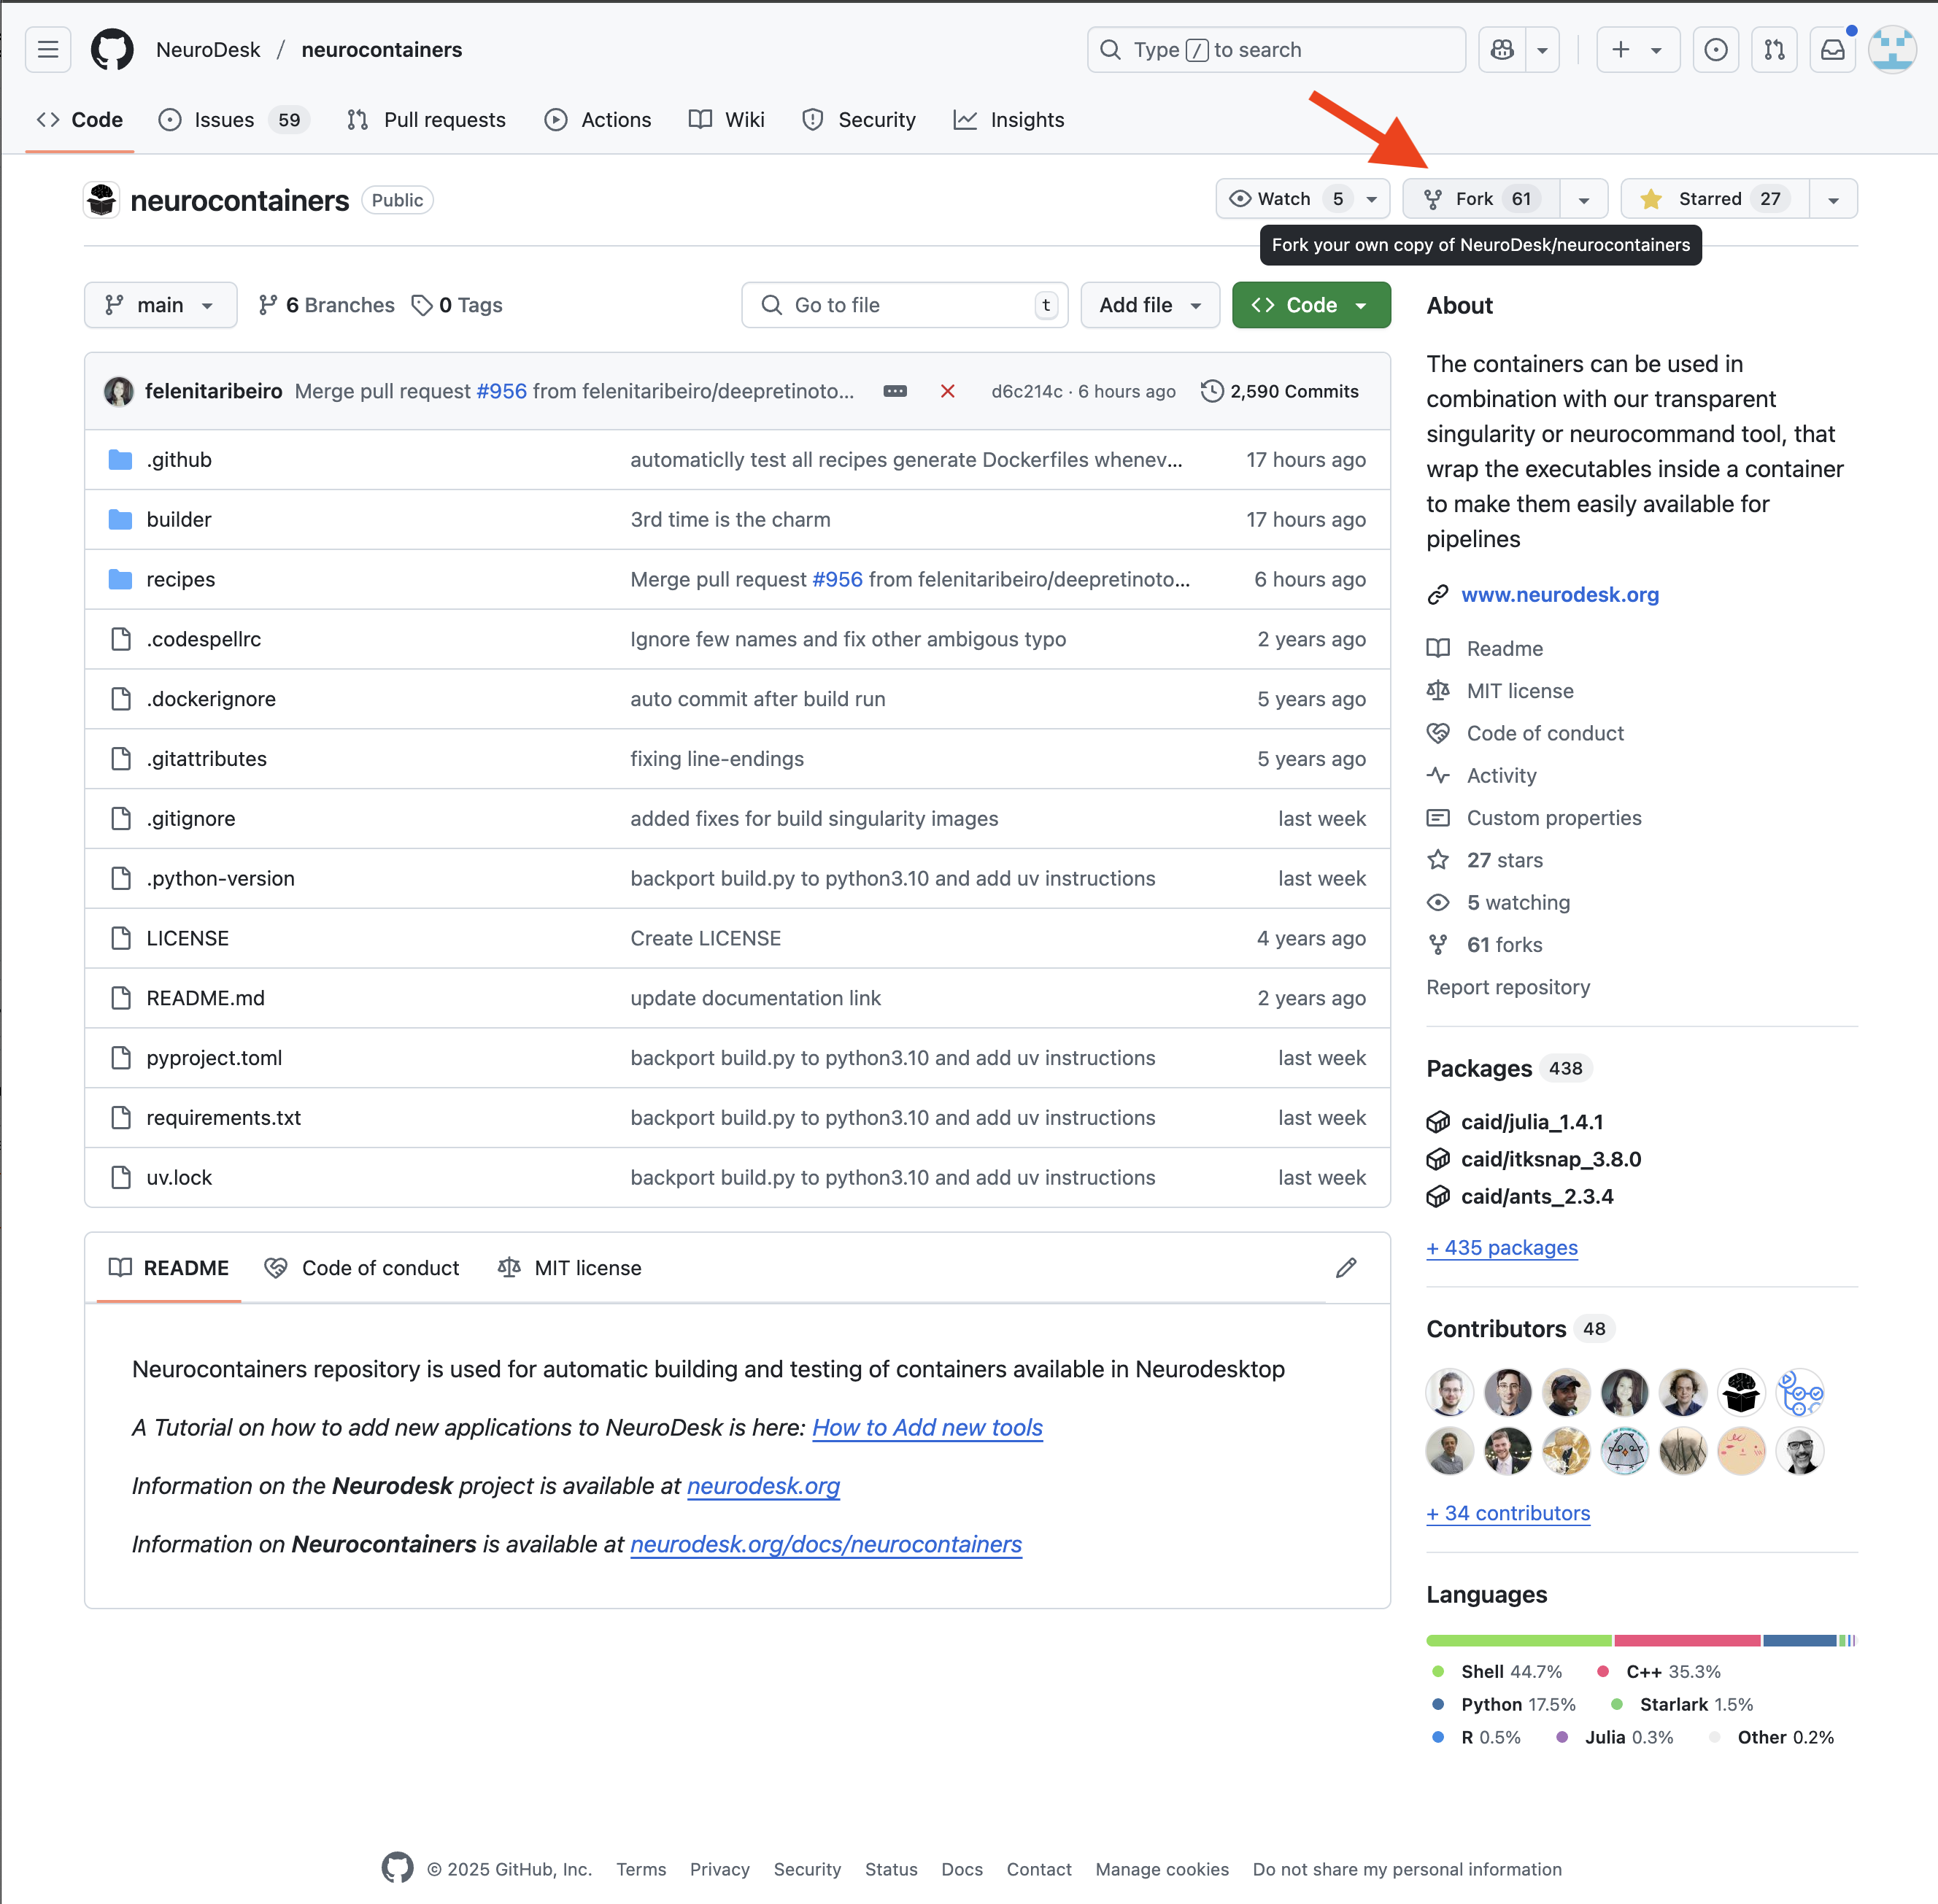
You may decide to keep the same name for your new reposoitory, or you may rename it.
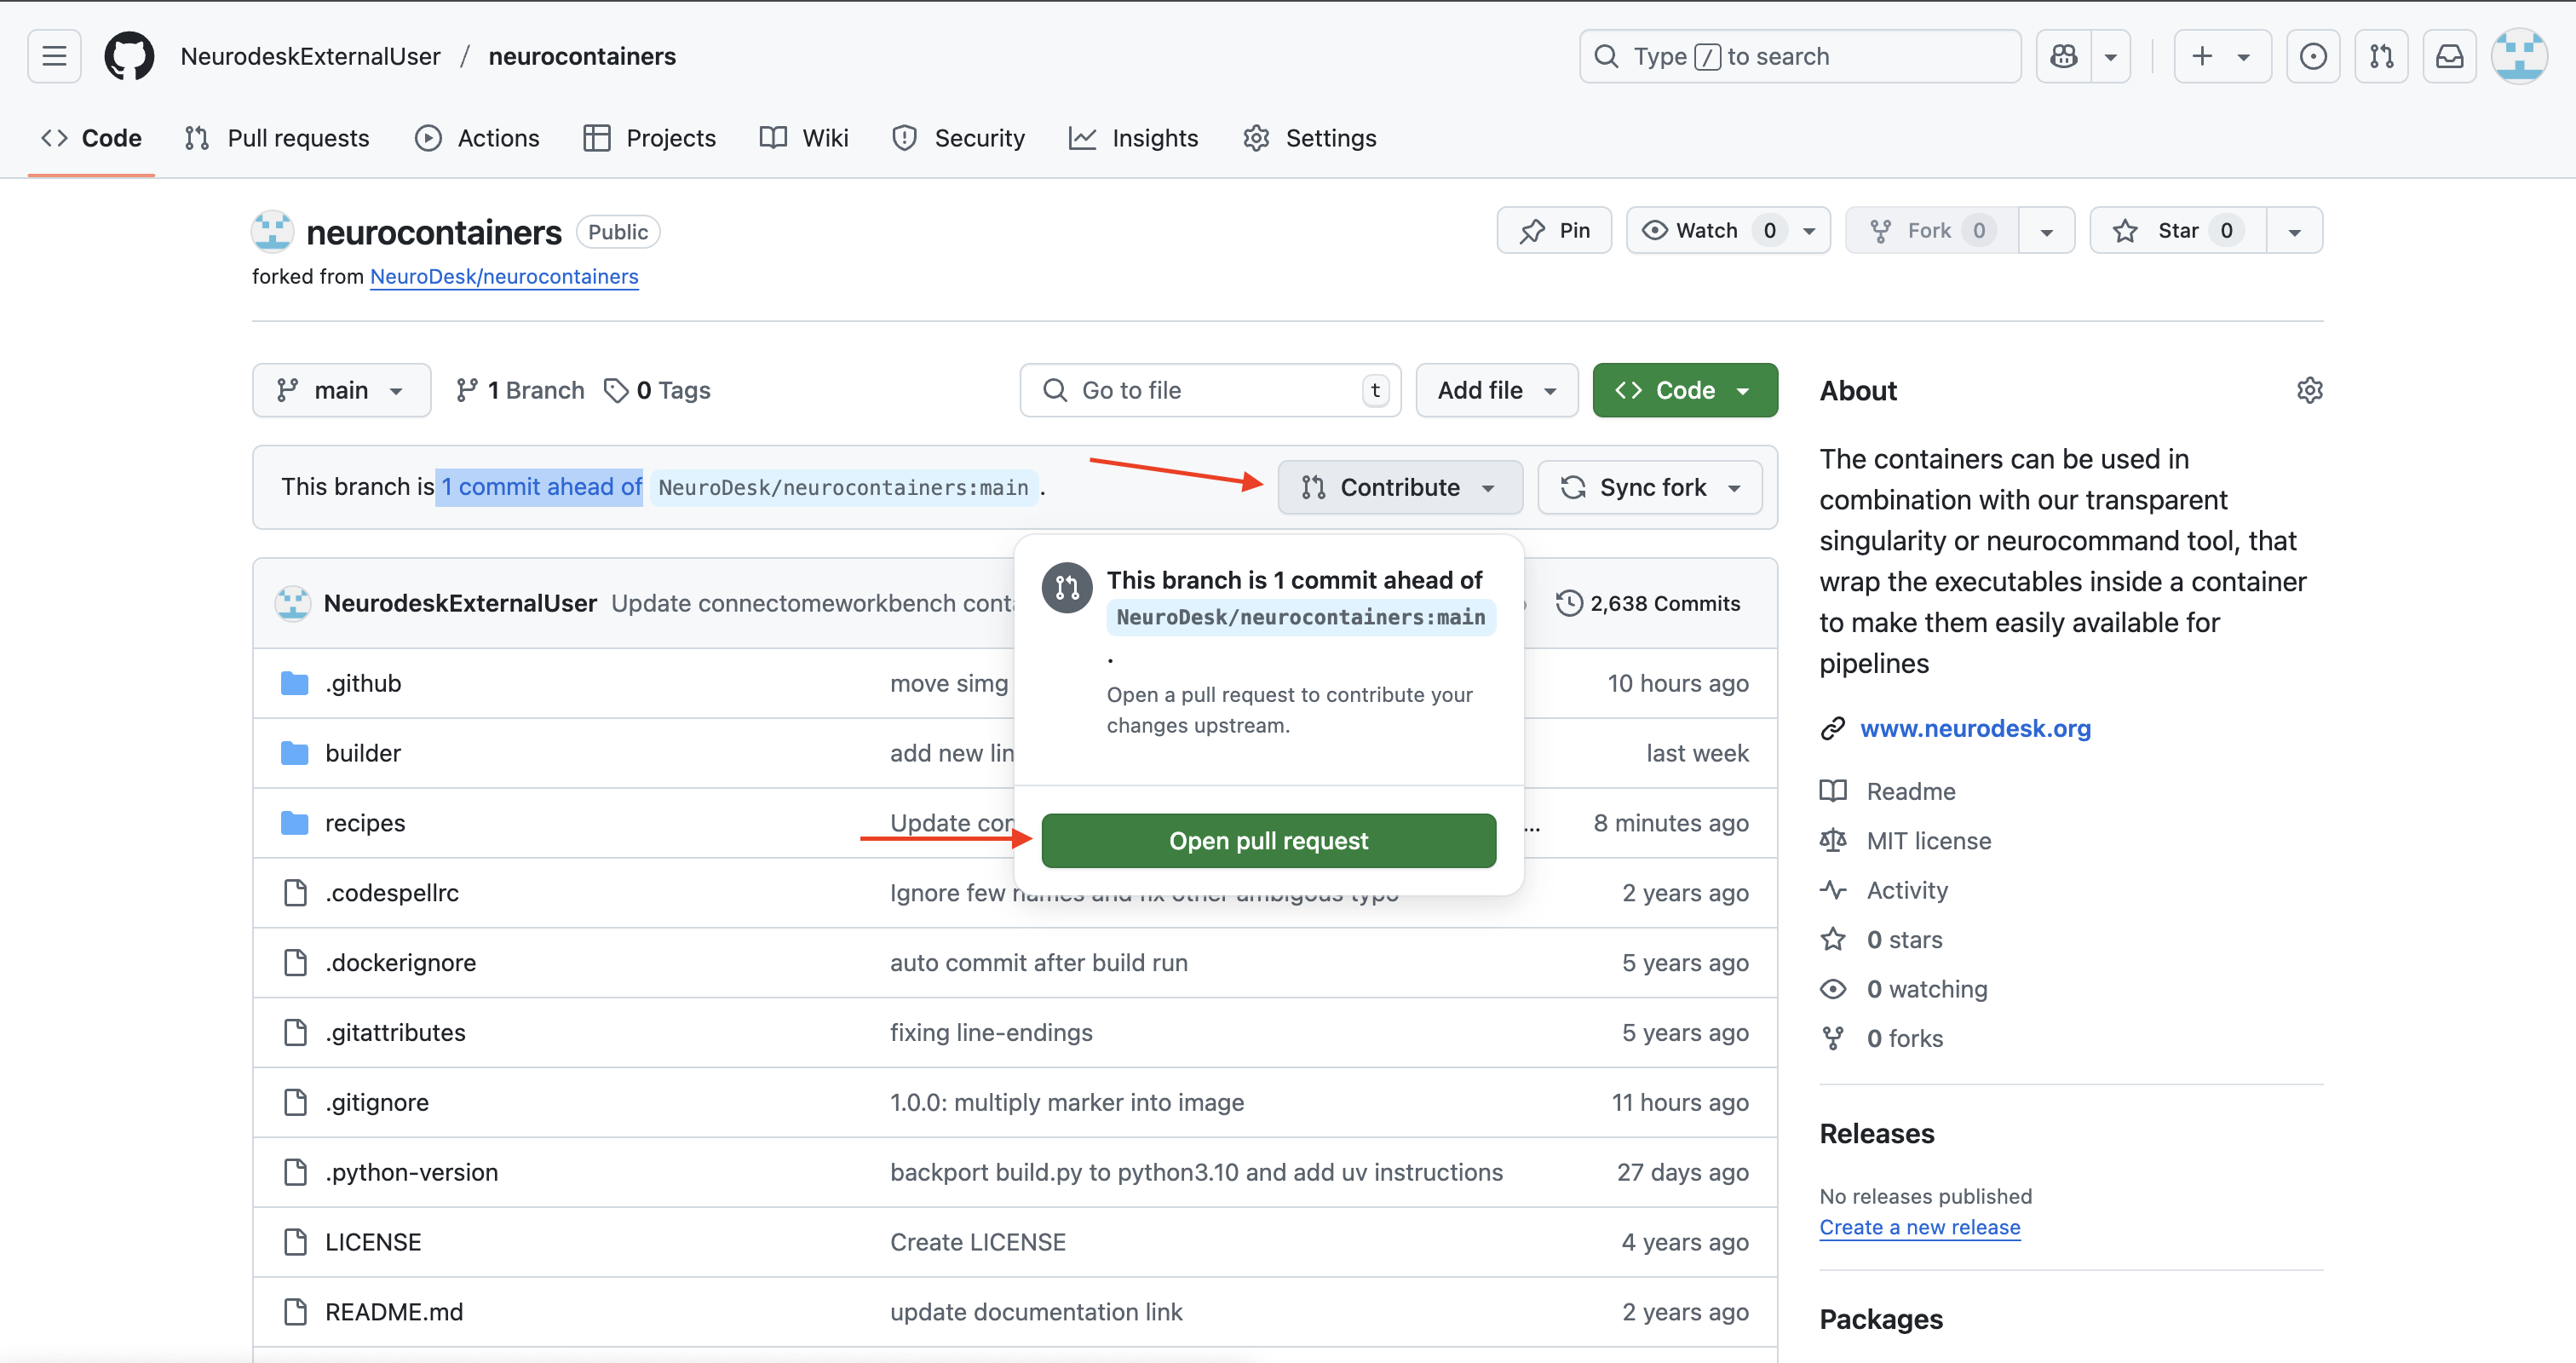
In the top left corner, you can see that you are in your forked repository of the neurocontainers repository.
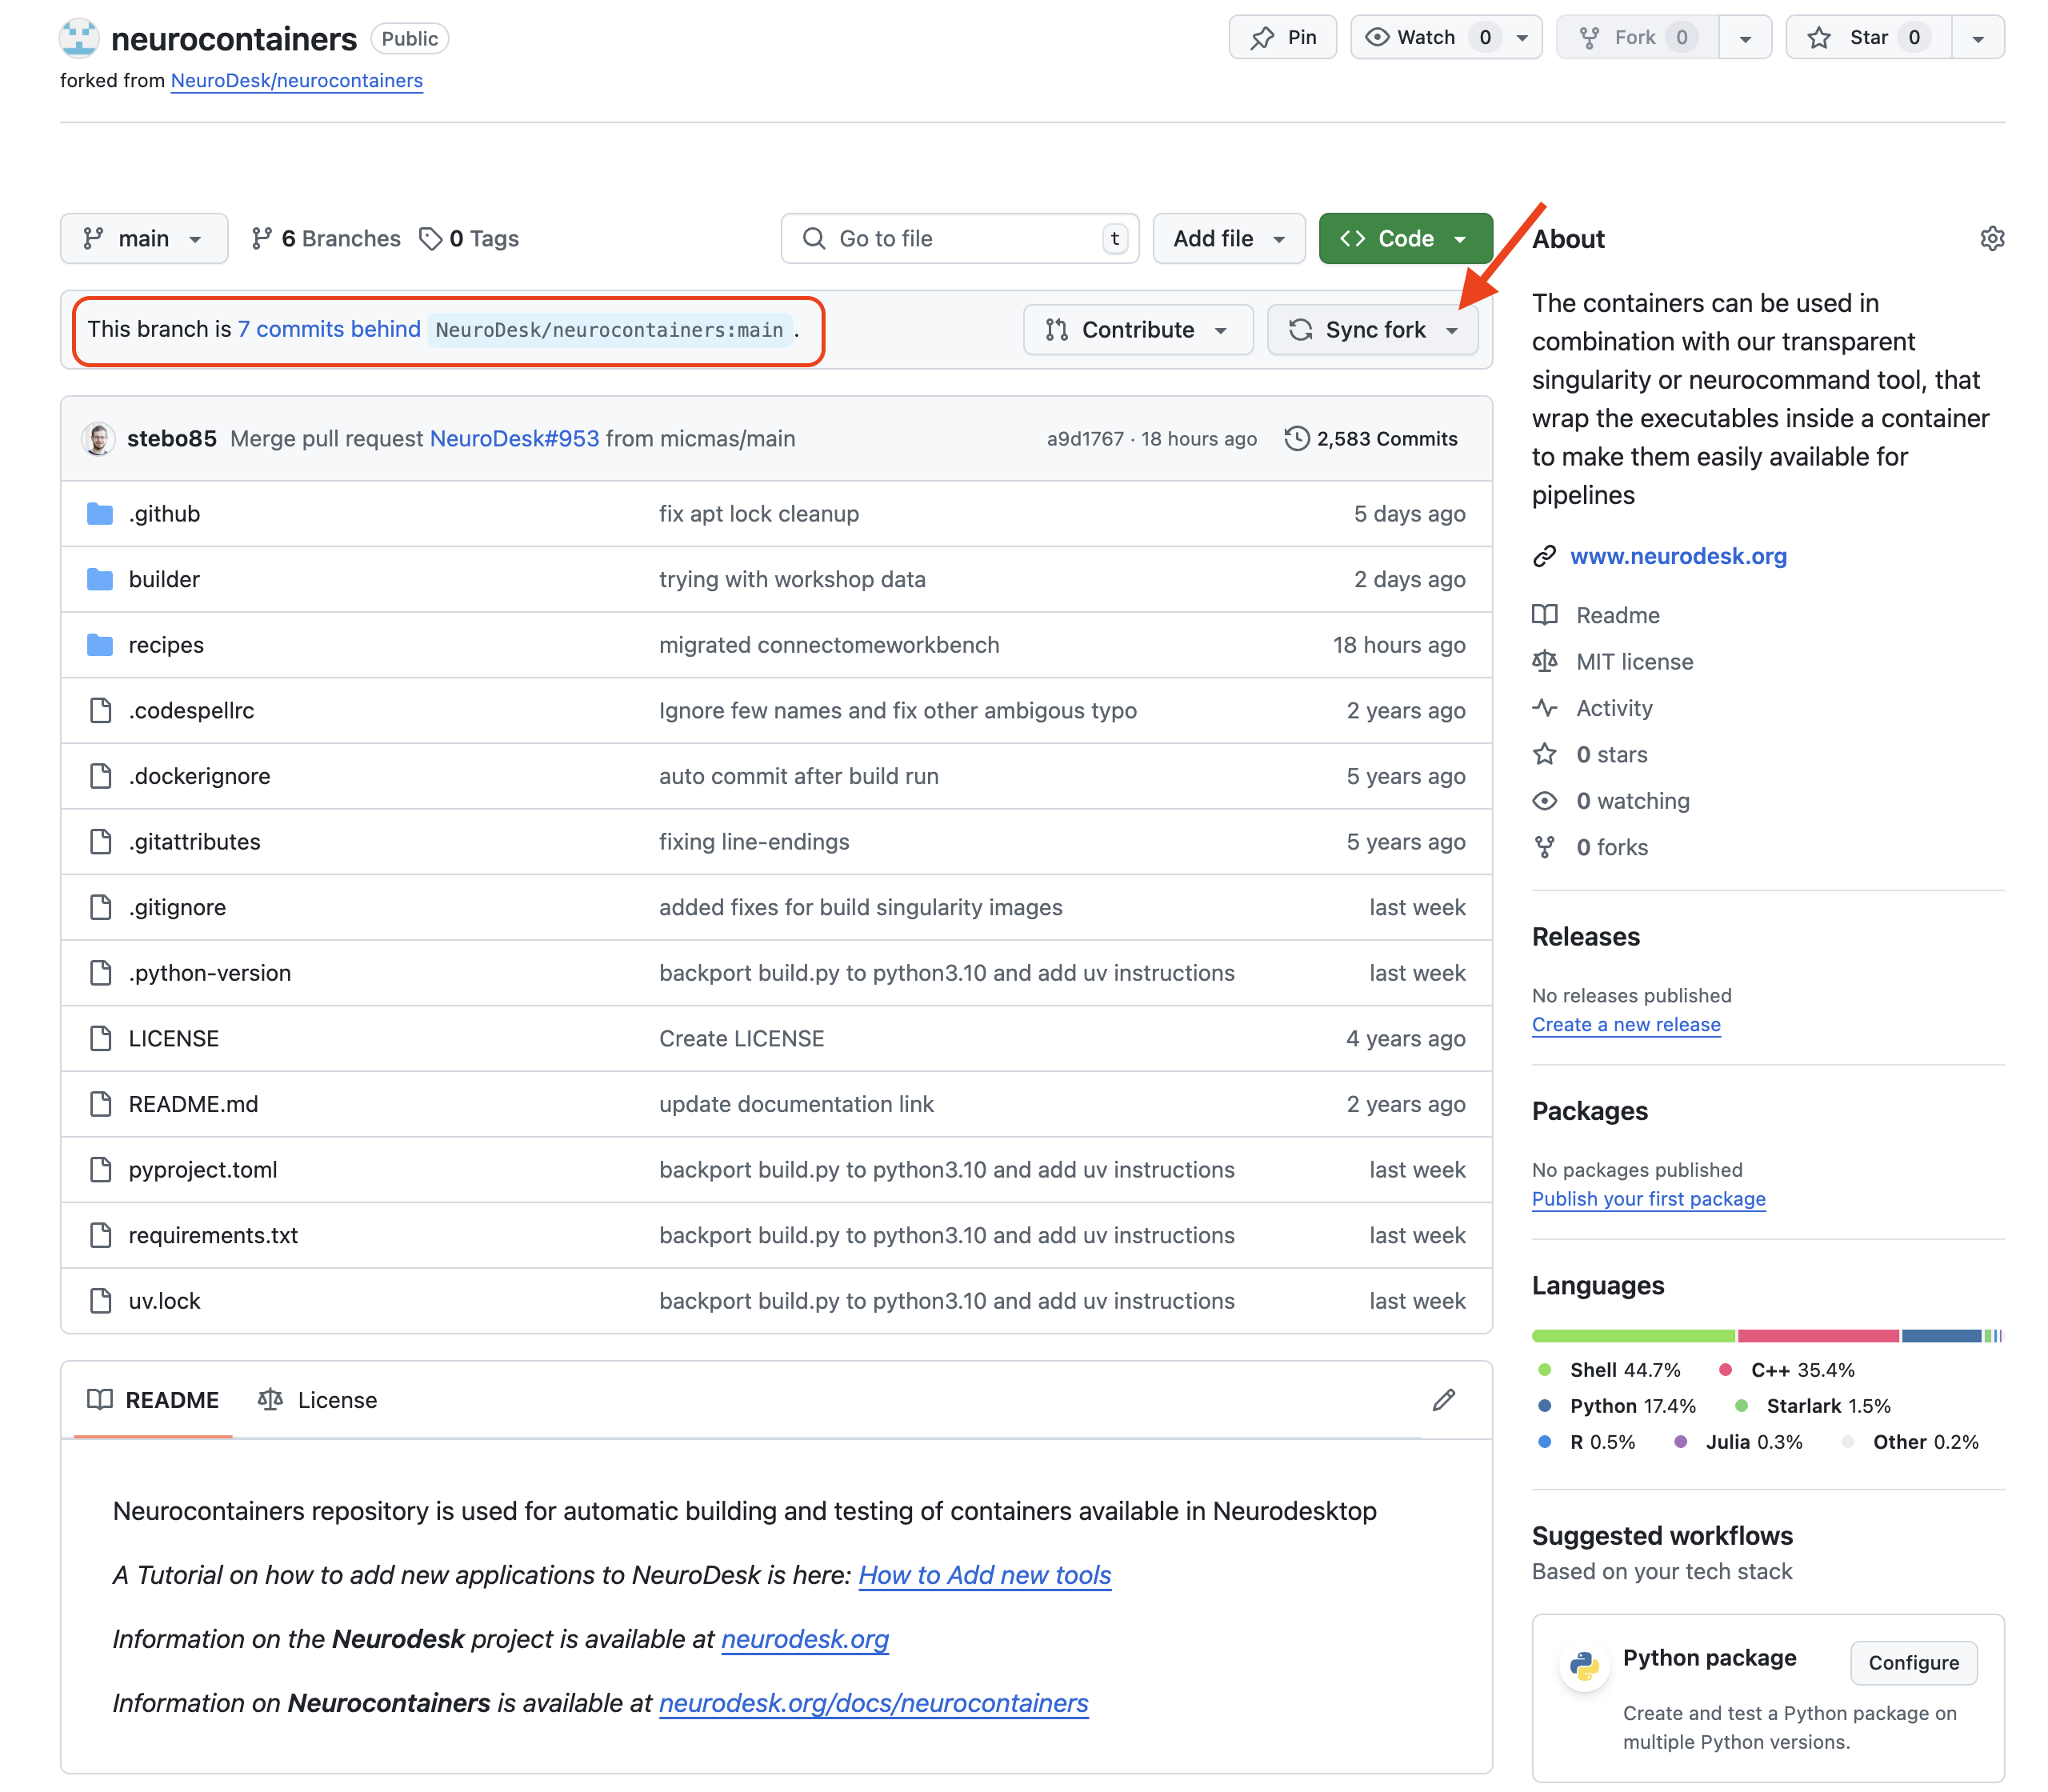
If changes are commited to the Neurodesk/neurocontainers repository, you will see a banner saying you are N commits behind. You may decide to Sync fork, which will update your repository, allowing you to have the most up-to-date files.
Once this is done, you will want to start a Codespace using by:
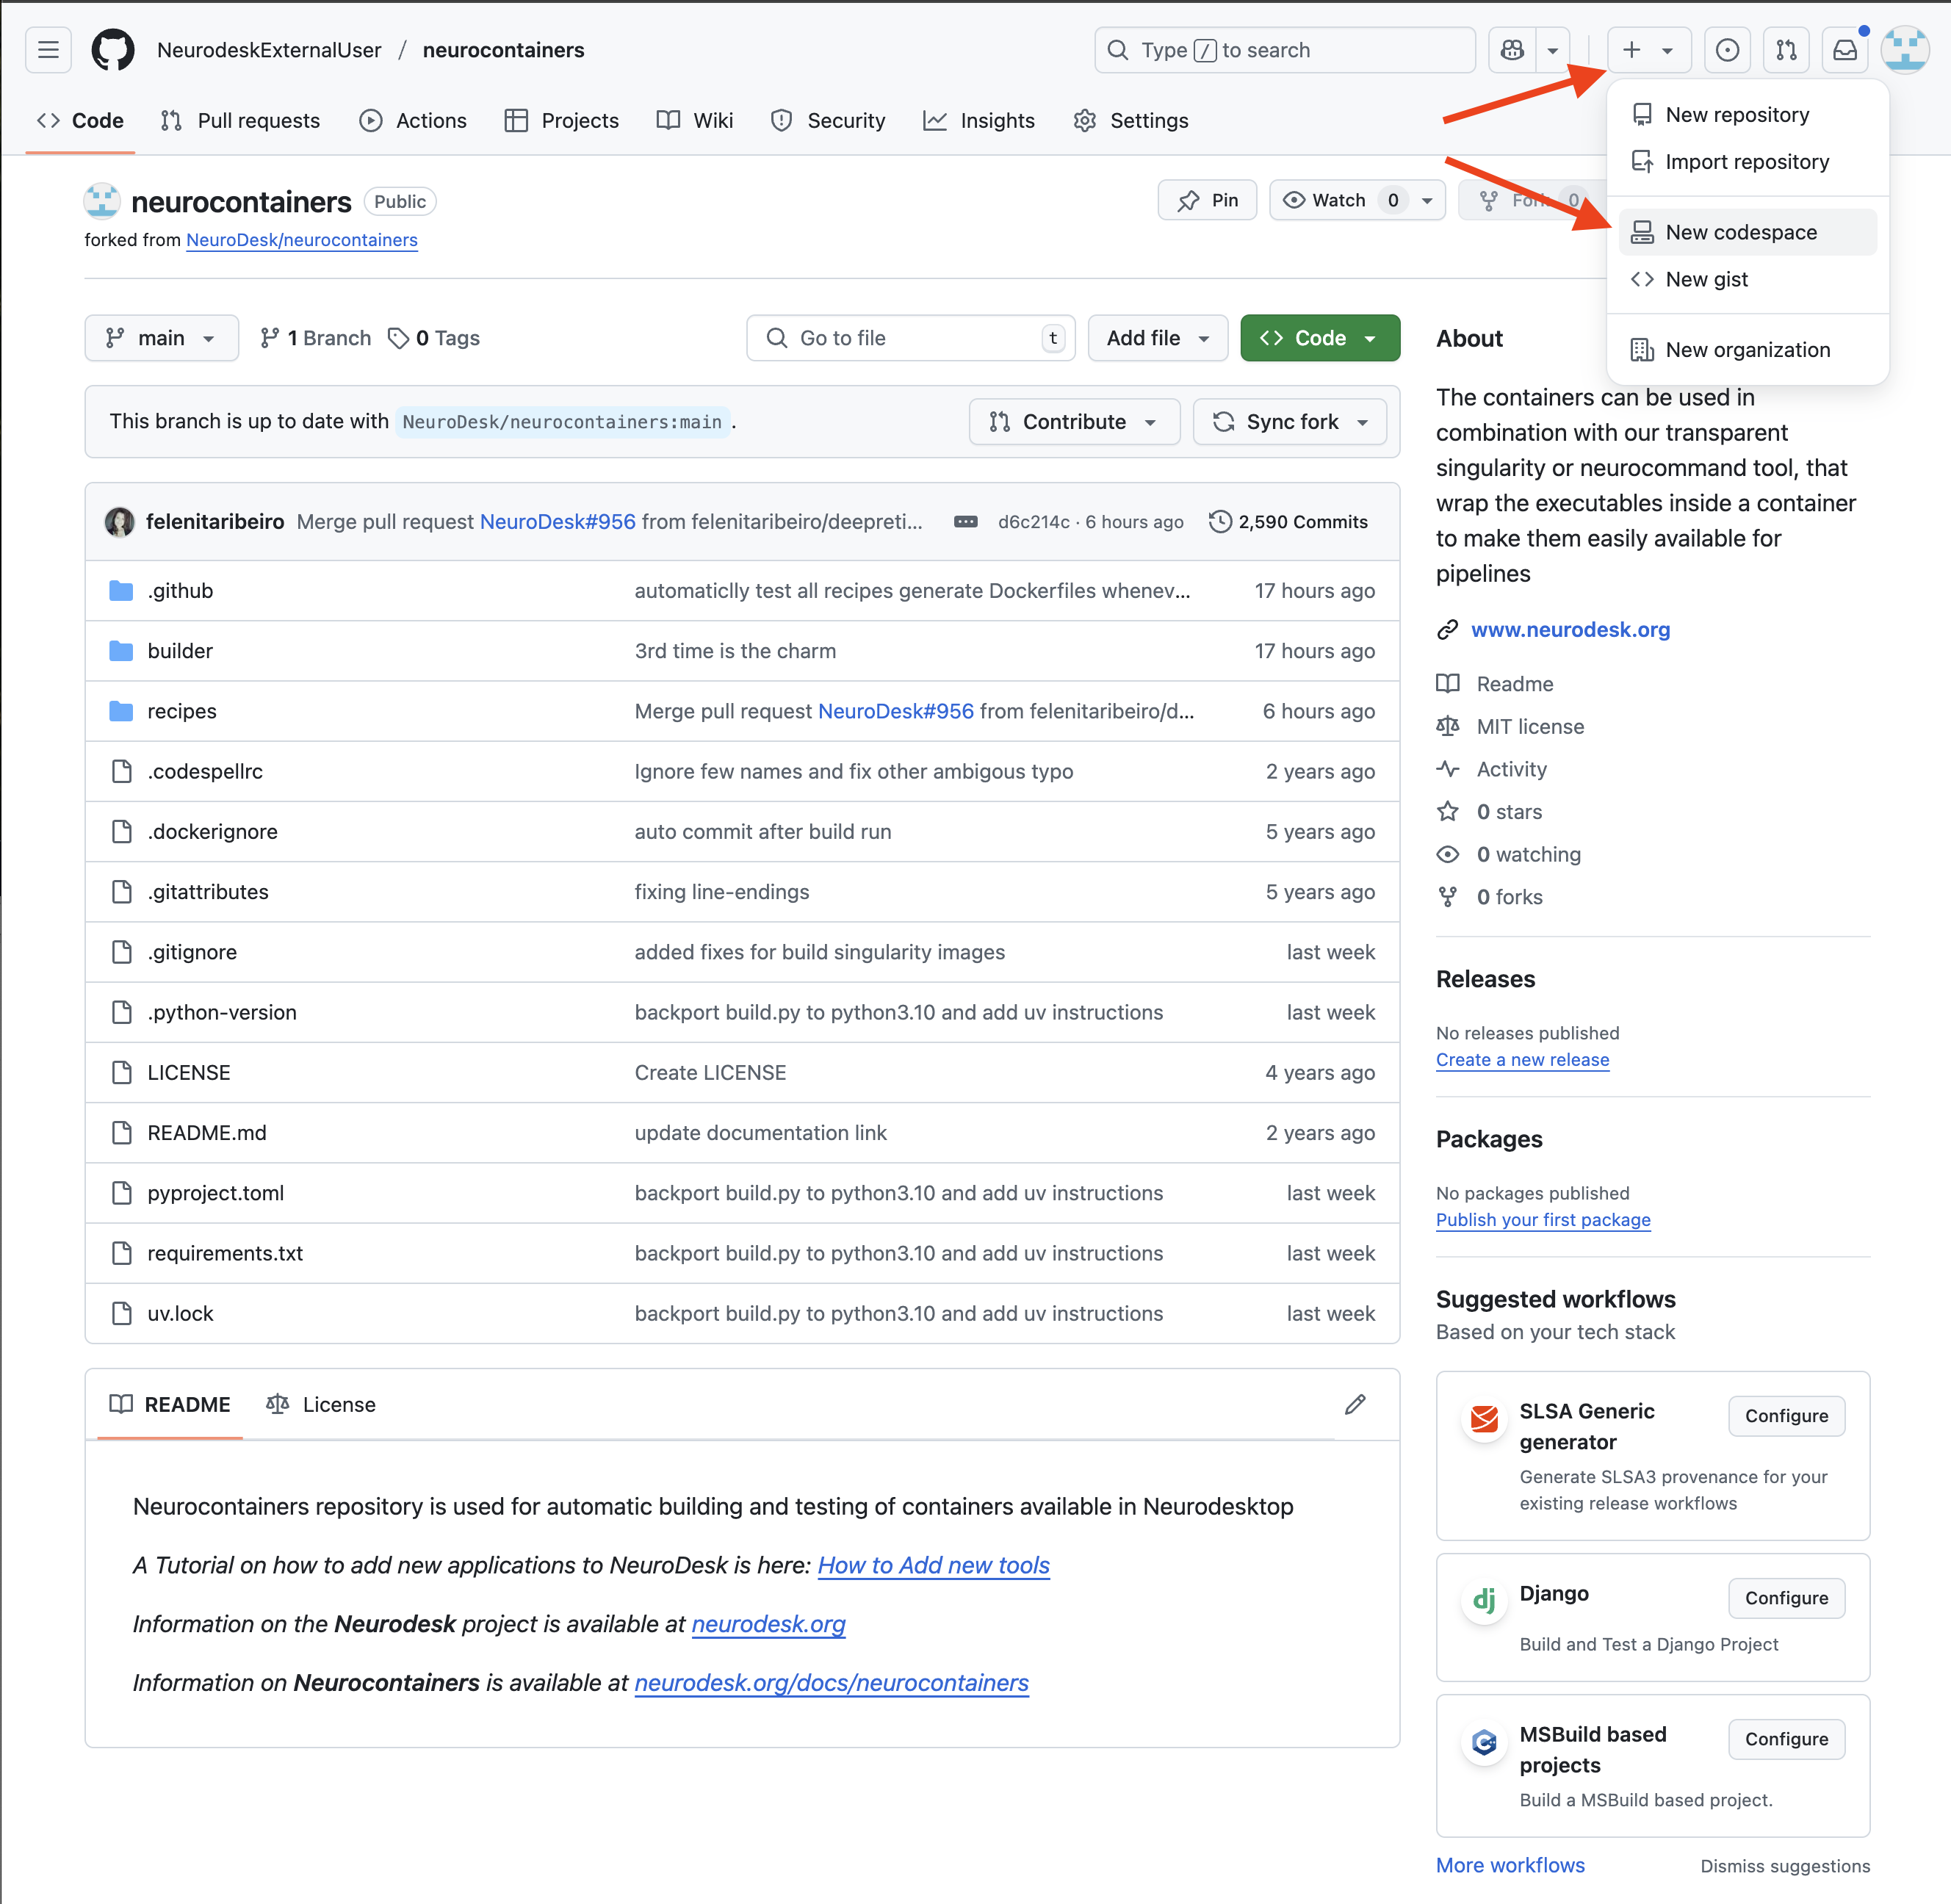
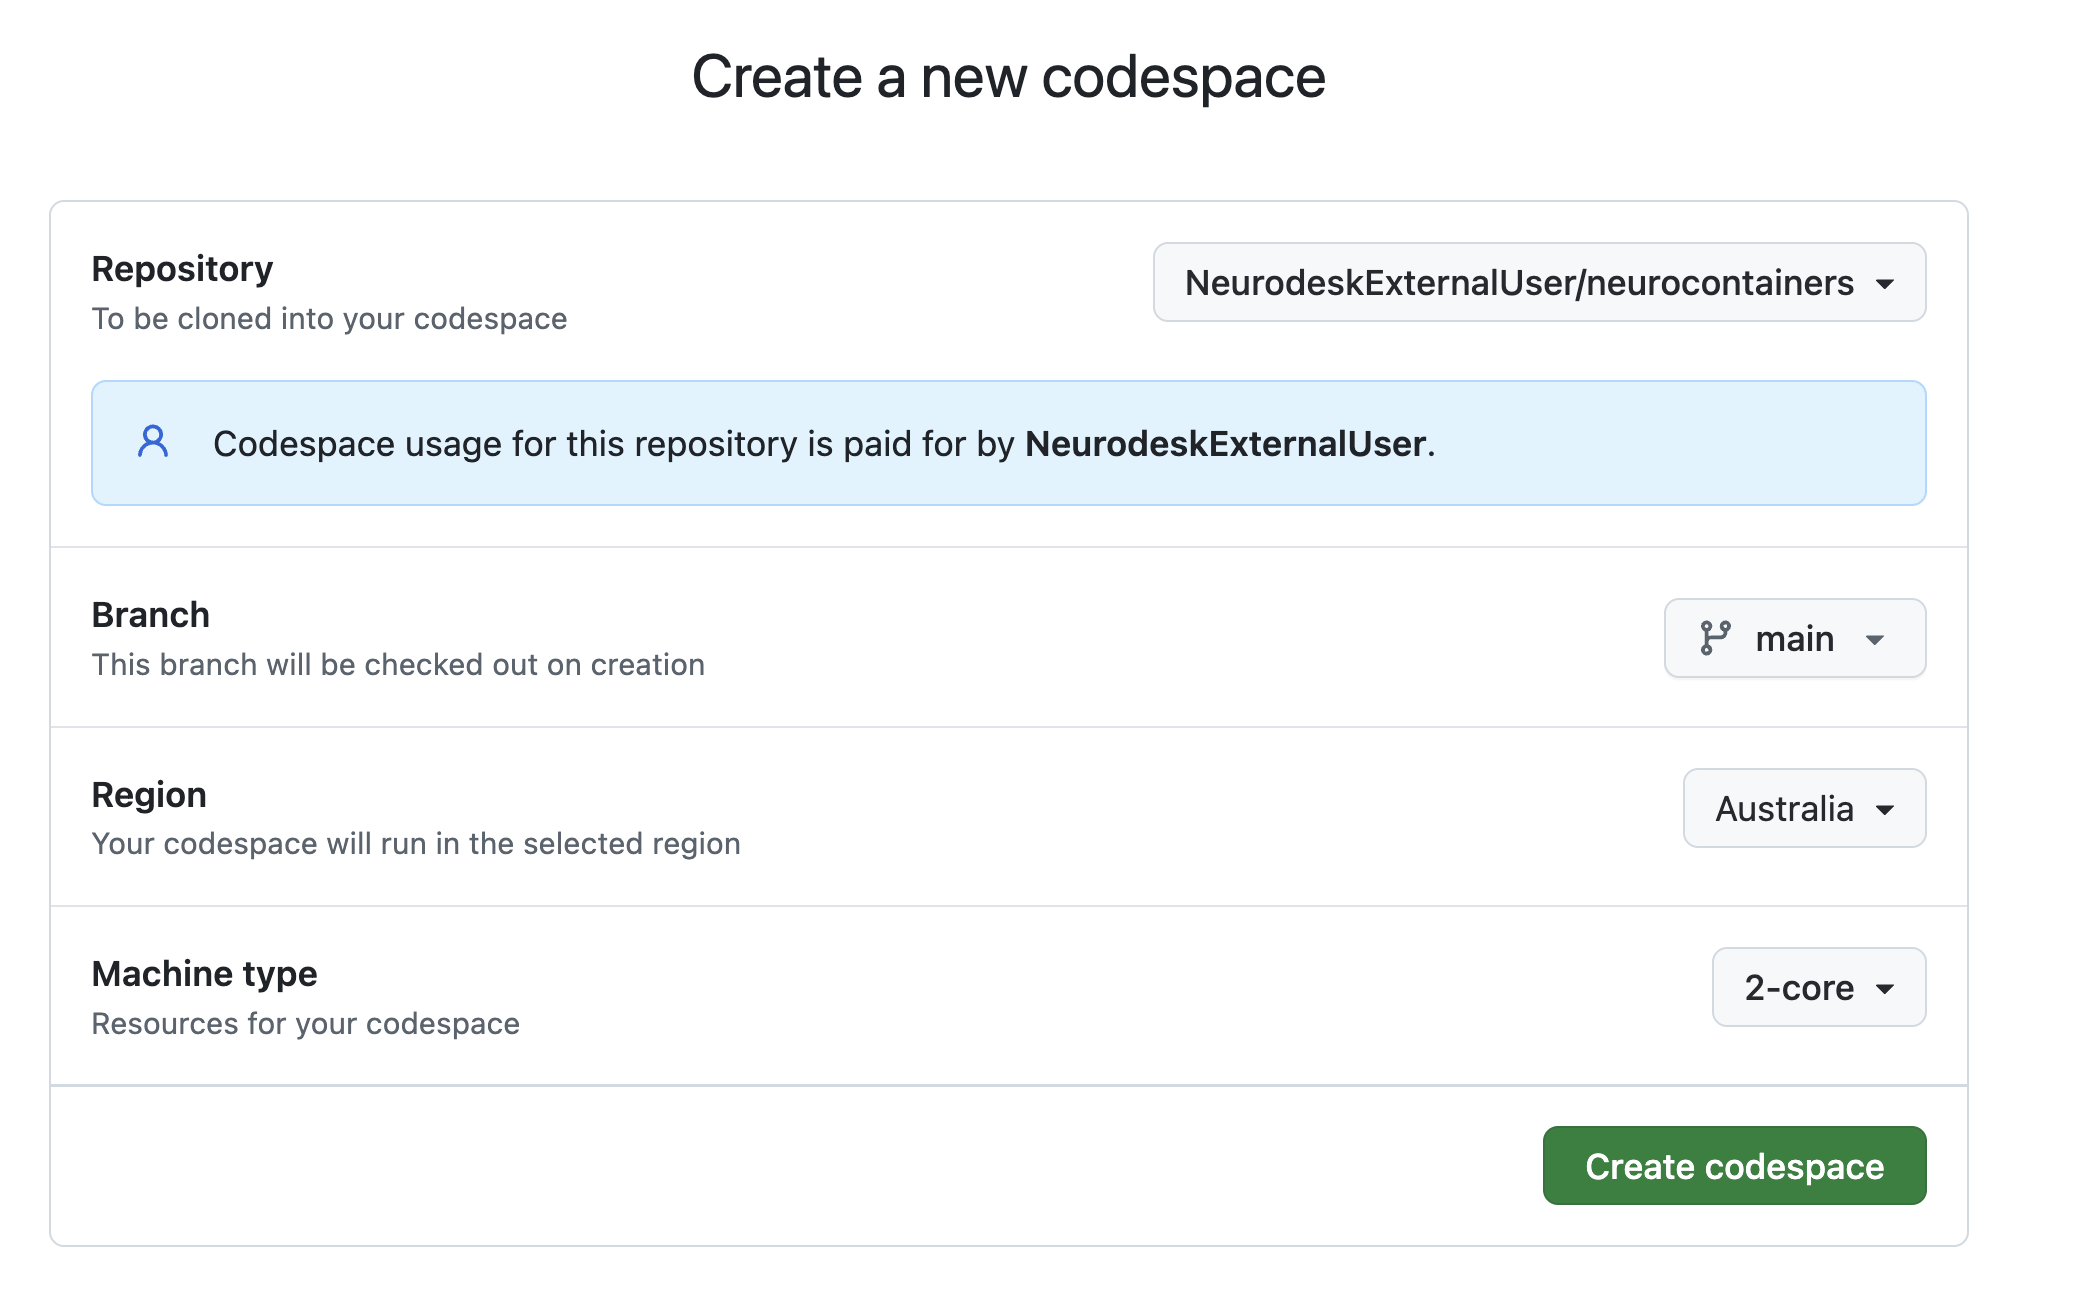
Configure your Codespace.
This opens an editable environment directly in your browser.
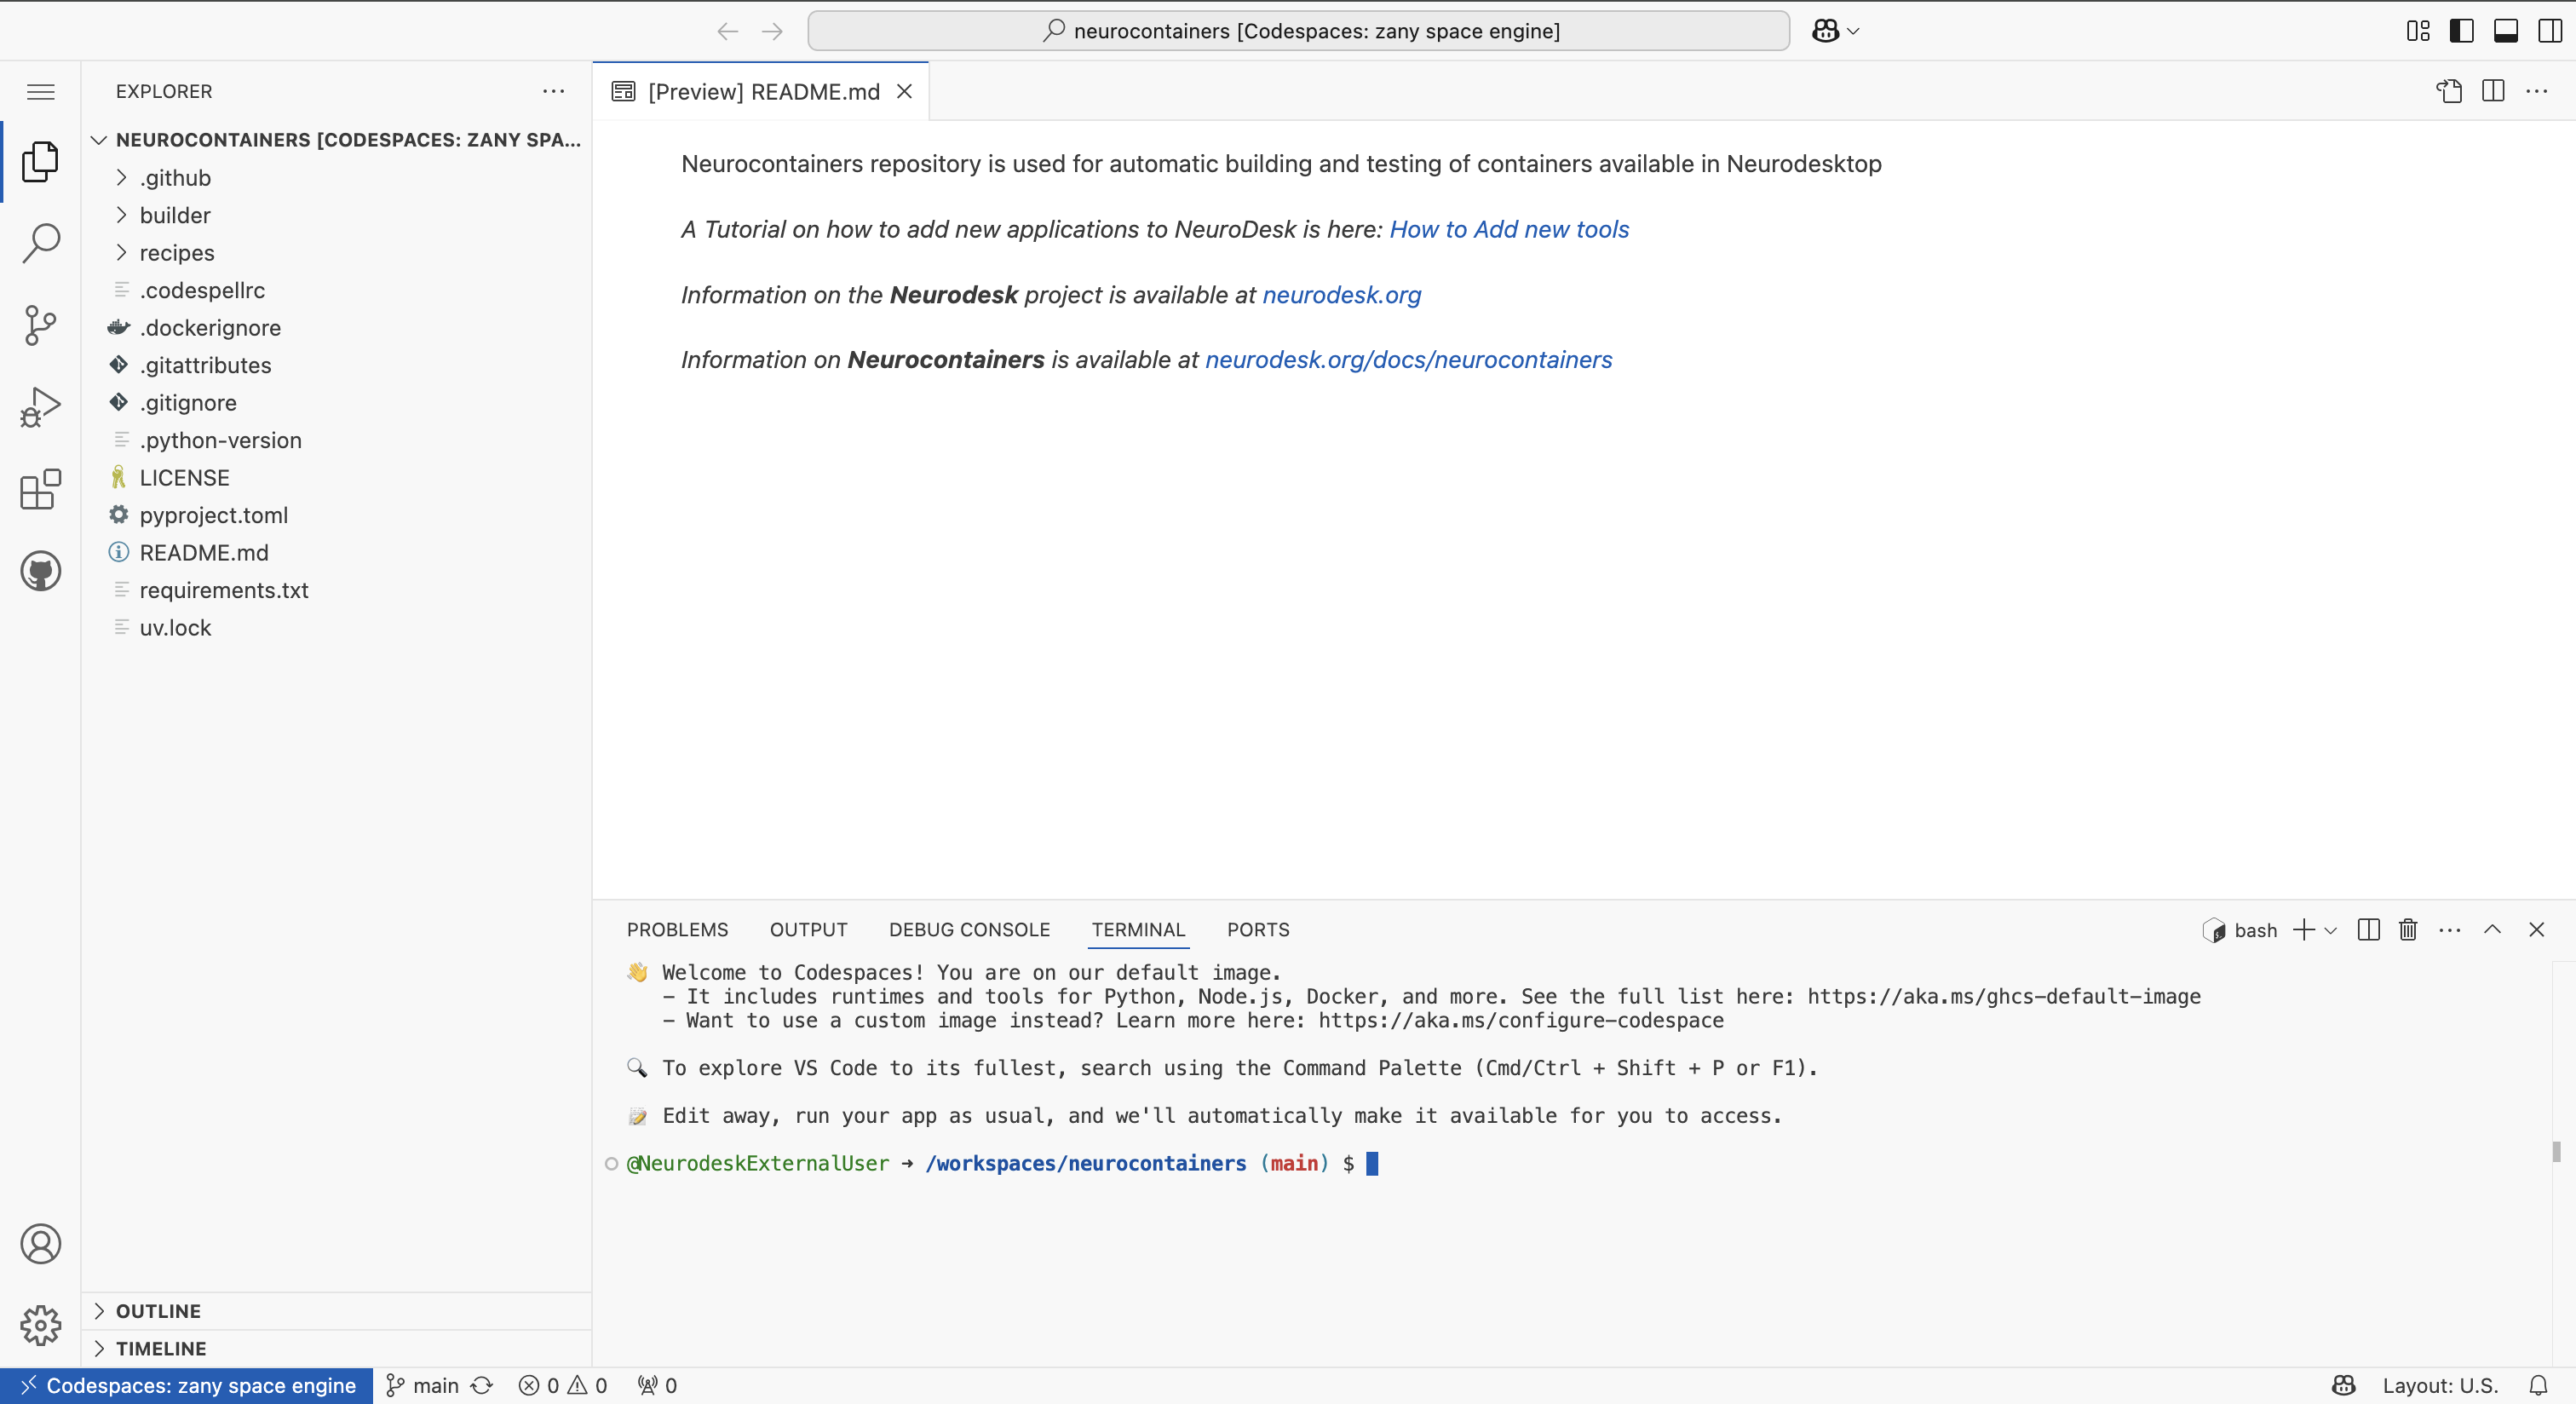
In the terminal, run the following lines to configure your codespace environment.
python3 -m venv env
source env/bin/activate
pip install -r requirements.txt
This will install a series of packages to allow you to make changes to neurocontainers.
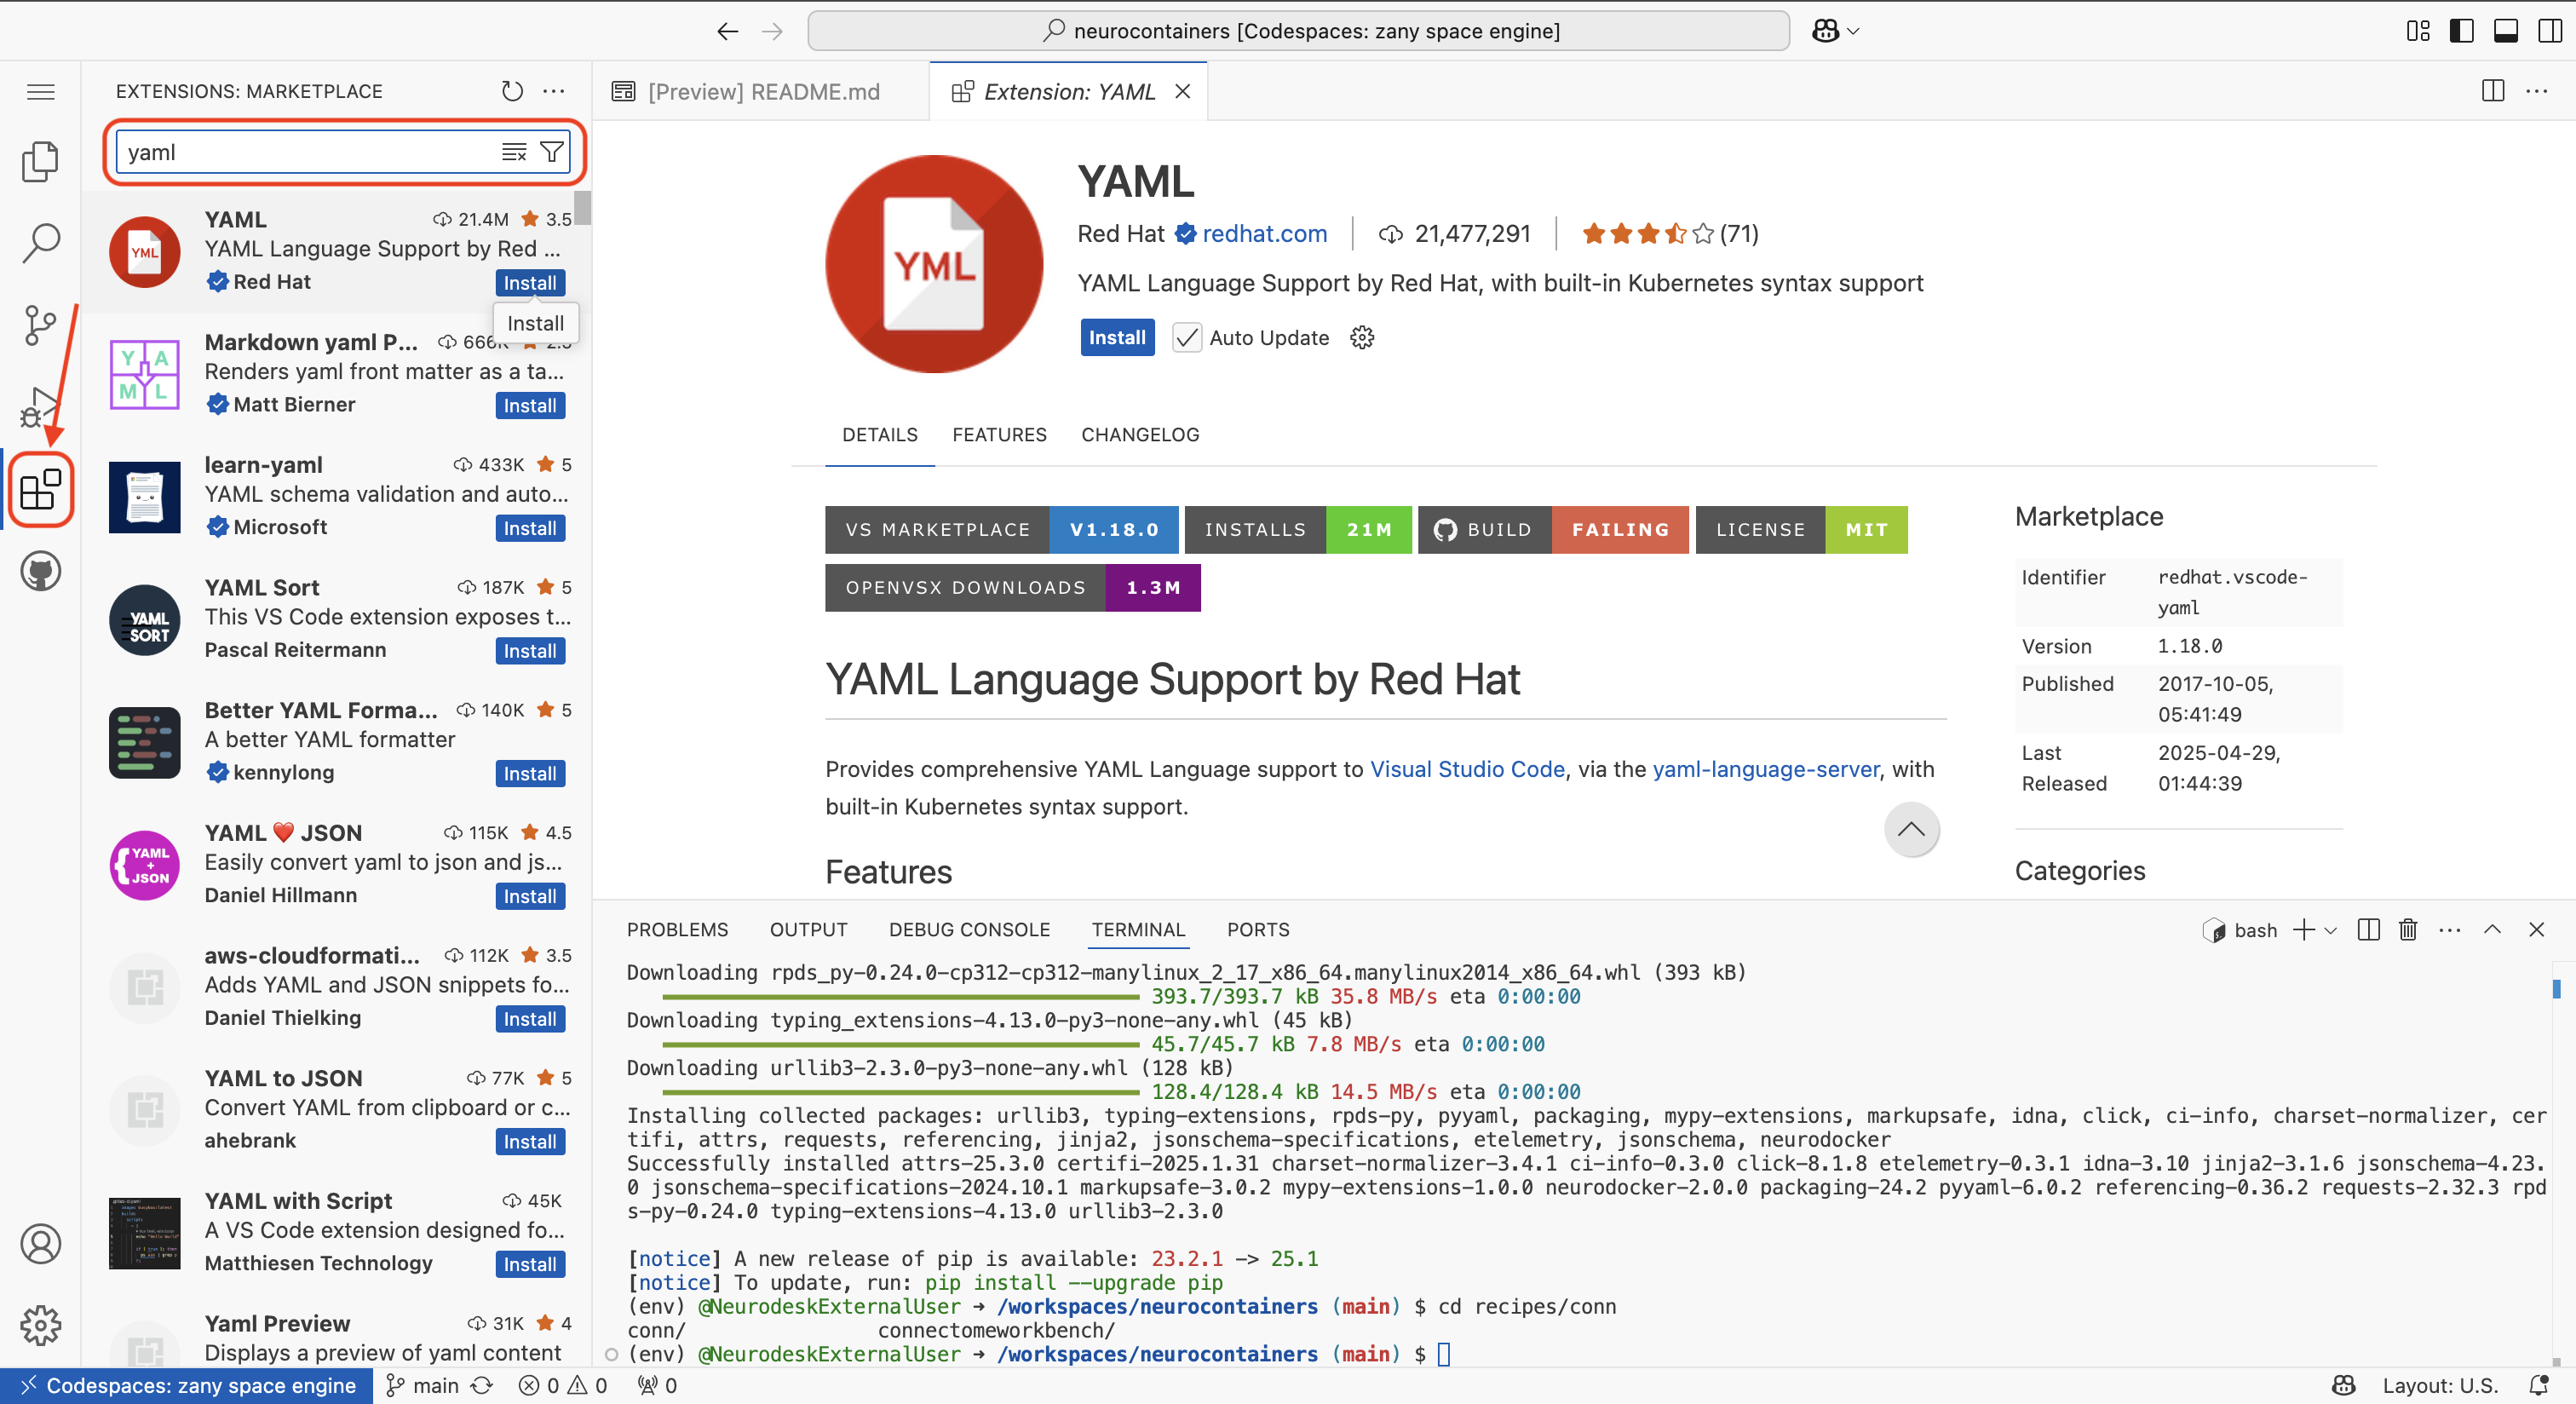
The first time you use a codespace, you will also need to download the YAML extension by navigating to the Extensions tab using icon on the left of your screen and searching for YAML. Click the install button.
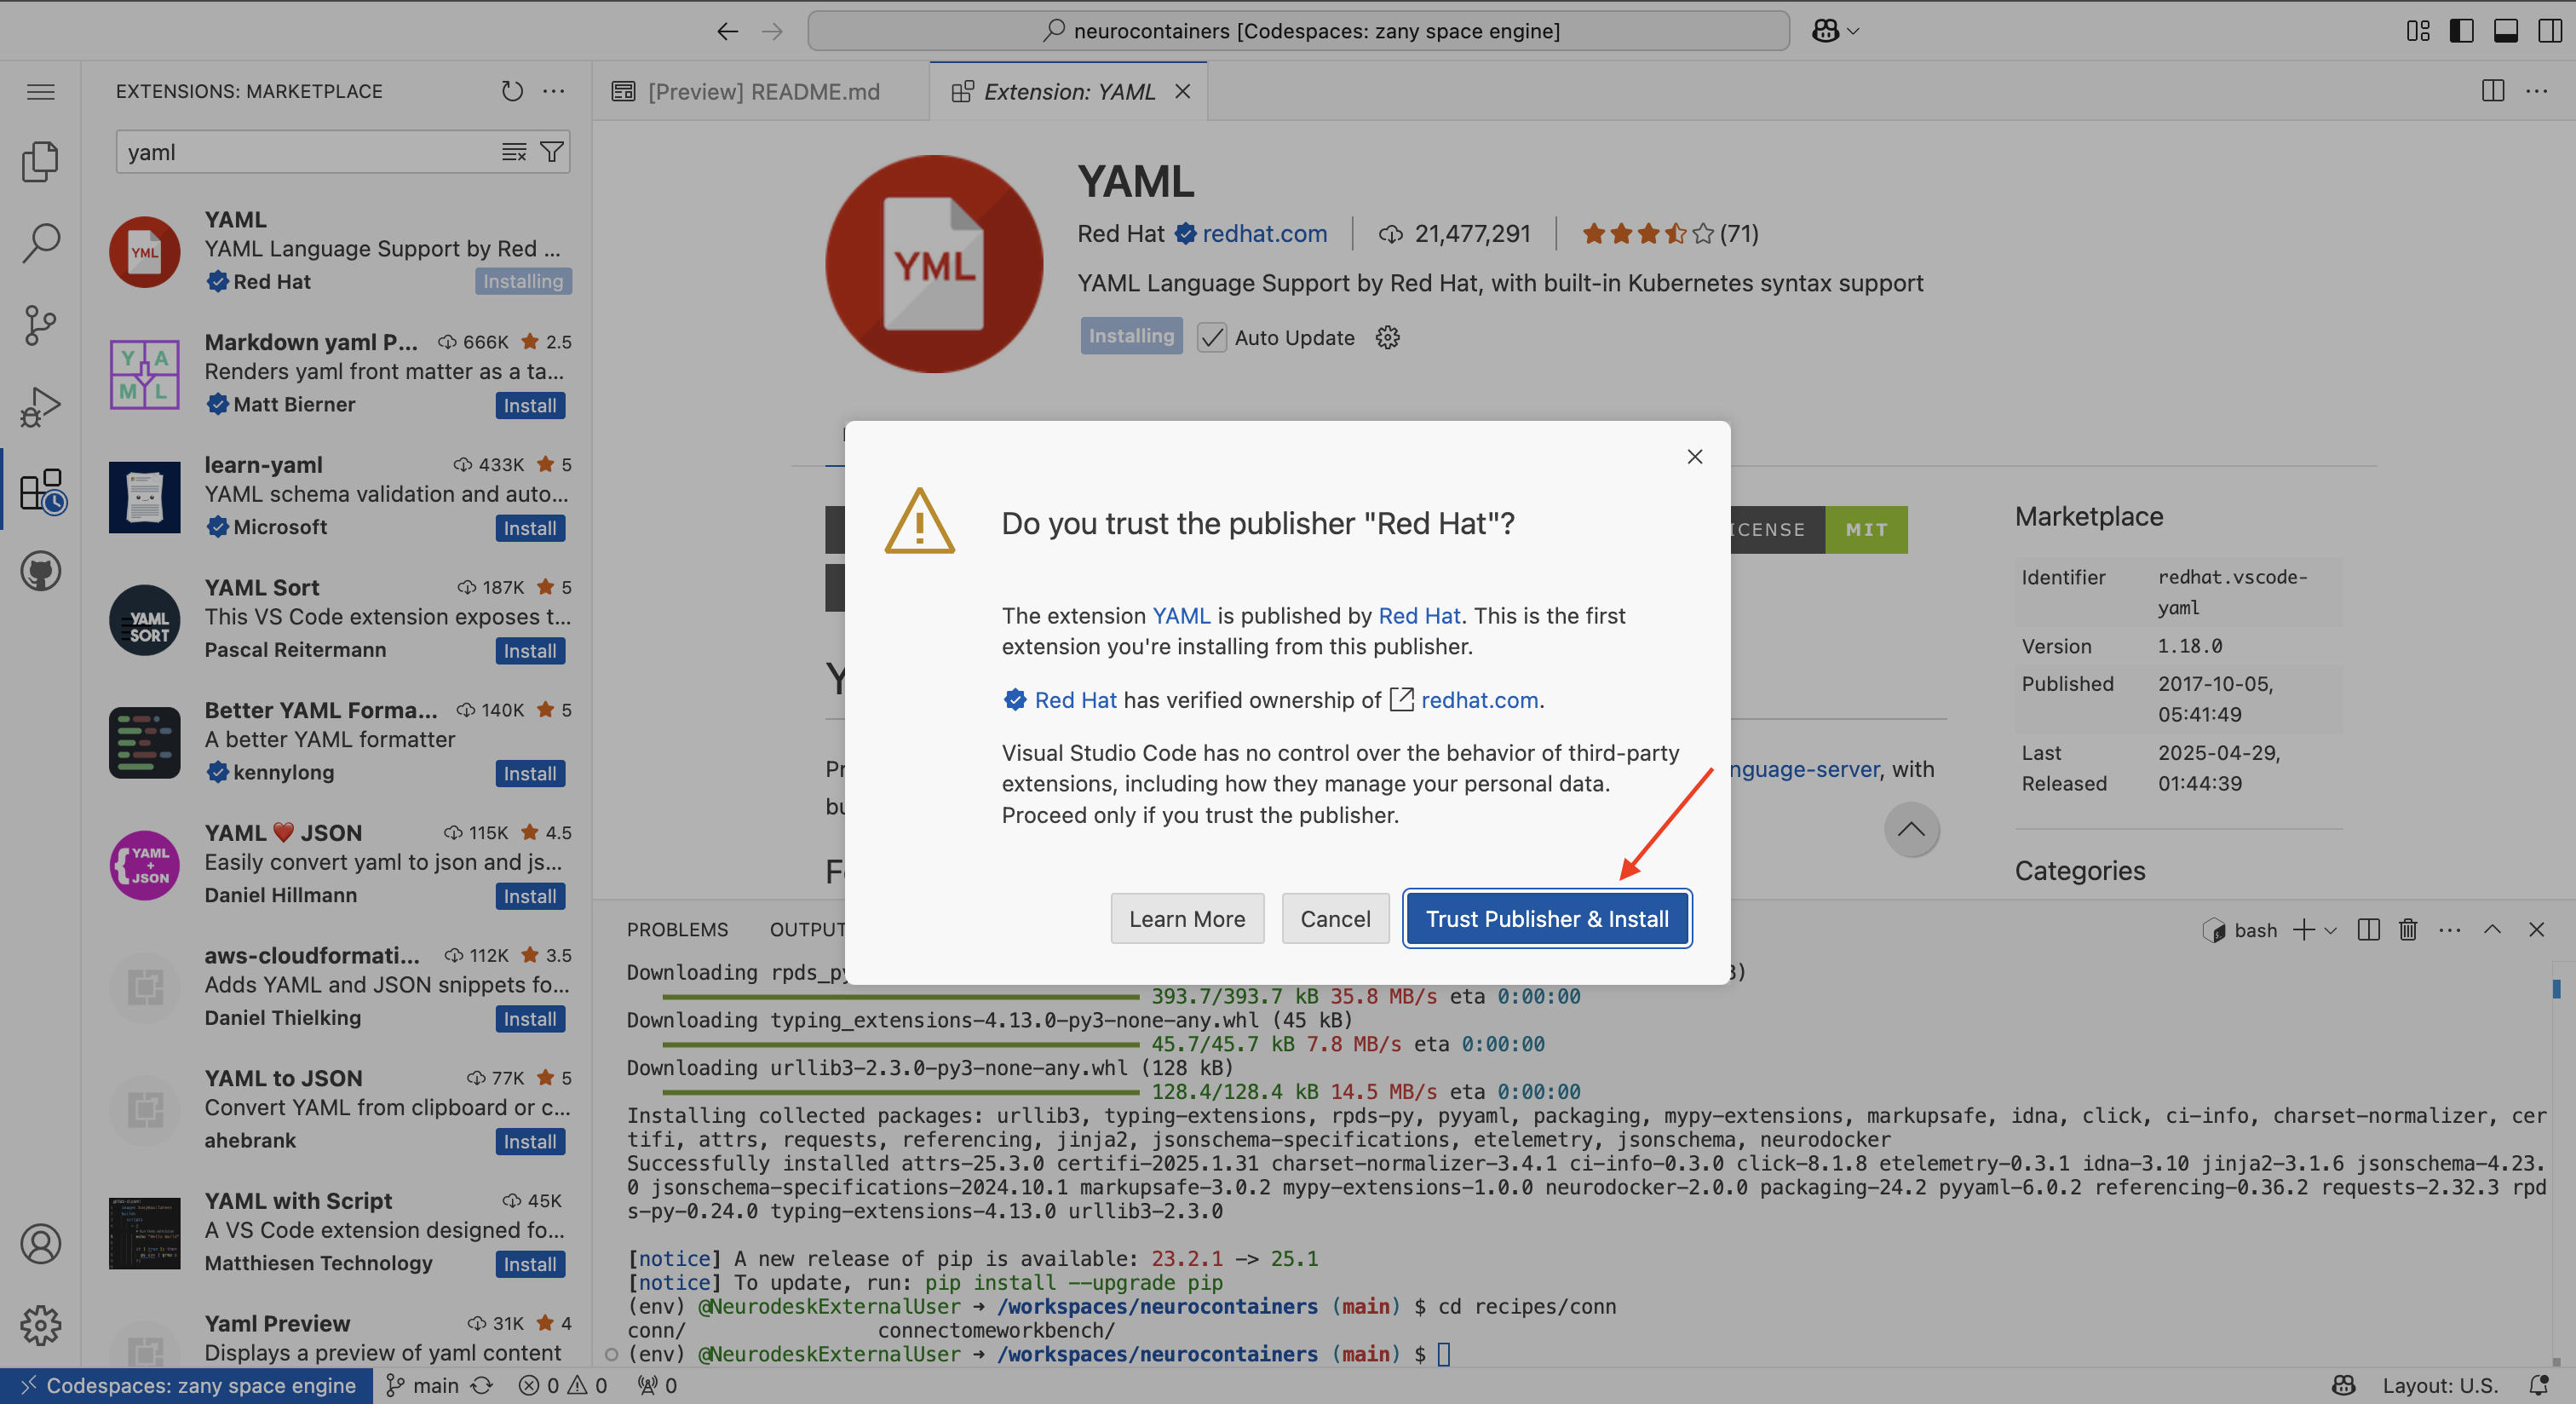
There will be a security pop-up where you will need to click “Trust Publisher & Install”
There will be another pop-up asking whether you allow the developers to collect data. You may click “Agree” or “Deny”
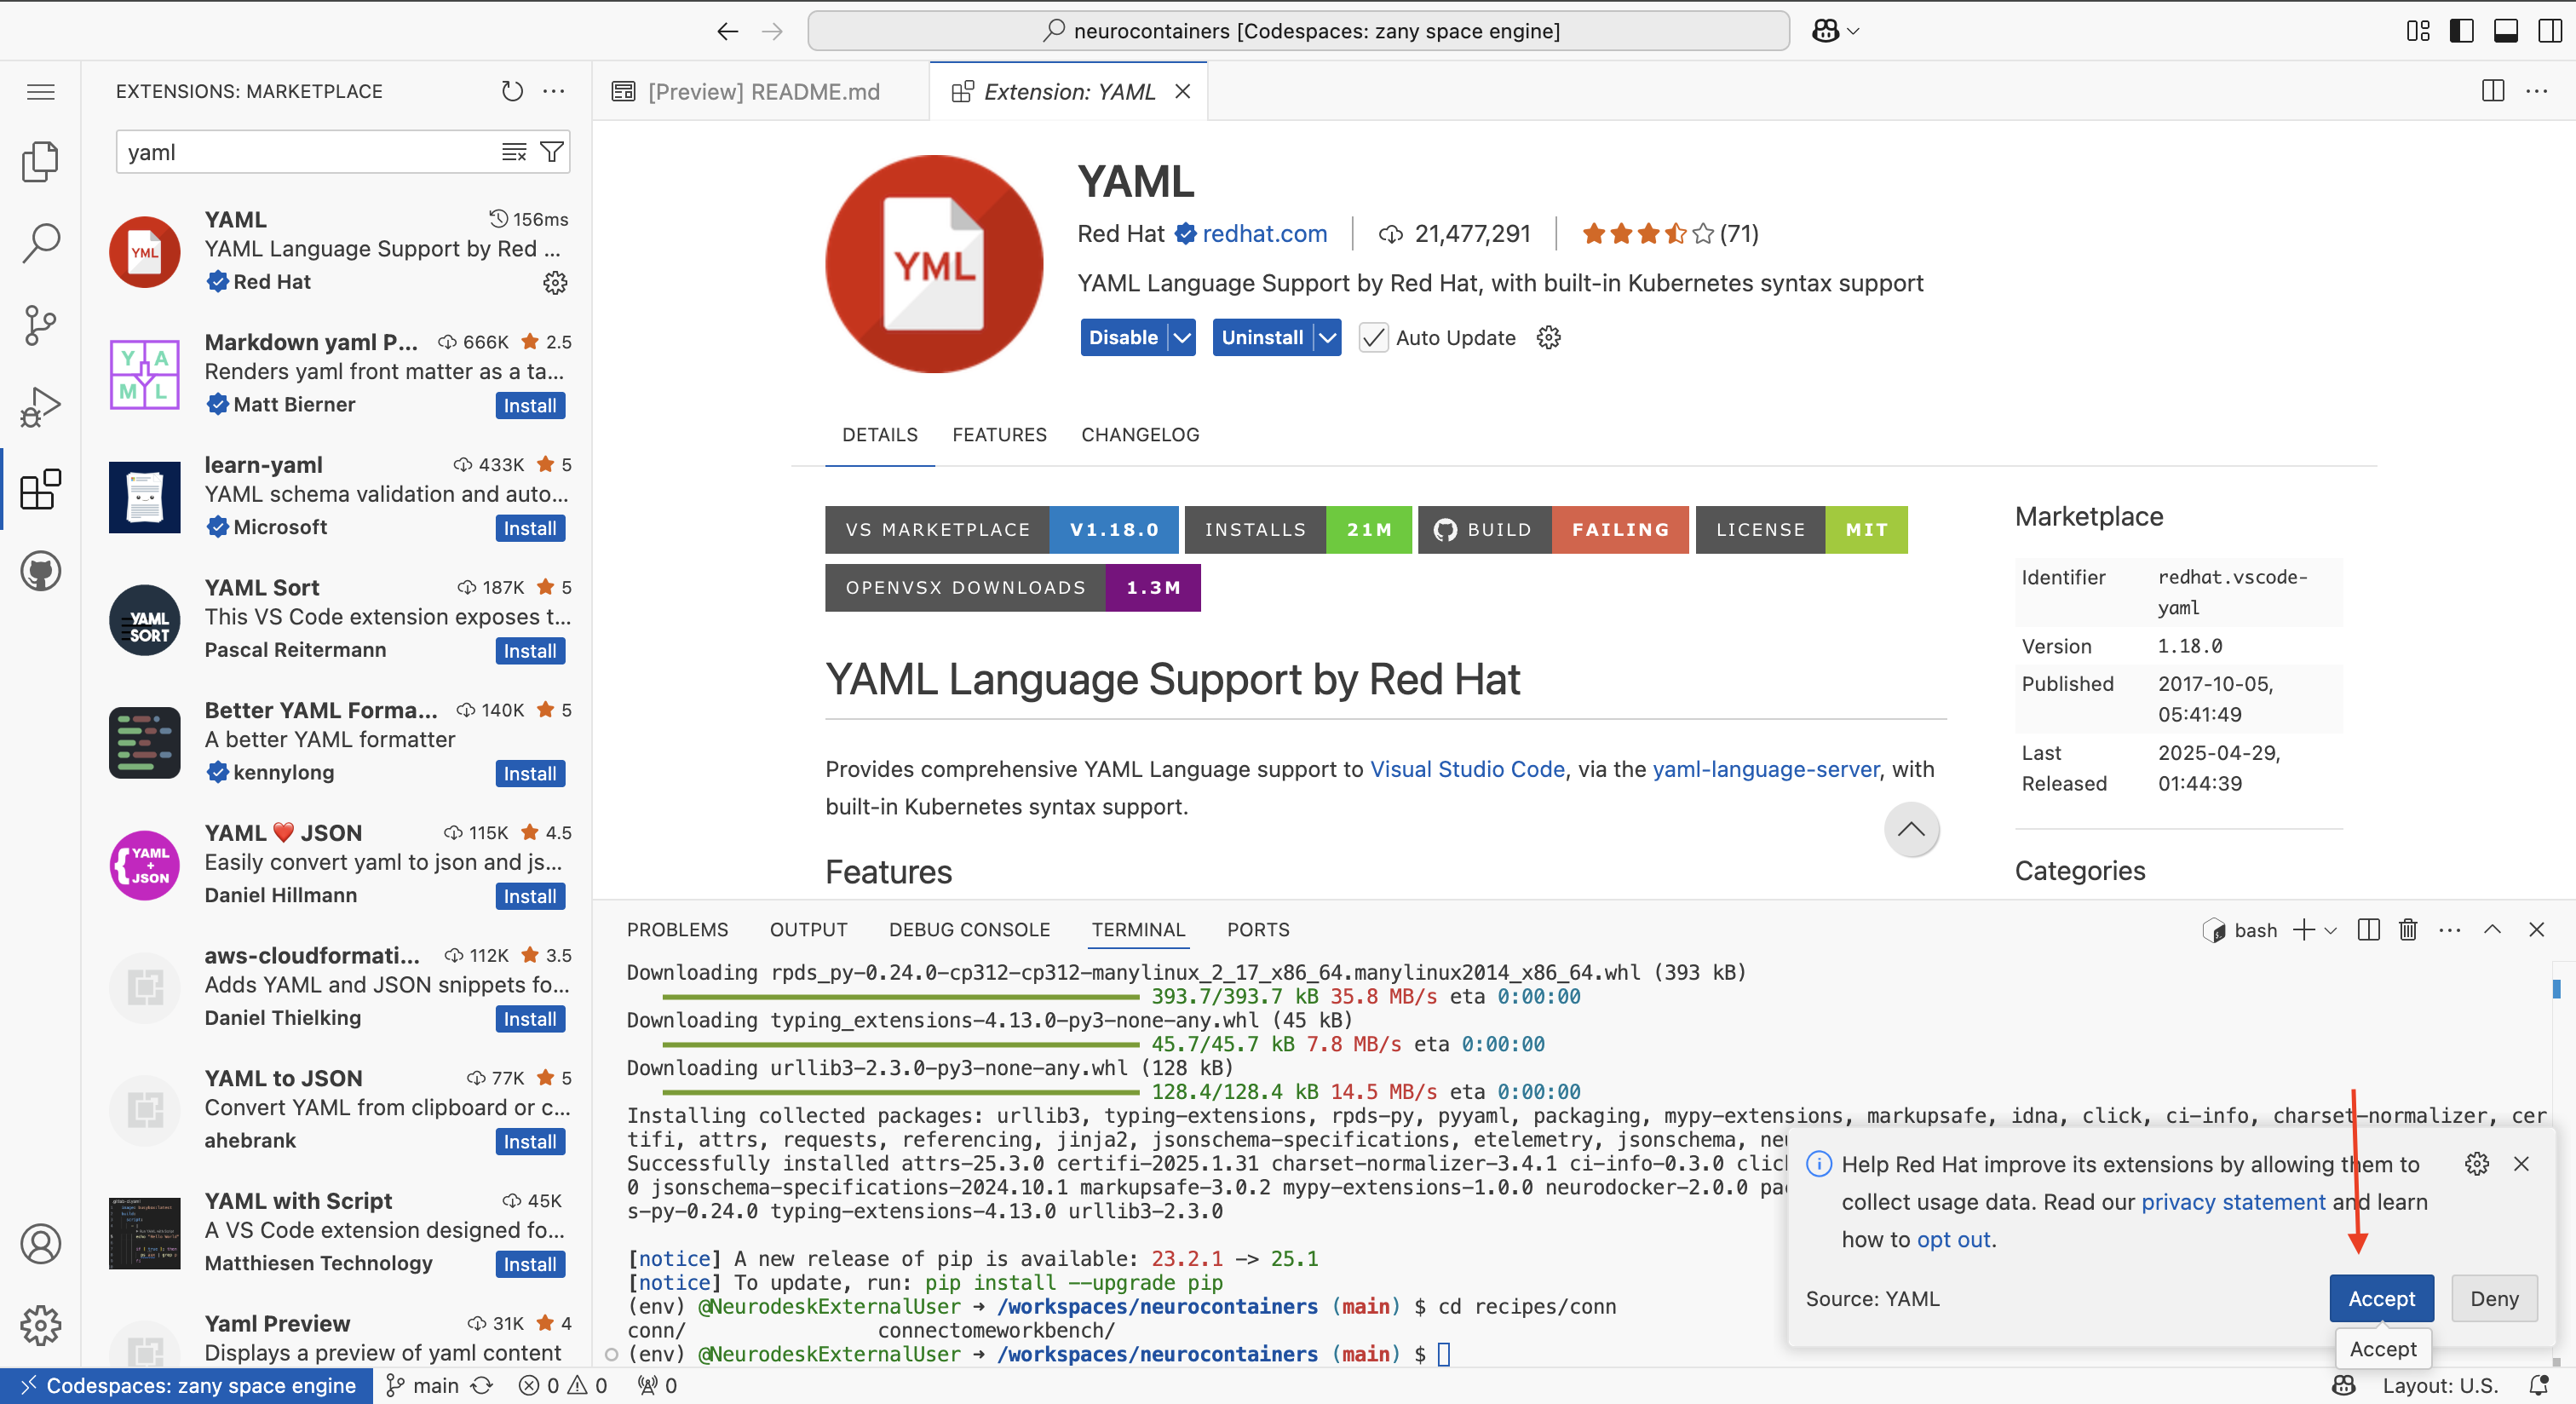
Navigate back to the Explorer tab using the icon on the left of your screen.
Using either the terminal at the bottom of your Codespace or the file browser on the left, navigate to the build.yaml file of the tool you wish to update.
Each tool has its own folder inside the recipes/ directory, and inside that folder, you will find the corresponding build.yaml file.
recipes/connectomeworkbench/.cd recipes/connectomeworkbench/ #or whichever other neurocontainer you want to update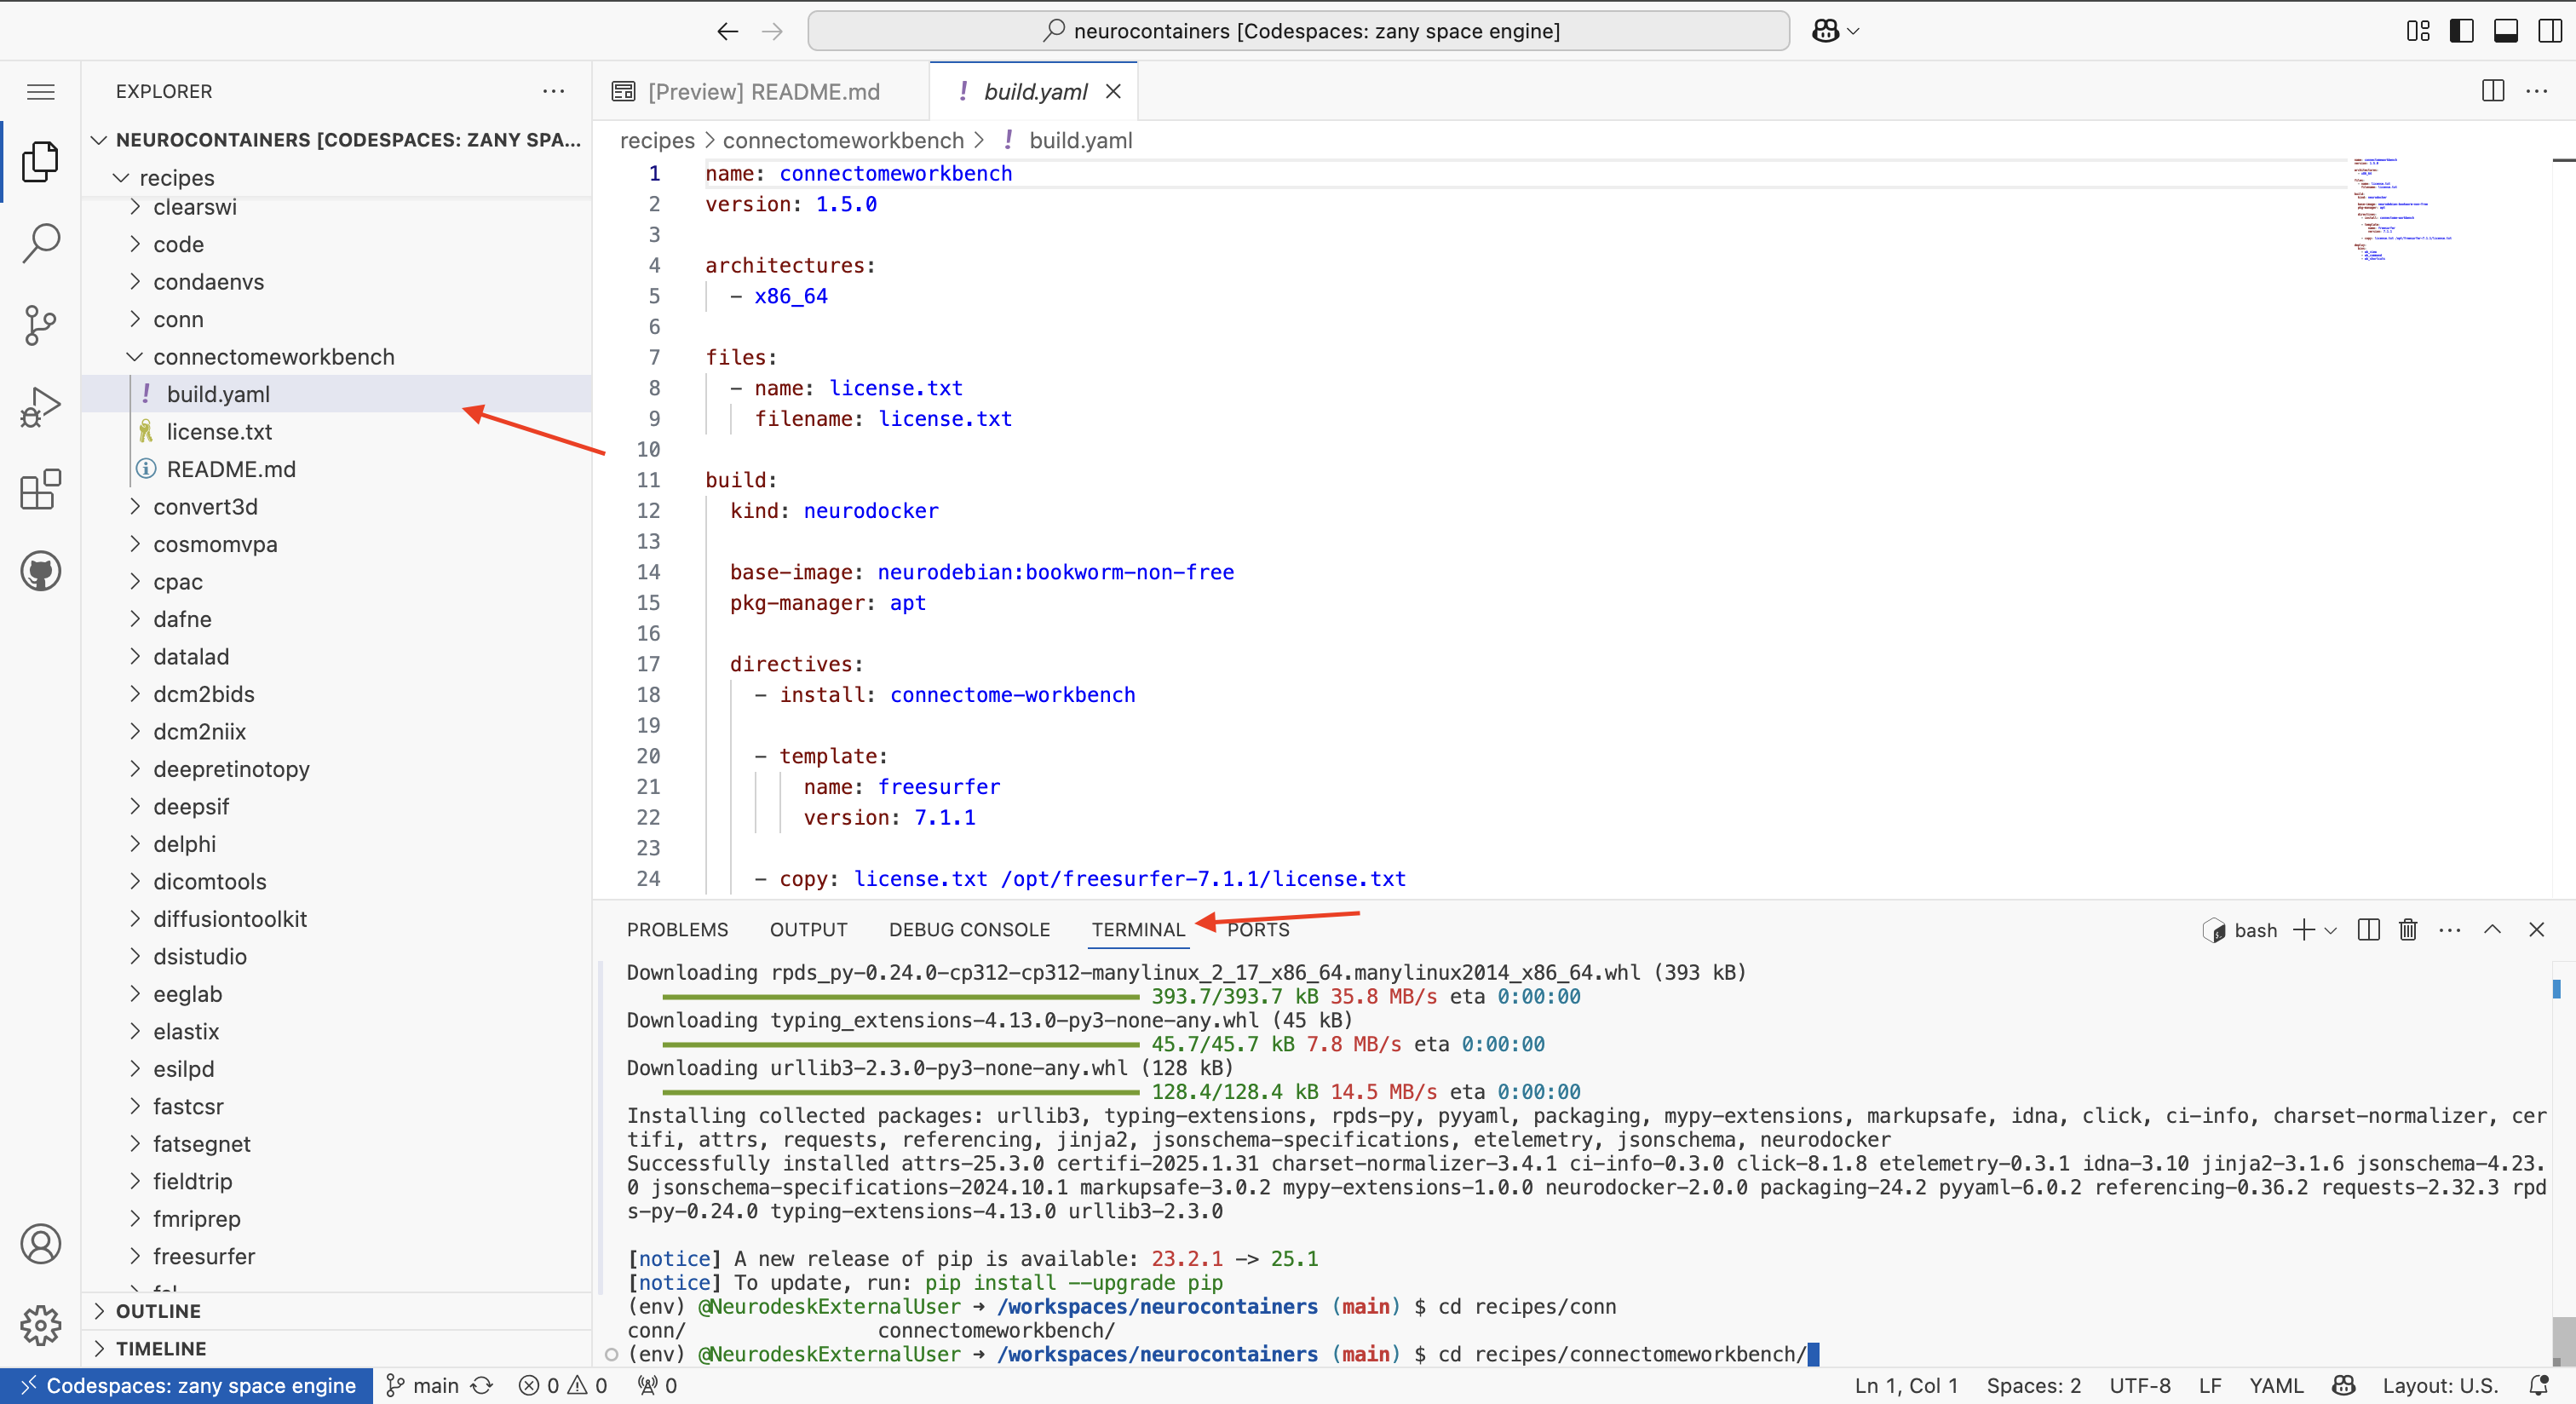
build.yamlOpen the build.yaml file. Make the necessary updates to:
In this example, when we go to the Connectome Workbench website, we can see that the latest version available is Connectome Workbench v2.0.1.
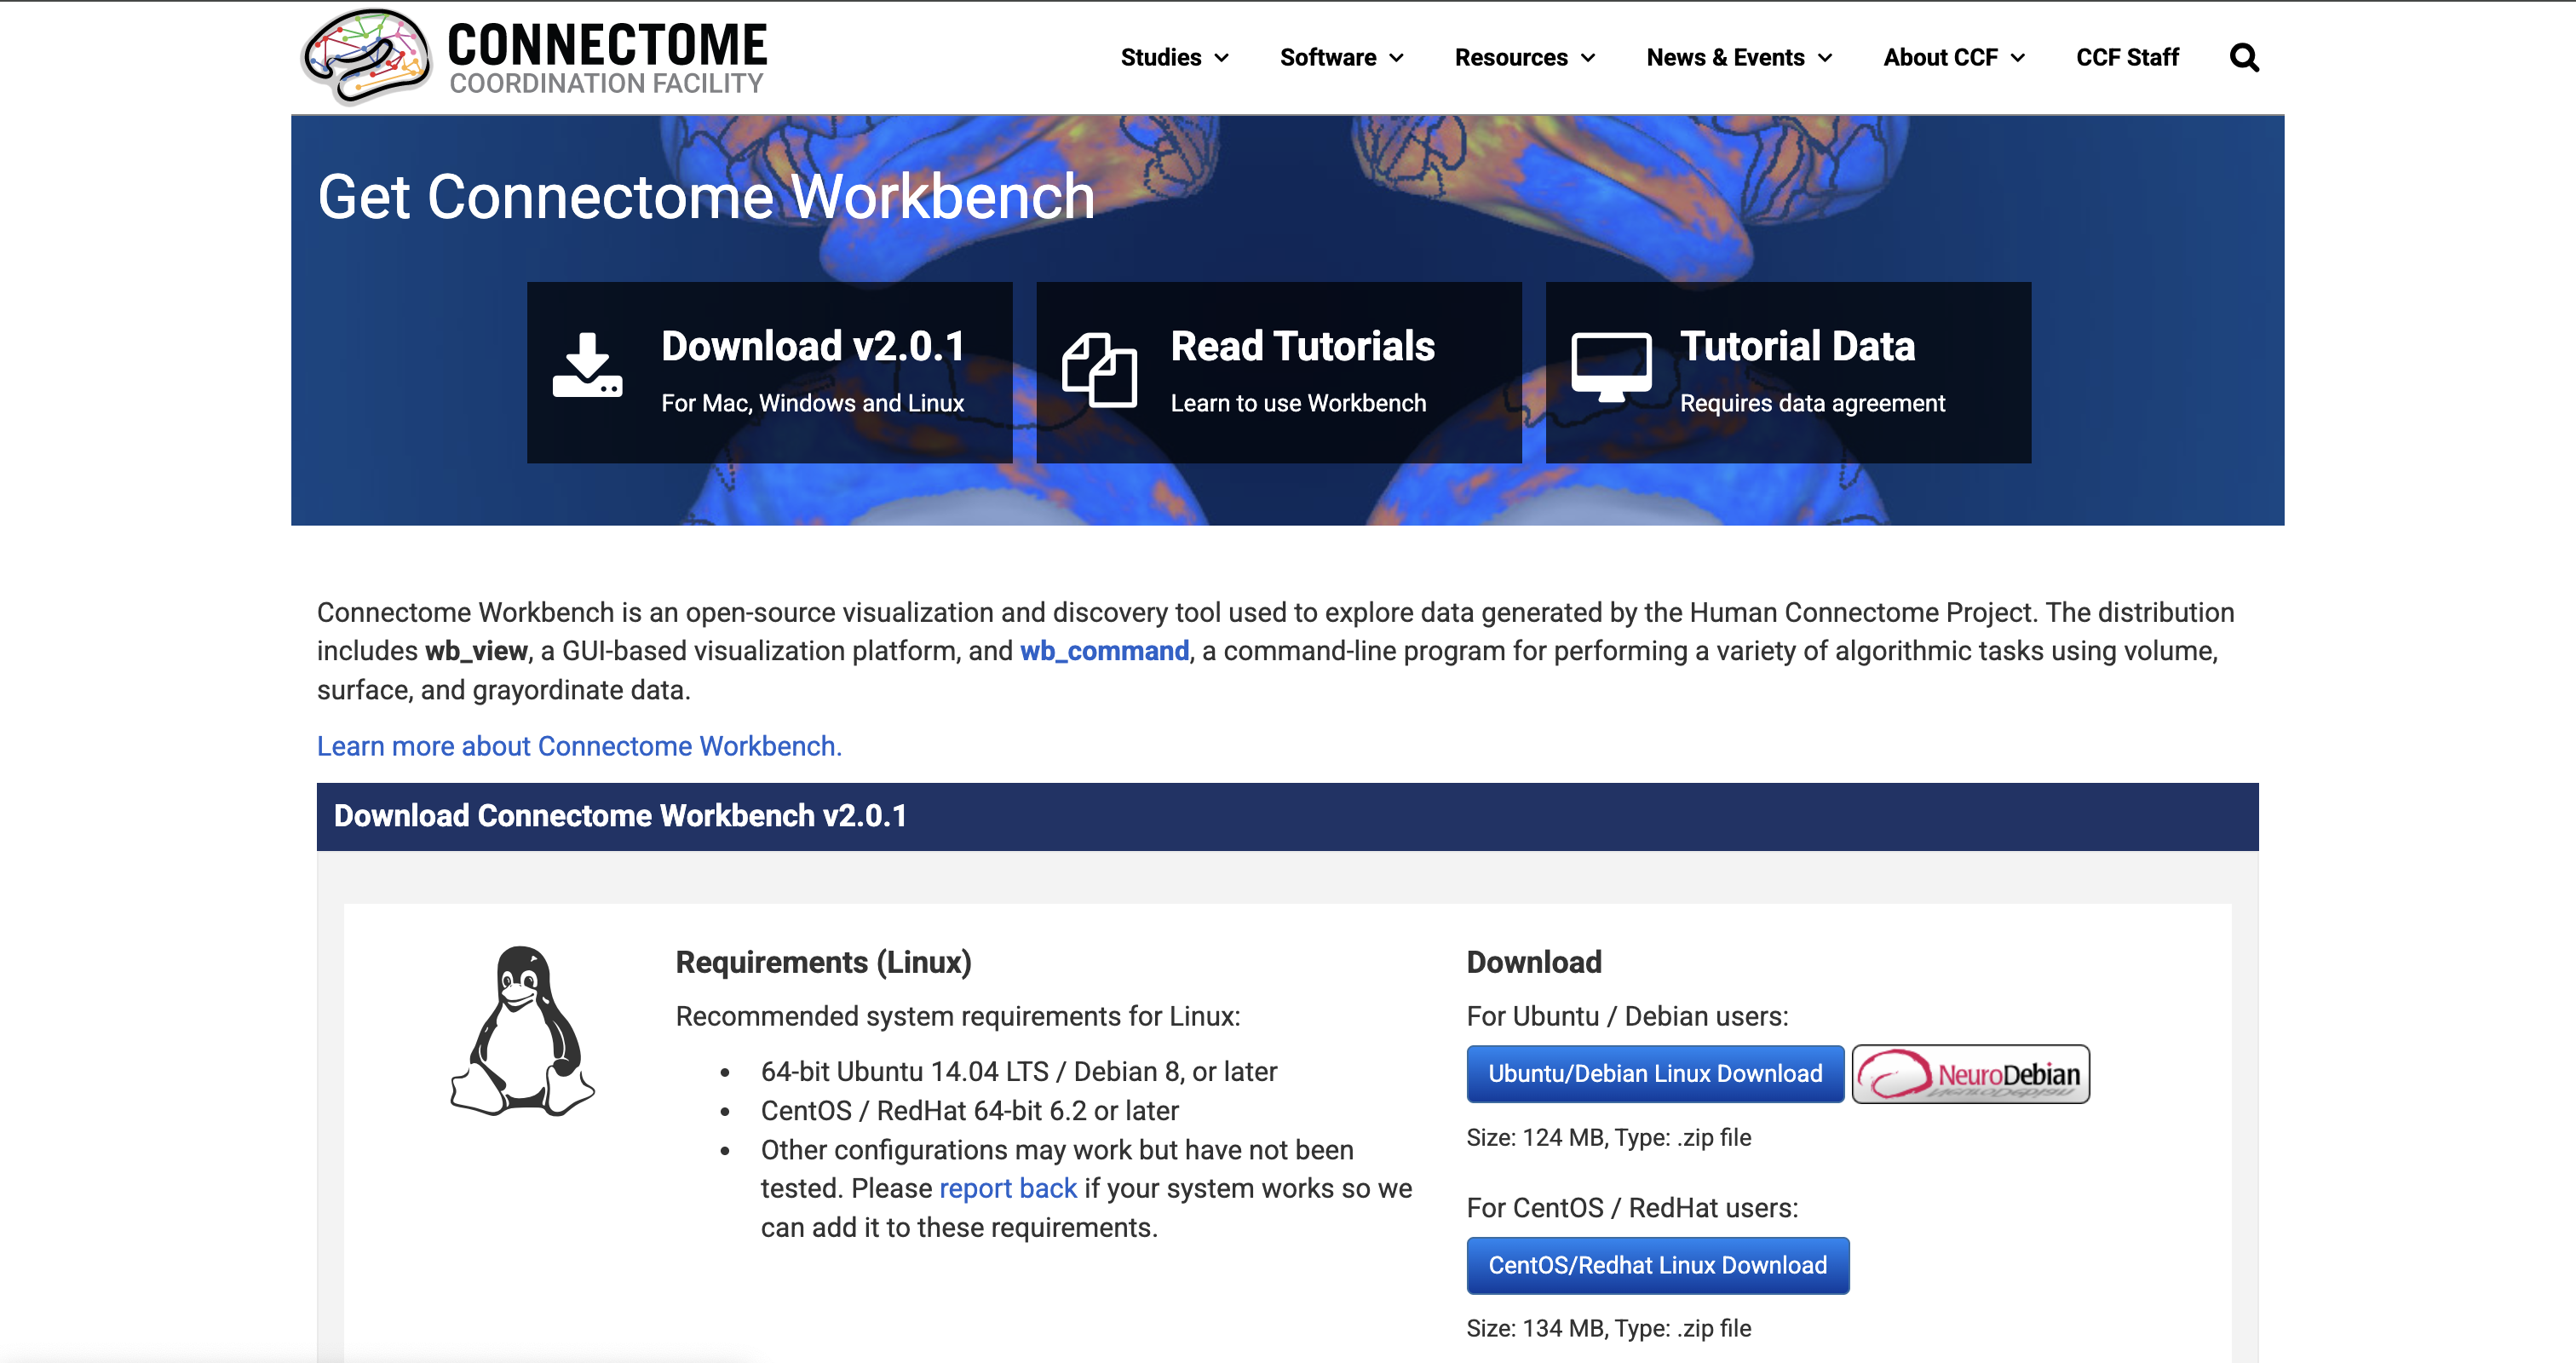
To update Neurocontainer version, simply change the version: to 2.0.1
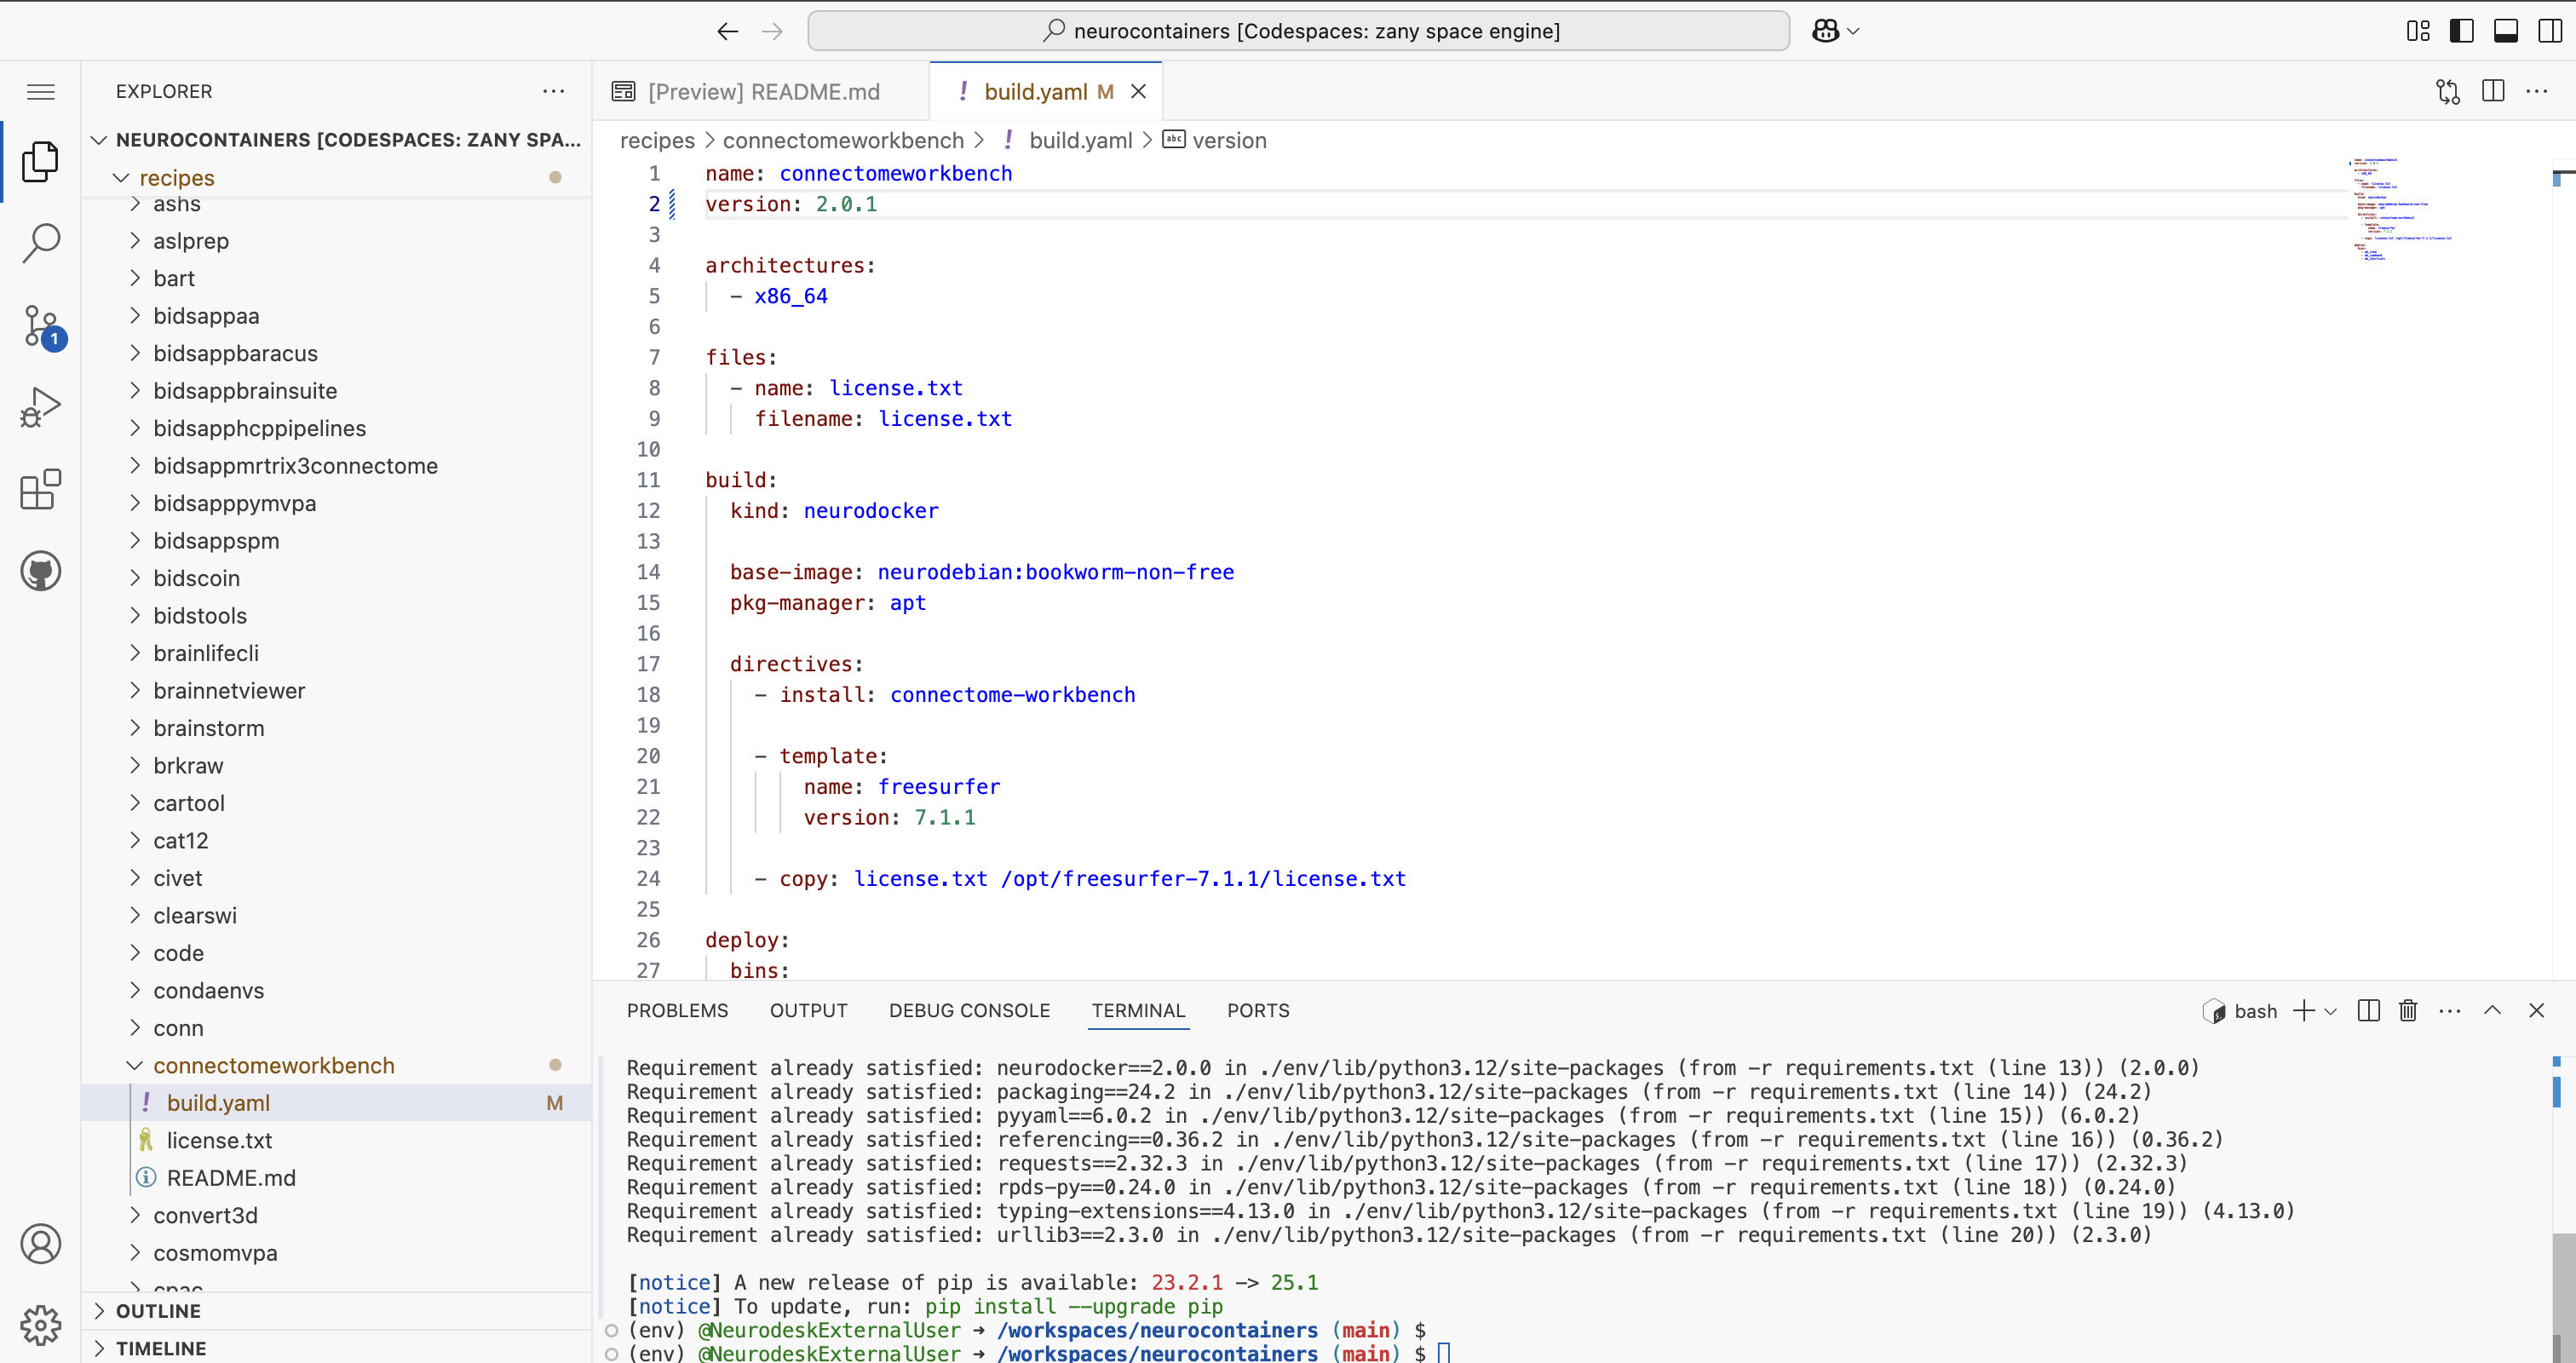
If you are unsure how to structure the build.yaml, please refer to the examples provided in the Neurocontainers builder documentation.
Once you have made your changes, save the file.
Before committing, make sure your changes are valid.
In the terminal, run:
./builder/build.py generate connectomeworkbench #Replace connectomeworkbench with the name of the folder you updated

#This second step can take some time
./builder/build.py generate connectomeworkbench --recreate --build --test #Replace connectomeworkbench with the name of the folder you updated
This script will:
build.yamlYou will be able to see the progress for each of the building steps.

If there are errors, correct them before proceeding.
Once you see Docker image built successfully at connectomeworkbench:2.0.1, you are ready to commit and push your changes.
Once you have validated your build.yaml, it’s time to save and upload your work.
In the terminal:
git statusto check which files were changed.
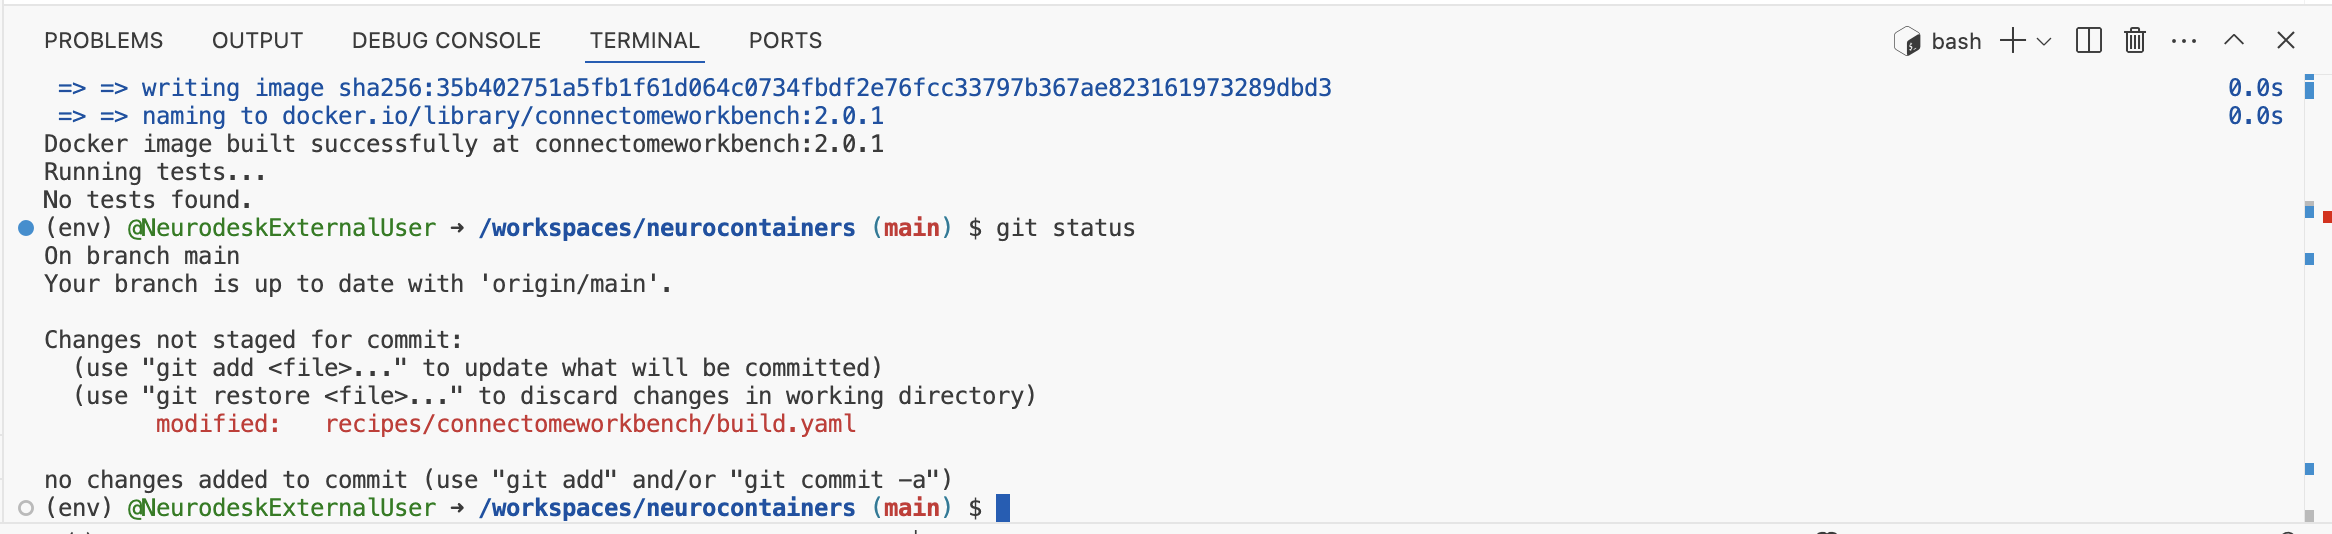
If only this reflects the changes you’ve made, then stage, commit, and push your changes:
git add recipes/connectomeworkbench/build.yaml #Replace connectomeworkbench with the name of the folder you updated
git commit -m "Update connectomeworkbench container: updated version 2.0.1" #Adapt commit message
git push
Make sure your commit message is clear and descriptive, for example:
Update Connectome Workbench container to version 1.5.0 Adjust the commit message based on the updates you made to the neurocontainer.
After pushing your changes:
neurodesk/neurocontainers:main”.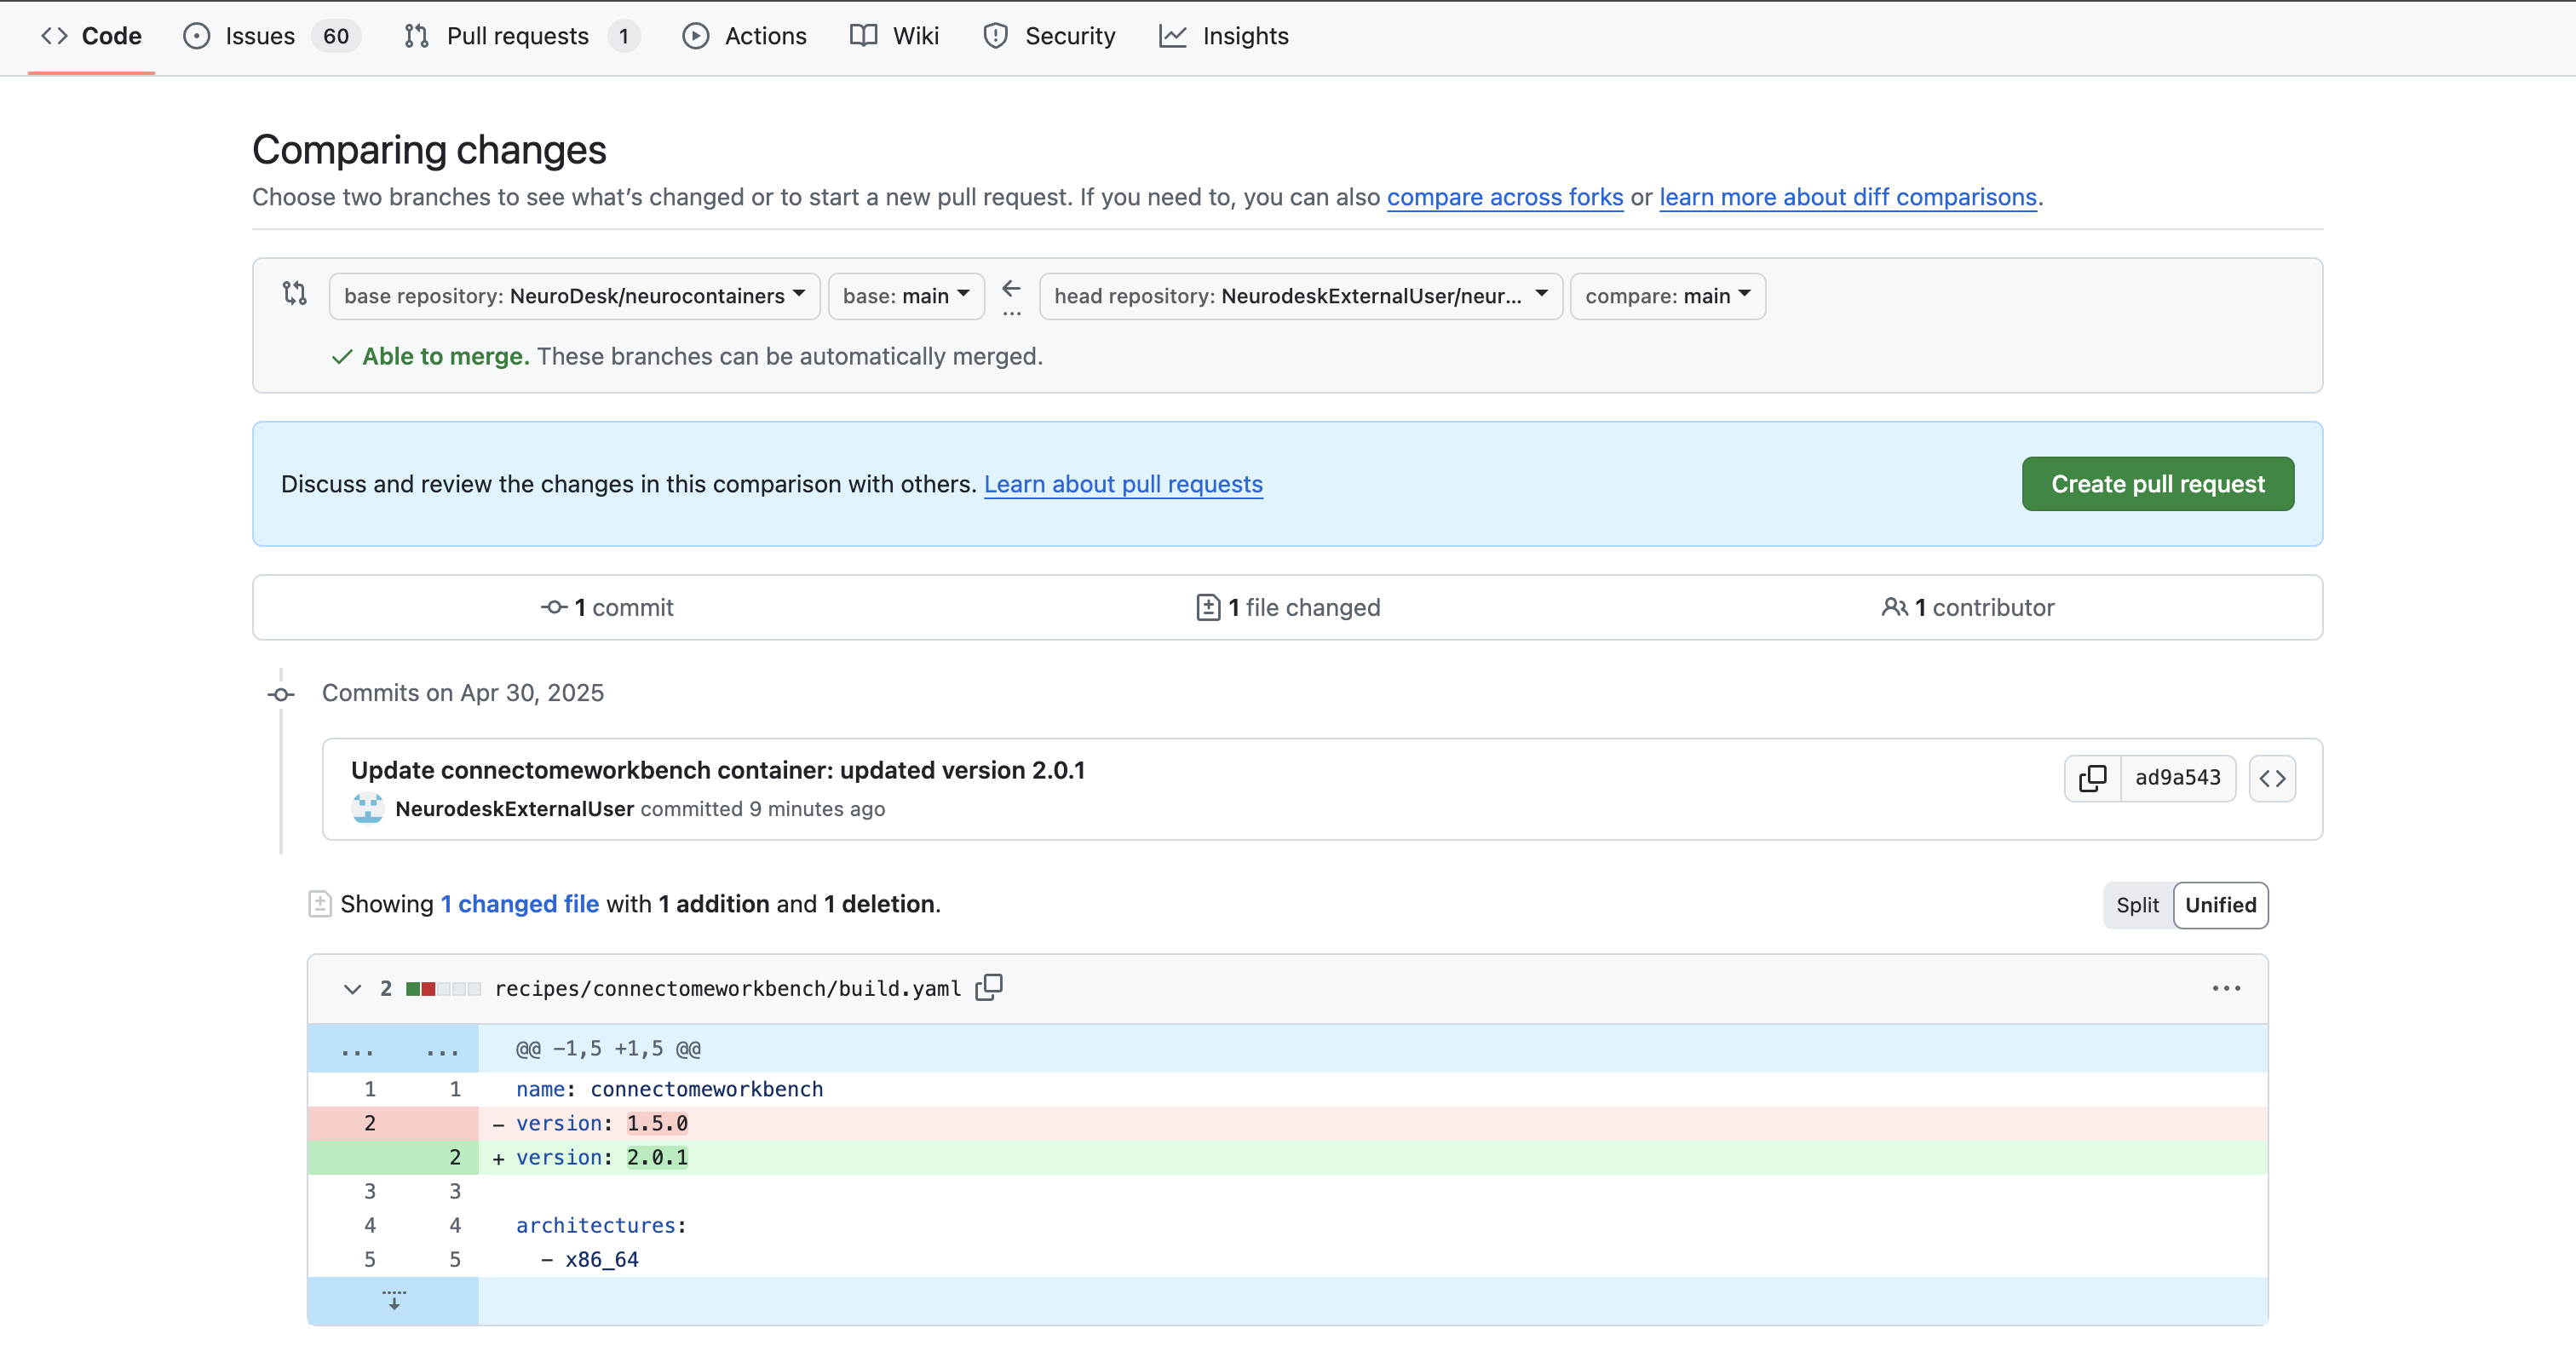
click on Contribute > Open pull request.
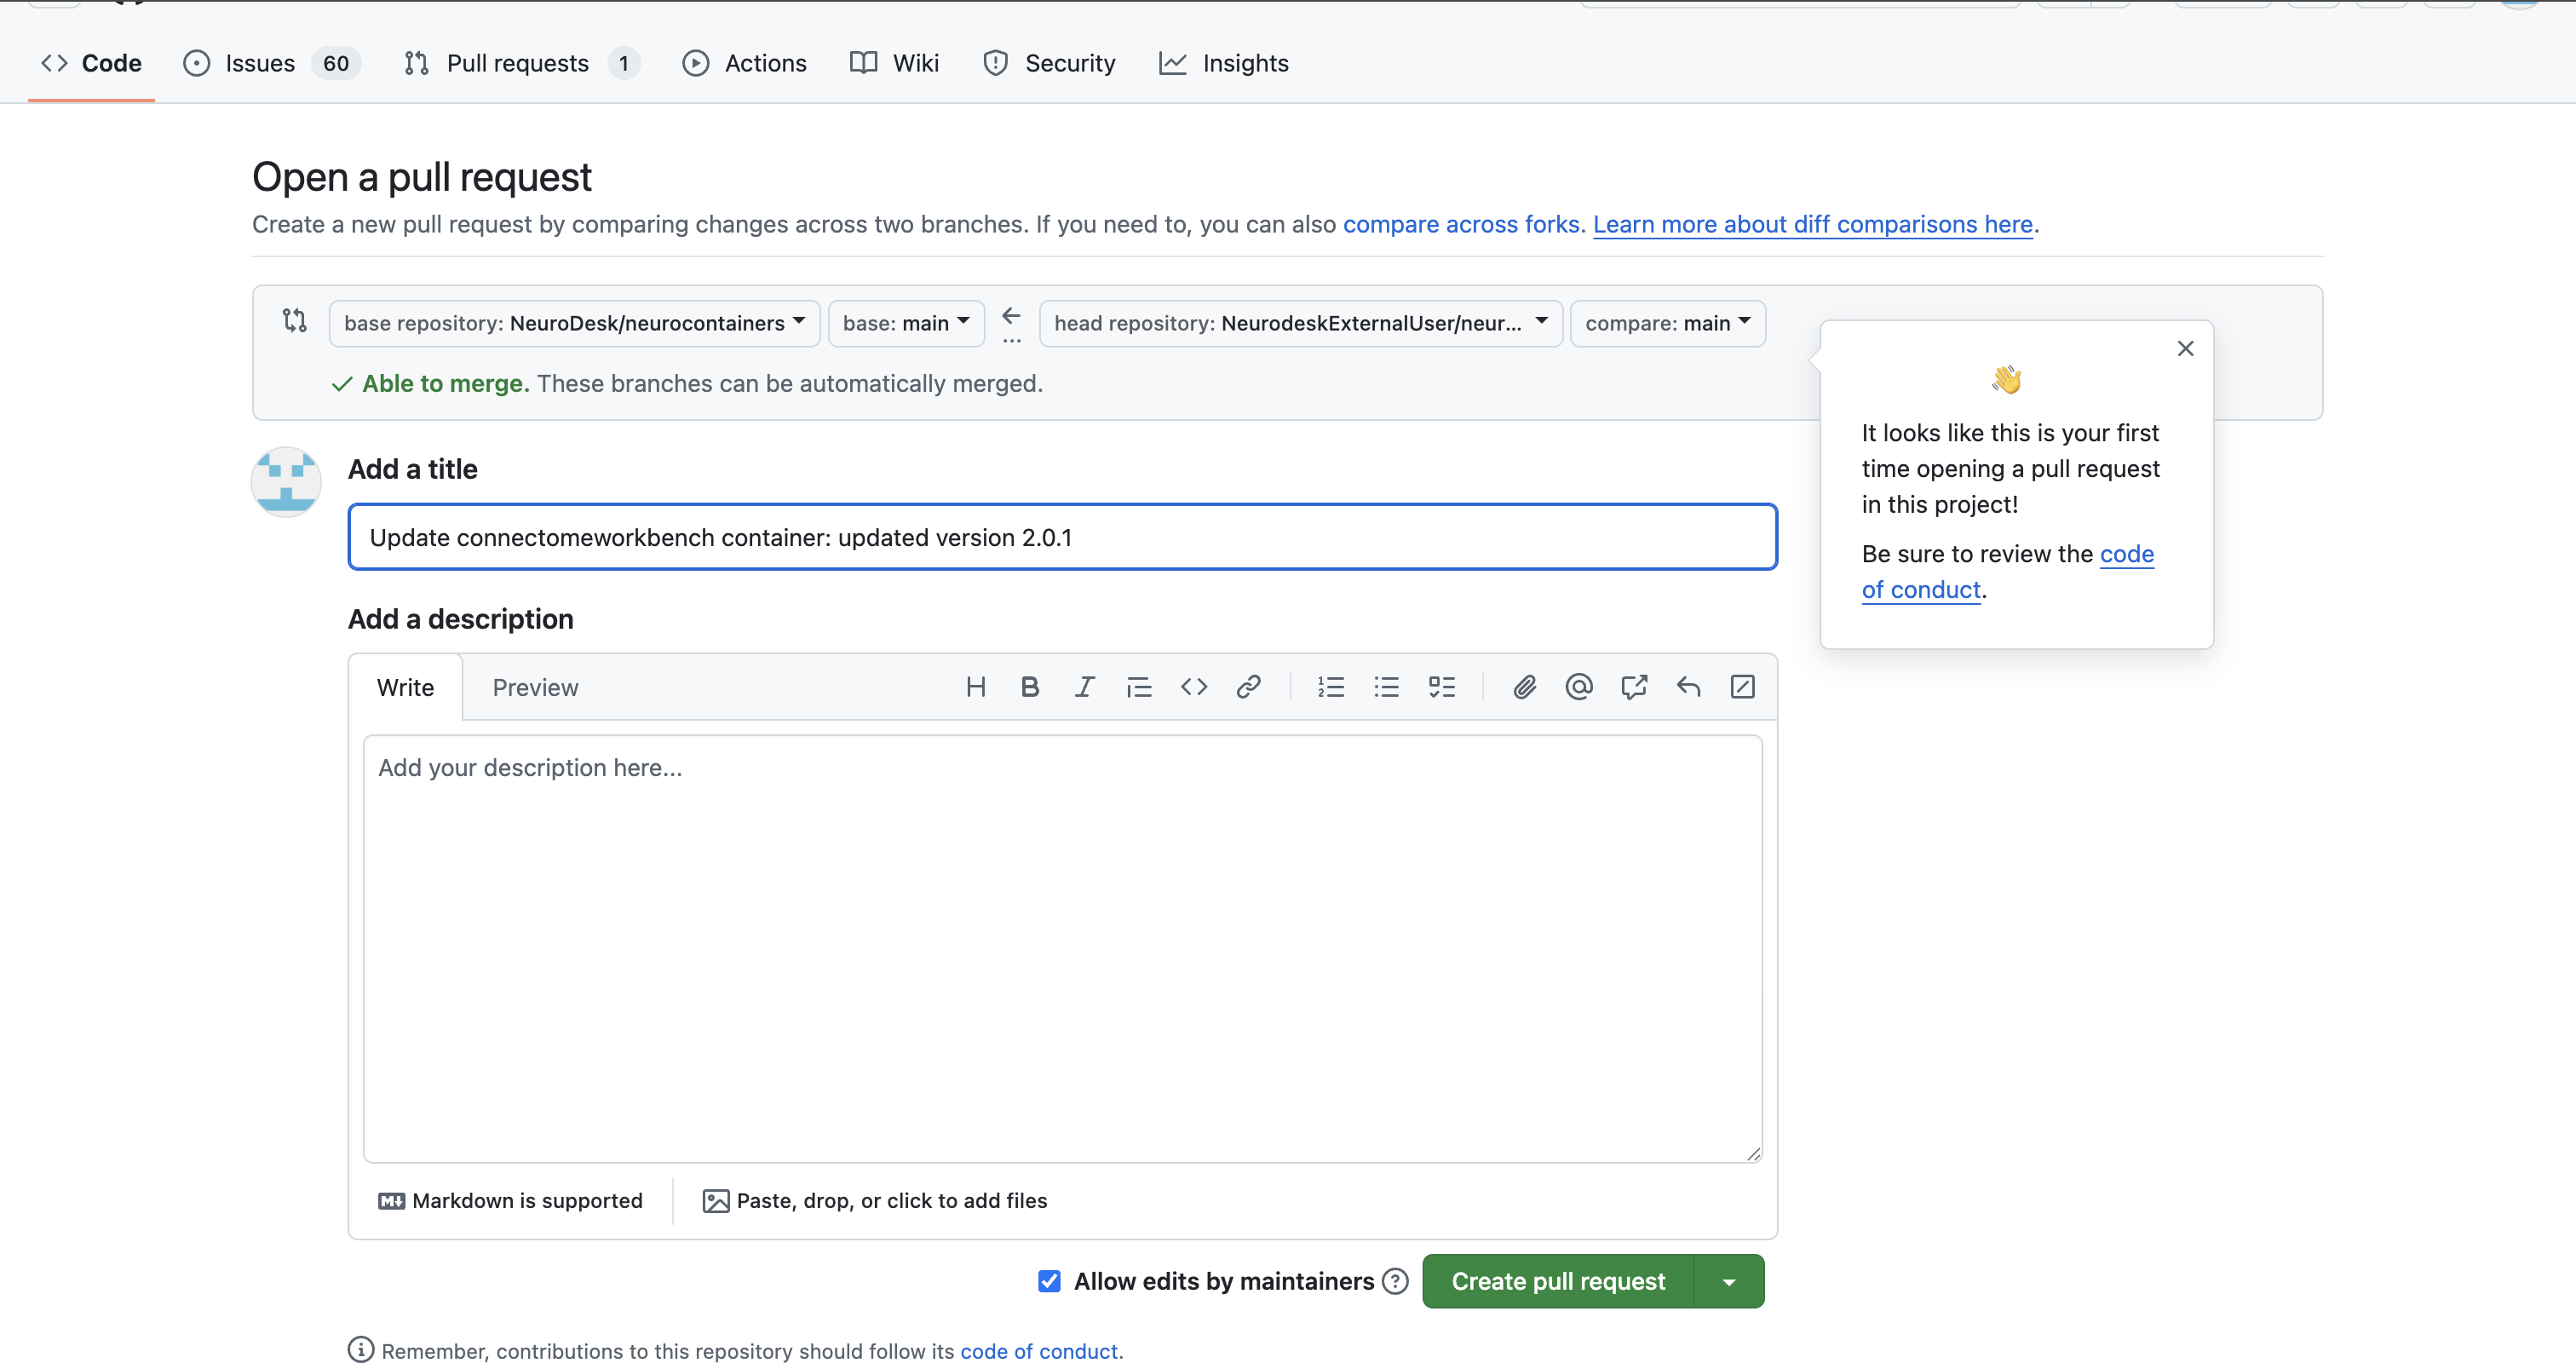
Our Neurodesk team will review your proposed update, test the updated container to make sure it work and merge your changes to Neurodesk if everything works correctly, allowing all users to benefit.
More detailed documentation can be found here: https://github.com/neurodesk/neurocontainers/tree/main/builder
If you have questions or would like feedback before submitting:
We appreciate your contribution to the Neurodesk community and reproducible science.
This style guide provides clear standards to ensure visual consistency across all Neurodesk platforms and materials.
Neurodesk is a community-oriented open-source solution for neuroimaging analysis with four guiding principles: accessibility, portability, flexibility and, overarchingly, reproducibility. This guide ensures visual consistency across all Neurodesk products and documentation.
Below are official Neurodesk logos available for download. Please refer to the examples below for acceptable usage.
Use these logos on light or neutral backgrounds.
These logos are optimized for use on dark backgrounds:
No image
You can download the official Neurodesk color palette file for design use:
| Color Name | Hex Code | RGB Code | Usage |
|---|---|---|---|
| Seafoam green ◼︎ | #6aa329 | (106, 163, 41) | Primary actions |
| Color Name | Hex Code | RGB Code | Usage |
|---|---|---|---|
| Black ◼︎ | #0c0e0a | (5, 8, 2) | Regular text, menu bar |
| Darkest green ◼︎ | #161c10 | (16, 24 6) | Successful selection |
| Muted olive green ◼︎ | #1e2a16 | (26, 41, 10) | Accent background |
| Dark olive green ◼︎ | #4f7b38 | (79, 122, 31) | Selected buttons, Hyperlinks |
| Light green ◼︎ | #b7d886 | (181, 224, 133) | Hover over a button |
| Lighter green ◼︎ | #d3e7b6 | (211, 237, 182) | |
| Verdant Haze ◼︎ | #e6f1d6 | (230, 245, 214) | Unselected buttons |
| Pale Lime Green ◼︎ | #f0f7e7 | (240, 249, 231) | |
| White ◼︎ | #ffffff | (255, 255, 255) |
To ensure consistency in our branding, please follow the guidelines below when referring to Neurodesk and its associated tools.
Avoid the following incorrect variations:
Neurodesk Overview Slides - accessible for the Neurodesk team
To request access, please email mail.neurodesk@gmail.com
You can start a neurodesktop container using docker or the neurodeskapp. If you want to connect to this running session using a shell you can do this as well:
docker ps
# note the name of the running container, e.g. neurodeskapp-49977

# now connect to this container
docker exec --user=jovyan -ti neurodeskapp-49977 bashThis currently does not work on Apple Silicon Machines!
Install necessary tools, e.g. for MacOS
brew install coreutils
brew install websocat
or for linux:
wget https://github.com/vi/websocat/releases/download/v1.12.0/websocat.x86_64-unknown-linux-musl
chmod +x websocat.x86_64-unknown-linux-musl
sudo mv websocat.x86_64-unknown-linux-musl /usr/local/bin/websocat
apt install jq
Start a jupyter notebook session, e.g. on EXAMPLE_API_URL=play-europe.neurodesk.org
Then open a terminal in jupyter and find your jupyterhub token and your username:
echo JUPYTERHUB_USER=$JUPYTERHUB_USER
echo JPY_API_TOKEN=$JPY_API_TOKEN
Now you can interface with Jupyter through:
USER=$JUPYTERHUB_USER
USER_TOKEN=$JPY_API_TOKEN
API_URL=$EXAMPLE_API_URL

TERMINAL_RESPONSE=$(curl -k -s -X POST \
    -H "Authorization: token $USER_TOKEN" \
    "https://$API_URL/user/$USER/api/terminals" || echo '{"error": "curl_failed"}')

echo "Terminal API response: $TERMINAL_RESPONSE"

TERMINAL_NAME=$(echo "$TERMINAL_RESPONSE" | jq -r '.name // empty')

if [ -n "$TERMINAL_NAME" ] && [ "$TERMINAL_NAME" != "null" ] && [ "$TERMINAL_NAME" != "empty" ]; then
    echo "✅ Terminal created successfully: $TERMINAL_NAME"
else
    echo "❌ Terminal creation failed"
    echo "Full response: $TERMINAL_RESPONSE"

    # more info about the user
    echo "Checking user info..."
    USER_INFO=$(curl -k -s -H "Authorization: token $USER_TOKEN" "https://$API_URL/hub/api/users/$USER" || echo '{"error": "failed"}')
    echo "User info: $USER_INFO"
fi

# Function to test WebSocket connection
test_websocket_connection() {
    local token="$1"

    echo "Testing WebSocket connection..."

    # Test connection
    WS_TEST=$(echo '["stdin", "echo test_connection\r\n"]' | \
        timeout 15 websocat --text "wss://$API_URL/user/$USER/terminals/websocket/$TERMINAL_NAME" \
        -H "Authorization: token $token" 2>&1 | head -10)

    if [ $? -eq 0 ] && [ -n "$WS_TEST" ]; then
        echo "WebSocket response: $WS_TEST"

        # Check if we got expected output format
        if echo "$WS_TEST" | grep -q '\["stdout"'; then
            echo "✅ WebSocket connection successful with proper output format"
            return 0
        elif echo "$WS_TEST" | grep -q 'test_connection'; then
            echo "✅ WebSocket connection successful"
            return 0
        else
            echo "⚠️ WebSocket connected but unexpected format"
            echo "Raw output: $WS_TEST"
            return 1
        fi
    else
        echo "❌ WebSocket connection failed"
        echo "Error: $WS_TEST"
        return 1
    fi
}

# Test with user token
if test_websocket_connection "$USER_TOKEN"; then
    echo "✅ WebSocket connection working with user token"
else
    echo "❌ WebSocket connection failed"
    echo ""
    echo "🔍 Additional debugging info:"
    echo "- Terminal exists: $TERMINAL_NAME"
    echo "- User token: ${USER_TOKEN}..."
    echo "- API accessible: $(curl -k -s -o /dev/null -w "%{http_code}" "$API_URL")"
    echo "- WebSocket URL: ws://$API_URL/user/$USER/terminals/websocket/$TERMINAL_NAME"
fi


# Function to send command and get response
send_command() {
    local cmd="$1"

    echo "Testing command: $cmd"

    local clean_api_url=${API_URL#*//}

    local output=""
    for attempt in {1..3}; do
        echo "  Attempt $attempt..."


        echo "$ $cmd"

        # Send command
        echo "[\"stdin\", \"$cmd\\r\\n\"]" | \
            timeout 15 websocat --text \
            "wss://$clean_api_url/user/$USER/terminals/websocket/$TERMINAL_NAME" \
            -H "Authorization: token $USER_TOKEN"


        sleep 10

        # get the terminal output
        local output=$(echo '["stdin", ""]' | \
            timeout 15 websocat --text \
            "wss://$clean_api_url/user/$USER/terminals/websocket/$TERMINAL_NAME" \
            -H "Authorization: token $USER_TOKEN")

        if [ -n "$output" ]; then
            echo "$output" | \
            grep '^\["stdout"' | \
            sed 's/^\["stdout", *"//; s/"\]$//' | \
            sed 's/\\u001b\[[?]*[0-9;]*[a-zA-Z]//g; s/\\r\\n/\n/g; s/\\r/\n/g' | \
            # sed -n "/\$ $cmd/,/\$ /p" | \
            sed '1d; $d' | \
            grep -v "^$"

            return 0
        fi

        echo "(no output), response: ${output}"

        sleep 2
    done

    echo "  ❌ Command failed after 3 attempts"
    echo "  Output: $output"
    return 1
}
send_command "touch test3.txt"
send_command "ls"
send_command "ml fsl; fslmaths"
send_command "pwd"
send_command "ml ants; antsRegistration"


# To start an interactive terminal session
interactive_terminal() {

    local clean_api_url=${API_URL#*//}

    echo "=== Interactive Terminal Started ==="
    echo "Type 'exit' to quit"
    echo "=================================="

    while true; do
        echo -n "$ "
        read -r user_cmd

        # Exit condition
        if [[ "$user_cmd" == "exit" ]]; then
            echo "Terminal session ended."
            break
        fi

        # Skip empty commands
        if [[ -z "$user_cmd" ]]; then
            continue
        fi


        echo "Executing: $user_cmd"

        # Send command

        echo "[\"stdin\", \"$user_cmd\\r\\n\"]" | \
            timeout 15 websocat --text \
            "wss://$clean_api_url/user/$USER/terminals/websocket/$TERMINAL_NAME" \
            -H "Authorization: token $USER_TOKEN"


        sleep 10

        # get the terminal output
        local output=$(echo '["stdin", ""]' | \
            timeout 15 websocat --text \
            "wss://$clean_api_url/user/$USER/terminals/websocket/$TERMINAL_NAME" \
            -H "Authorization: token $USER_TOKEN")


        if [ -n "$output" ]; then
            echo "$output" | \
            grep '^\["stdout"' | \
            sed 's/^\["stdout", *"//; s/"\]$//' | \
            sed 's/\\u001b\[[?]*[0-9;]*[a-zA-Z]//g; s/\\r\\n/\n/g; s/\\r/\n/g' | \
            # sed -n "/\$ $user_cmd/,/\$ /p" | \
            sed '1d; $d' | \
            grep -v "^$"

        else
            echo "(output error, response:)  ${output}"
        fi

        echo ""
    done
}

interactive_terminal

